Setting Ample Timeouts in Test
Random failures in test or test list runs are often caused by the lack of synchronization between the speed of executing the action steps and the application responsiveness during the execution.
The below article describes one option to address failures related to multiple 'Element not found' errors.
Problem to Solve
Tests often fail at random steps when running these as part of a test list. Most of the errors state that an element is not found.
What Causes the Misbehavior?
The tests often fail due to a synchronization issue.
Let's explore an example: You are testing a dynamic web or desktop application. You have a test step that clicks on a button. This button is dynamically generated after certain conditions are met. However, when these conditions are met, it still takes 40 seconds for the app to perform a postback and generate the button. The test fails because Test Studio attempts to find the button and click on it but without waiting an ample amount of time for it to appear. Thus, the failure states that the element is not found.
Solution
Does Test Studio use any timeout to wait for elements to appear?
The majority of test steps in any given test consist of interactions with elements within the application. If the element associated with a given step can't be found, the step doesn't immediately fail. Instead, it waits a set amount of time for the element to appear. That time is set in the project setting Wait On Elements timeout as defined in the Quick Execution Timeouts.
The default WaitOnElementsTimeout value is 30 seconds and this is the time that each step waits for the element to appear in the applications's DOM. So, if you have a button to be clicked but it's not there yet, the 'Click' step waits for 30 seconds before it fails with an 'Element not found' error. Usually the elements appear almost immediately and the 30 seconds timeout is ample.
What to do if the default timeout is not abundant?
You can address the need of longer time to wait for the elements in the tested application for single test run, for test list execution, or even for a single step.
Adjust the Wait On Elements Timeout for Quick Execution
The default value for the Wait On Elements timeout is 30,000 milliseconds (30 seconds). If this time is not always sufficient for the application to load its elements, you can increase it from the Test ribbon.

Adjust the Wait On Elements Timeout for Test List Execution
The corresponding test list setting is called ElementWaitTimeout and is under the General tab. The default value for the test list is 15,000 milliseconds (15 seconds). Ensure to increase it especially if you are using larger amount of time for single test runs.
Note!
Test list setting overrides theWait On Elementstimeout set on project level.
Adjust the Wait On Elements Timeout for Single Step
In other cases you may need to increase the timeout for a single step to get it working. For example, you know that one dynamically generated element in the application require longer time to appear. In such situation you have the option to increase the Wait On Elements timeout only for this specific step.
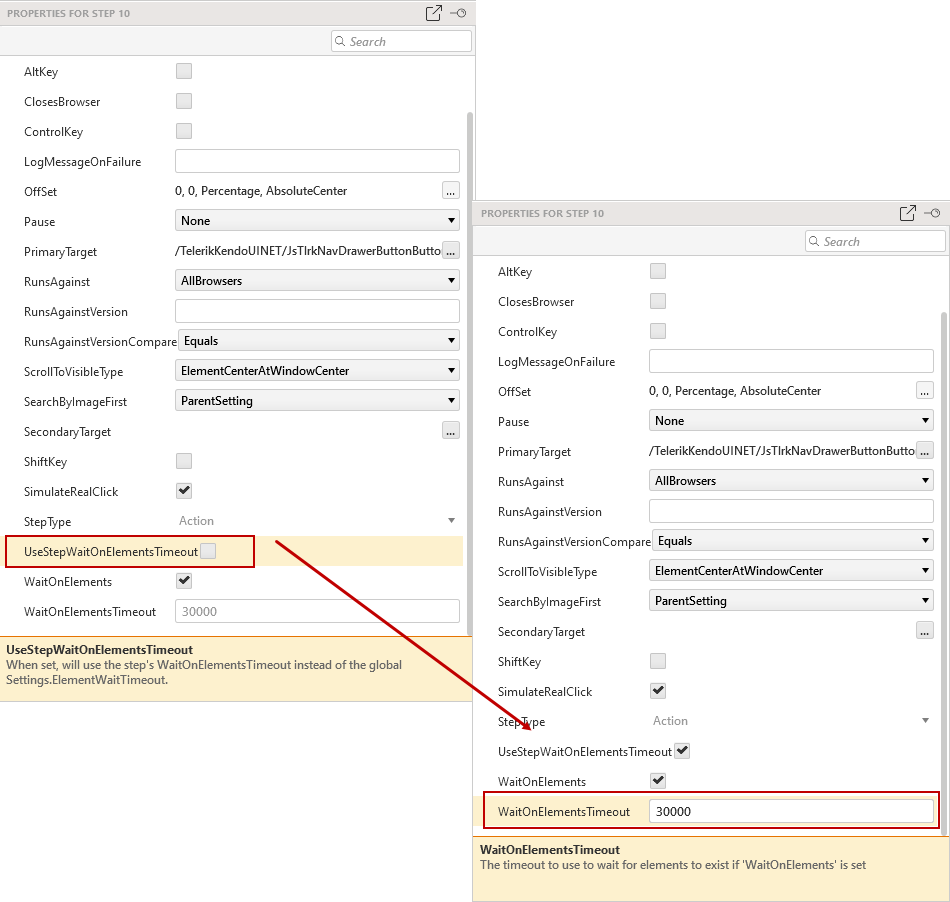
At the bottom of the step properties pane you can find the property UseStepWaitOnElementsTimeout, which is by default set to 'False'. Set its value to 'True' and the WaitOnElementsTimeout gets enabled and lets you set ample timeout used for this step only.
One more option is to increase the global project Wait On Elements timeout, but this affects the wait time for all other elements and in case of failures the test run takes longer time until it times out. So, consider if this is convenient for the automation project.