How Video Recording of a Test List Helps
Test Studio provides a rich set of test list settings to help for stable execution of the test suites and easier debugging in case of failures.
Test lists are designed for unattended execution and as such, you cannot always observe the test list run. Some test list failures are specific for a particular machine, or time of execution, etc., which is difficult to reproduce and debug.
Enable Screen Recording for Test List Execution
Observing the test list execution in such occasions usually helps in understanding what caused the failure. Thus Test Studio provides built-in settings for capturing a video of the test list execution. By default the screen recording option is disabled, but you can choose between always enabled or enable only on failure.
Important
Video recording is not available for test lists set to execute in headless browser mode (Chrome and Edge).
Watch the Video from the Test List Execution
The results for a test list, which captures a video of the execution, contain a specific 'Screen Recording Info' icon to provide access to the video.
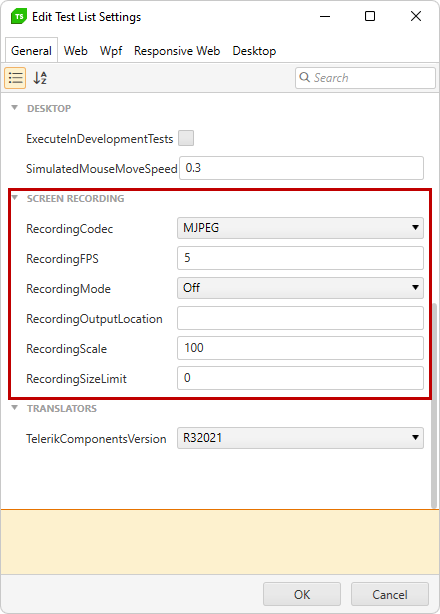
Recording Settings Specifics
Below are listed the settings related to screen recording of test list execution with the specifics related to each one.
- Recording Codec
Supported codecs are:
Motion JPEG (Biggest file size)
X264: X264 download page
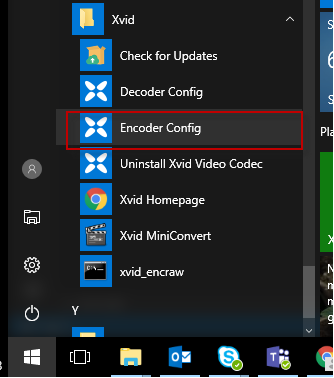
Xvid: Xvid download page
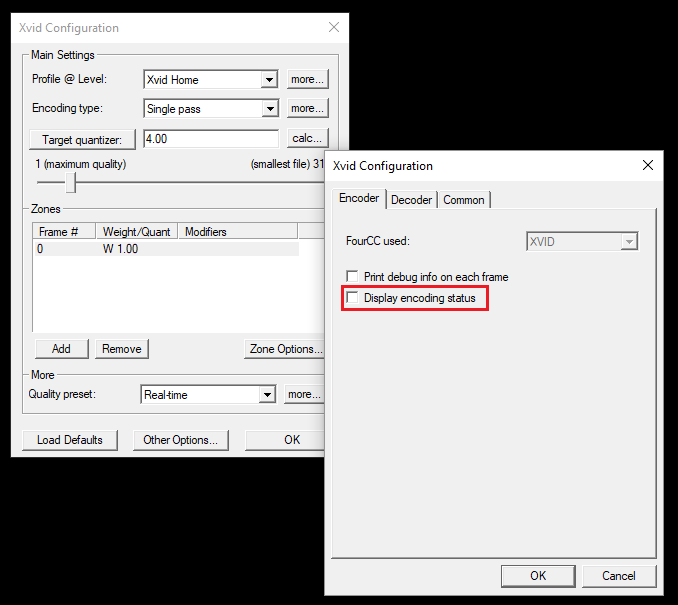
After installing Xvid, "Display encoder status" encoder setting must be disabled. From Windows Start menu open "Encoder Config" ->
Click "Other Options.." -> Uncheck "Display encoder status"
The default selected codec MJPEG can be used without any further adjustments.
To use Xvid or X264 codecs, they must be installed on the execution machine (for local and Visual Studio runs on the local machine, and for remote runs, on the machine where test list will be executed)
Recording FPS - Sets captured video frames per second. Lower number produces smaller files.
-
Recording mode - Sets recording mode. You can choose between three different recording modes:
Off (Default) - In this mode no video recordings are created.
Always - Video recordings for all executed tests are saved.
OnFail - Only video recordings for failed tests are saved.
-
Recording output location - Set a valid path to output all video files.
- For local test list runs the output folder can be empty as the project results folder is used by default.
- For remote or Visual Studio runs setting the output location is mandatory.
For remote executions best practice is to use a shared folder accessible from all remote execution agents.
-
Recording scale - Sets downscaling of the recorded video in percents. From 10 to 100.
- Example: If set to 100% the original screen resolution is preserved. If set to 50% the resolution of video is halved.
Lower number produces smaller files, but decreases video quality.
- Recording size limit - Sets file size limit in megabytes, 0 is unlimited size.
If the limit is reached, video recording will be stopped before the test execution ends.