Add a Drilldown Action to the Graph
Environment
| Product | Progress® Telerik® Reporting Graph Report Item |
Description
How can I create a Column chart and add drill-down capabilities to its category groups by using the Graph item and the AdventureWorks sample database?
Solution
The demonstrated solution includes a chart that will display the amount of sales by product categories per year, and the attached drill-down actions provide a more detailed view over the sales, showing the subcategories for the selected product category.
For the purposes of the suggested solution, use either the Standalone Telerik Report Designer or the integrated Visual Studio Report Designer.
-
Start the report designer and create a new report:
- (Standalone Report Designer) File > New > Blank Report
- (Visual Studio Report Designer) File > New Project > Telerik Report Library 2025 Q4 > Blank Report.
-
Add a new SqlDataSource component:
- (Standalone Report Designer) Double-click the SqlDataSource in the Data tab.
- (Visual Studio Report Designer) Double-click the SqlDataSource item in the VS Toolbox.
As a result, the SqlDataSource Wizard will start.
-
On the Choose Data Connection page, either select an existing connection to the AdventureWorks database, or create a new one by specifying the SqlClient Data Provider and a valid connection string to an AdventureWorks database.
On the Data Connection options page, save the newly created connection string by name in the
CONFIGfile of the current project or embed it with all details in theSqlDataSource.ConnectionStringproperty.On the Configure Data Source Command page, paste the following SQL query in the Select Statement window:
SELECT
PC.Name AS ProductCategory
, PS.Name AS ProductSubCategory
, P.Name AS ProductName
, SOD.LineTotal
, SOH.OrderDate
FROM
Production.Product AS P
INNER JOIN Production.ProductSubcategory AS PS
INNER JOIN Production.ProductCategory AS PC
ON PS.ProductCategoryID = PC.ProductCategoryID
ON P.ProductSubcategoryID = PS.ProductSubcategoryID
INNER JOIN Sales.SalesOrderDetail AS SOD
ON P.ProductID = SOD.ProductID
INNER JOIN Sales.SalesOrderHeader AS SOH
ON SOD.SalesOrderID = SOH.SalesOrderID
Click Next and, then, the Execute Query... button to make sure that everything is fine with your data connection and that the data is fetched from the database. Click Finish when ready to close the SqlDataSource Wizard.
-
Select the report in the Report Designer and increase its Width to
11in. To provide more space for the content in the designed report, open the PageSettings properties of the report and set the following configurations:LandscapetoTrue.Margins(Top,Right,Bottom,Left) to0(zero) units.
-
Now that the data source is configured, configure the Graph item and start the Graph wizard:
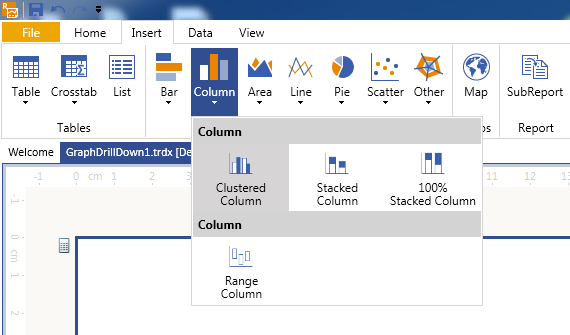
(Standalone Report Designer) Select the Detail section of the report. From the Insert tab, click Charts > Column > Clustered Column.
(Visual Studio Report Designer) From the VS Toolbox, drag and drop the Graph Wizard icon to the Detail section of the report. On the first page, select Column > Clustered Column.

-
Select the data source previously created and click Next.
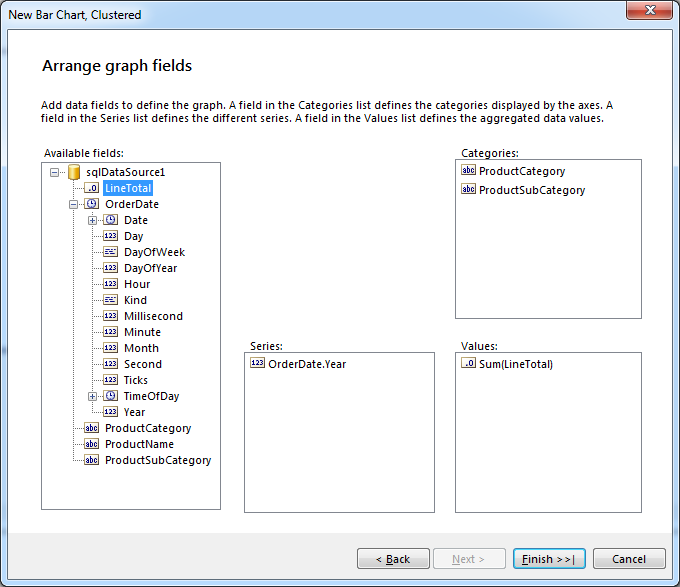
On the Arrange graph fields page, drag the ProductCategory and ProductSubCategory fields consecutively to the Categories box. The wizard will determine the master-detail relations between them and will automatically create the toggle visibility actions.
To display the sales amount by year, expand the OrderDate field and drag its Year field to the Series box. Then, drag the LineTotal field to the Values* box where it will be displayed as Sum(LineTotal) because Sum() is the default aggregate function.

-
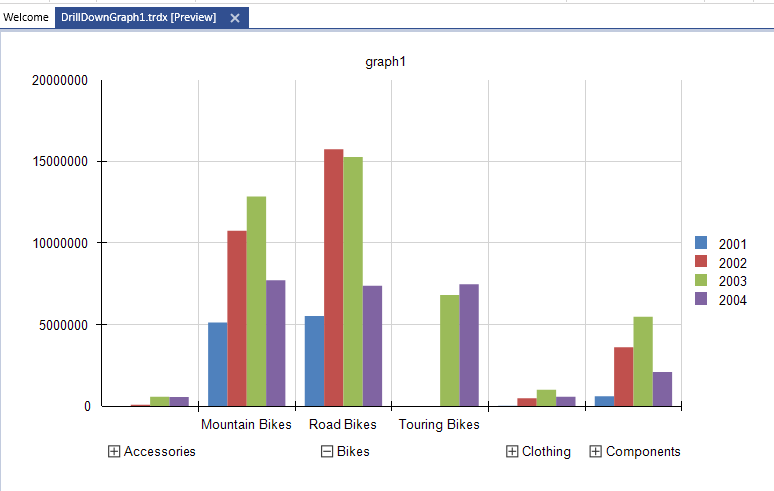
Click Finish to see the product categories of the Graph grouped by year. To increase its width for a better preview, click Preview and click the toggle mark of the desired category to display its subcategories.

-
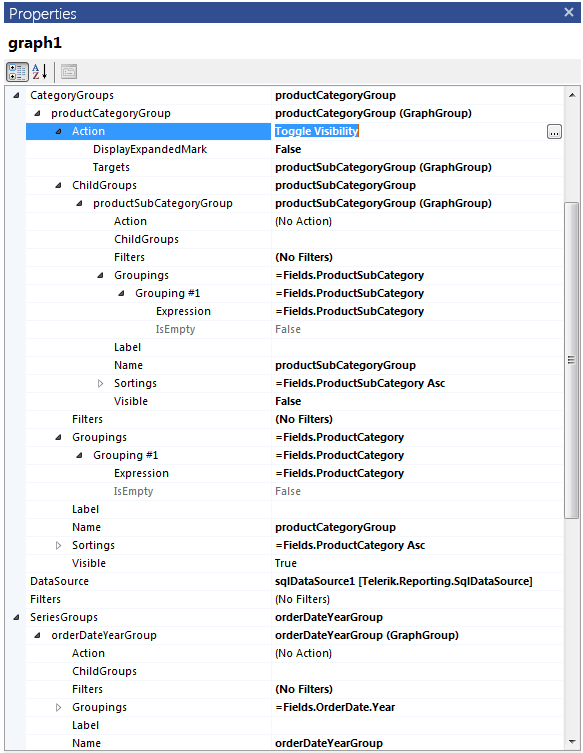
To see the result from the Graph Wizard actions, examine the
CategoryGroupsof the report item.The Graph wizard has created a
CategoryGroupinstance for the product categories and has added a child group to it for the product subcategories (CategoryGroups>ChildGroups).The wizard has also created a
ToggleVisibilityActionand set itsTargetsto theProductSubCategoryGroupenabling you to show or hide this group by clicking the toggle mark of its parent.Initially, the
ProductSubCategoryGroup.Visibleproperty is set tofalseto provide a more compact view. The expanded view of theCategoryGroupslooks similar to the following image: