Integrating Your Telerik Report in Web Applications
This guide targets users who want to build custom reports and, then, present them in applications of their choice. For the purposes of this tutorial, the scenario will display the report in an ASP.NET Core application.
First, you will install Telerik Reporting.
Next, you will create a sample report by using the Standalone Report Designer.
Finally, you'll create from scratch an ASP.NET Core application and add an Html5 Report Viewer with the necessary Reporting REST Service through our Visual Studio item template.
At the end, you'll be able to see the report in the web browser, export it in different formats, and print it.
For the first-steps scenario on designing a Telerik Report and exporting it to PDF, refer to the getting started guide on designing a report.
Prerequisites
The following prerequisites are required for accomplishing the scenario in this tutorial. For more information on the third-party tooling versions supported by Telerik Reporting, refer to the list with system requirements.
- Install Microsoft SQL Server Management Studio.
Step 1: Install Telerik Reporting
The steps to accomplish the installation of the Telerik Reporting controls and services are fully described in the first steps guide on designing the Telerik report.
Step 2: Create, Populate, and Style the Sample Report
Next, create the report that you will integrate in your web application. The steps required to create, populate with data, and style the report are described in the first steps guide on designing the Telerik report.
Once you have your report, save it as DemoReport.trdp. In the next step, you will integrate the TRDP report in the application.
Step 3: Integrate and Display the Report
In this final step, you'll integrate your report in an ASP.NET Core web application in .NET 8 and display the project with the HTML5 Report Viewer.
Open Visual Studio 2022. From the Start window, choose Create a new project.
Select ASP.NET Core Web App and name it TelerikWebApp. In the Additional information window, select .NET8.0 (Long-term support) and leave the rest of the settings as default. Click Create.
Right-click the project. Select Add > New Item > Telerik HTML5 Report Viewer Page [version]. Name the file
index.html.-
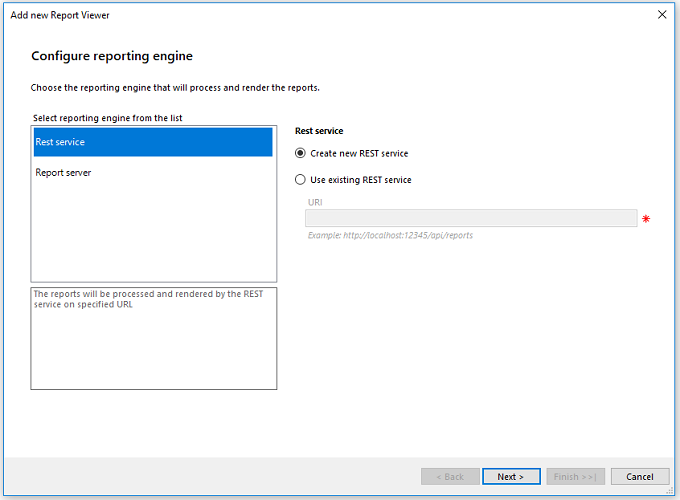
In the Configure reporting engine dialog, leave the selections in the same way they are set by default, that is, REST Service > Create new Rest Service. Click Next.
Click Sample report definition and, then, Next > Finish.
Run the project to make sure everything works as expected. Navigate to the
index.htmlpage to make sure you see the sample report.Let's add your own
DemoReport.trdpreport to the application. Note that the Visual Studio Item Template has created aReportsfolder in your application which contains a defaultSampleReport.trdpreport. To add theDemoReport.trdpto the same folder, right-click the folder, select Add > Existing Item and navigate to your report.Open the
index.htmlfile that hosts the HTML5 Report Viewer in thewwwrootfolder. Find thereportSourceproperty of the#reportViewer1element that is set up in thedocument.readyevent handler of the page. Change its innerreportelement from"SampleReport.trdp"to"DemoReport.trdp".-
Now, you have to include the connection string in the
appsettings.jsonfile because you added a named connection string to the report. If the report uses an embedded connection, you do not have to add it again to the Visual Studio project.The JSON configuration file looks similar to the following:
{
"Logging": {
    "LogLevel": {
        "Default": "Information",
        "Microsoft.AspNetCore": "Warning"
    }
},
"AllowedHosts": "*",
"ConnectionStrings": [
    {
        "name": "Telerik.Reporting.Examples.CSharp.Properties.Settings.TelerikConnectionString",
        "connectionString": "Data Source=(local)\\MSSQLSERVER01;Initial Catalog=AdventureWorks;Integrated Security=SSPI",
        "providerName": "System.Data.SqlClient"
    }
]
}
The following image shows how the viewer will display the report upon running the project and navigating to the
index.htmlpage in the browser.
That was it! Now you are ready to deep-dive into Telerik Reporting and take full advantage of its more advanced functionalities!