Google Cloud Big Query
This article provides a step-by-step tutorial on how to create a table in Google Cloud Big Query and configure the Kendo UI Grid to retrieve, create, update, and destroy items in that table.
The complete implementation of this tutorial is available in the Kendo UI Cloud Integration repository on GitHub.
- A Google Cloud account.
- Basic knowledge on using the Cloud Console.
Client-Side Authorization and Access through OAuth 2.0
The Google APIs Client library for JavaScript handles the client-side authorization flow for storing and using OAuth 2.0 access and refresh tokens. When you authorize access to a Google API, you are receive an access token for making calls to the API. The Google API OAuth 2.0 access tokens last for one hour. You can request and store a refresh token which will allow you to request a new access token when the previous access token expires. For more information on how to set up the authorization, refer to the article about authorizing API requests.
To create AOth 2.0 credentials and add authorized JavaScript origin:
-
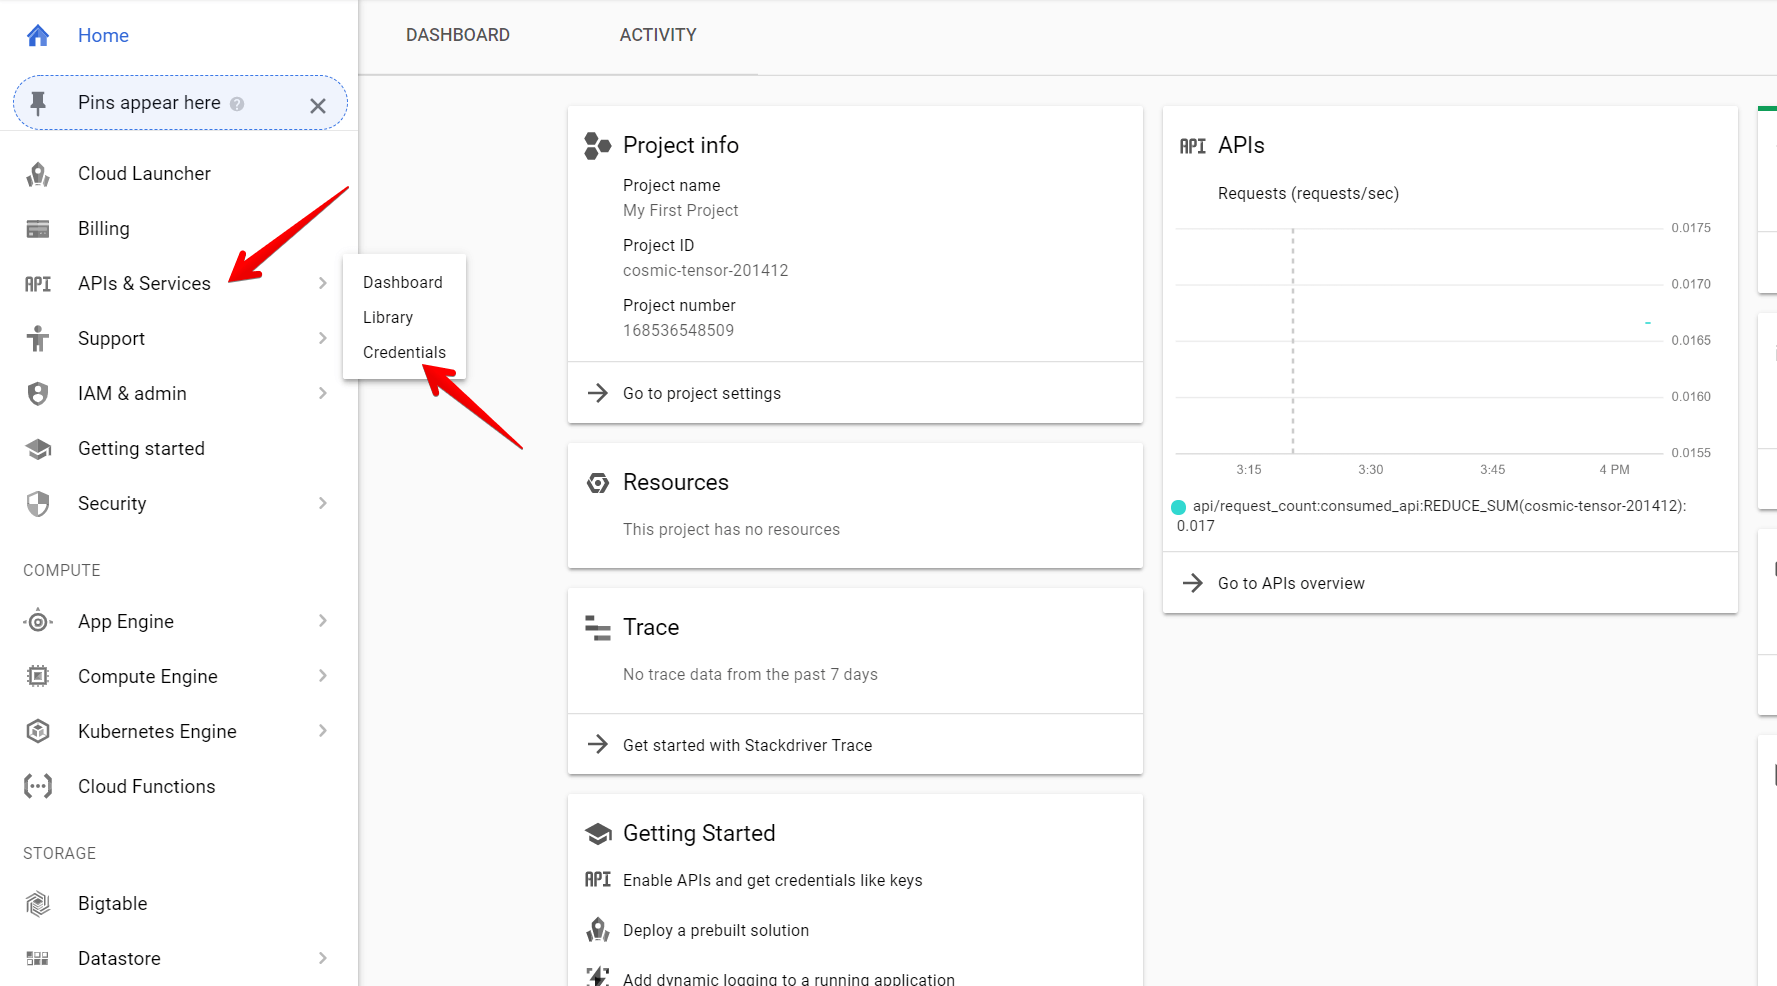
On the left-hand side pane in the Console, hover over the APIs and Services item and select Credentials.
Figure 1: Navigating to the Credentials section
-
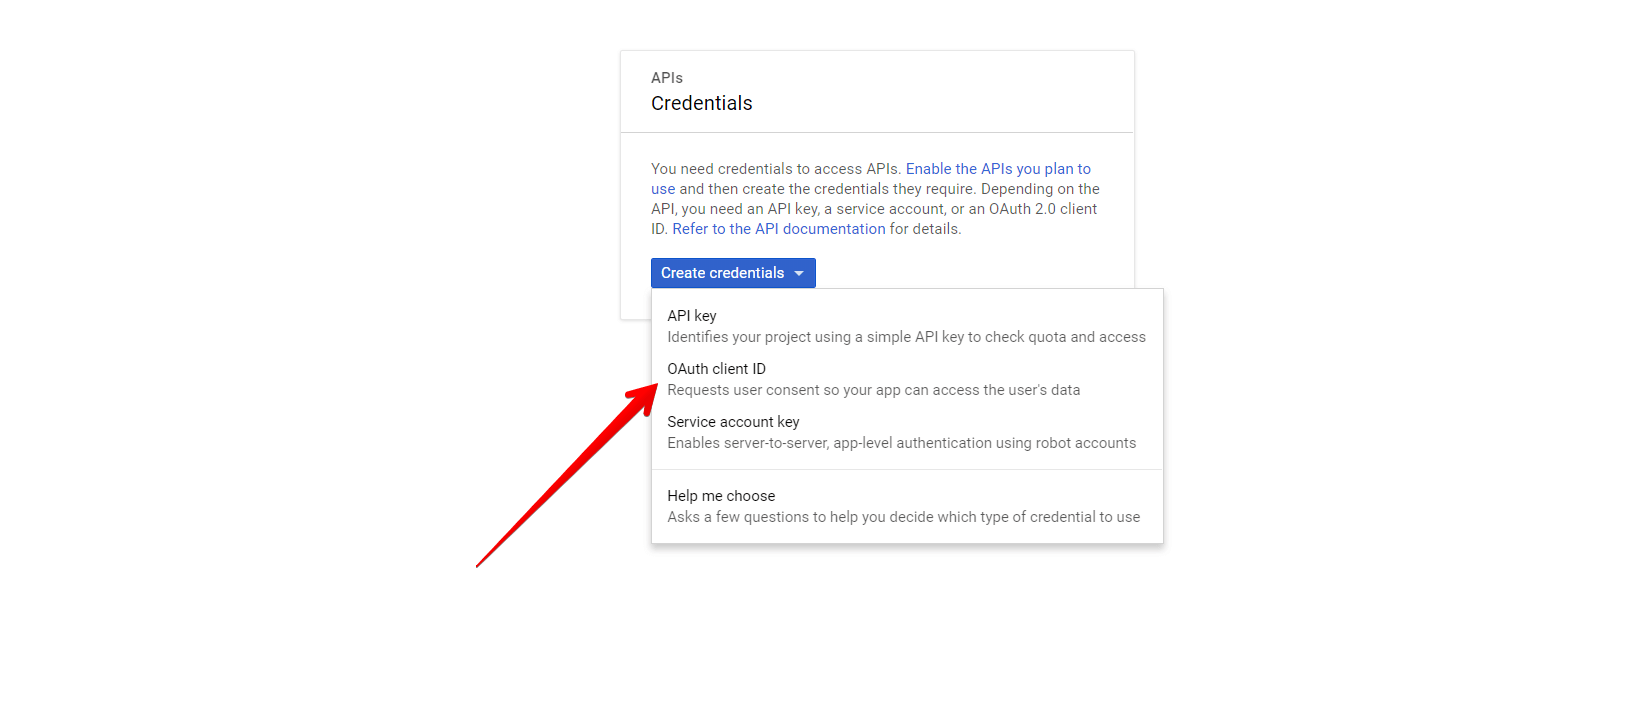
Click the Create Credentials button and select OAuth client ID.
Figure 2: Creating OAuth client ID
-
Select Web Application and add Authorized JavaScript origins. For the purposes of this sample project, add
runner.telerik.ioas authorized origin.runner.telerik.iois the domain of https://dojo.telerik.com/.Figure 3: Adding runner.telerik.io as authorized origin

Creating New DataSet and Table in BigQuery
For more information on how to create new DataSets and tables, refer to the articles about creating and using DataSets and creating and using tables from the official BigQuery documentation. For the purposes of this sample project, create a products table with the following Schema and Data.
Figure 4: Schema of the Products Table in the KendoDS DataSet
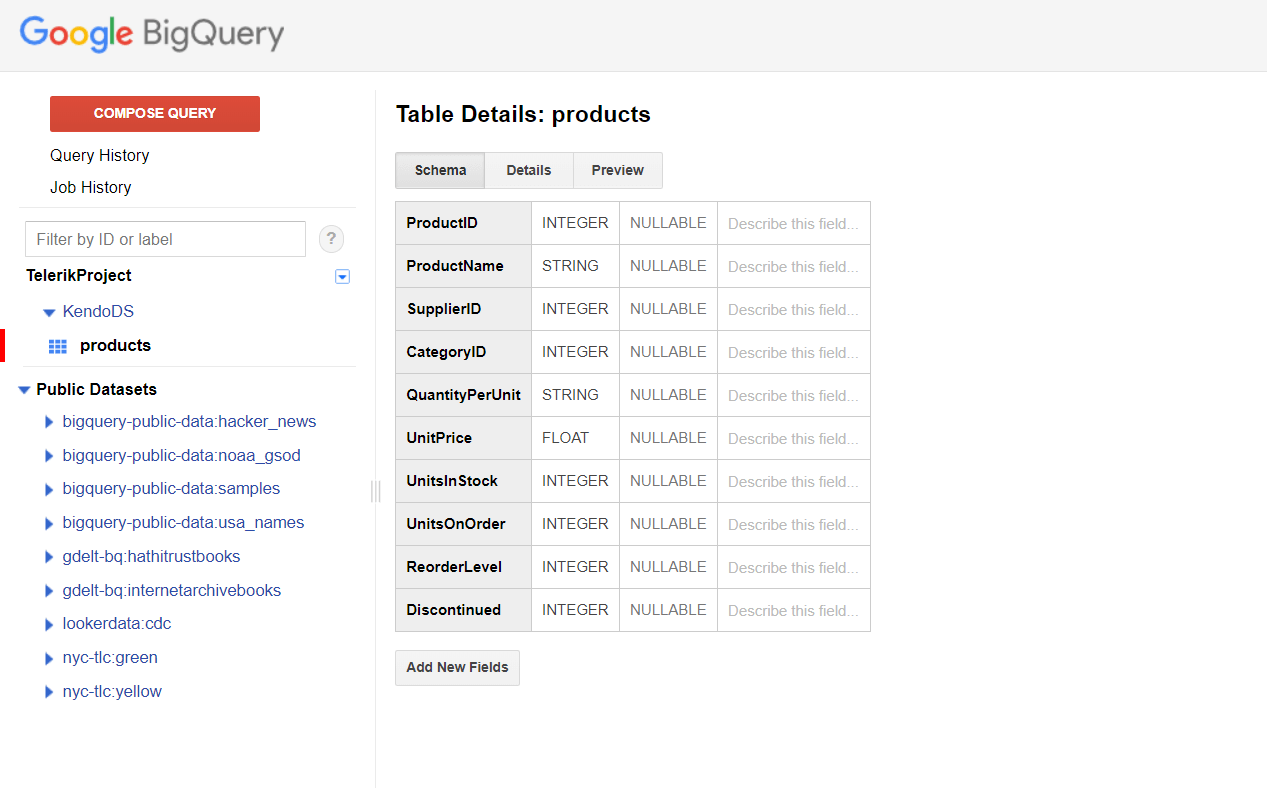
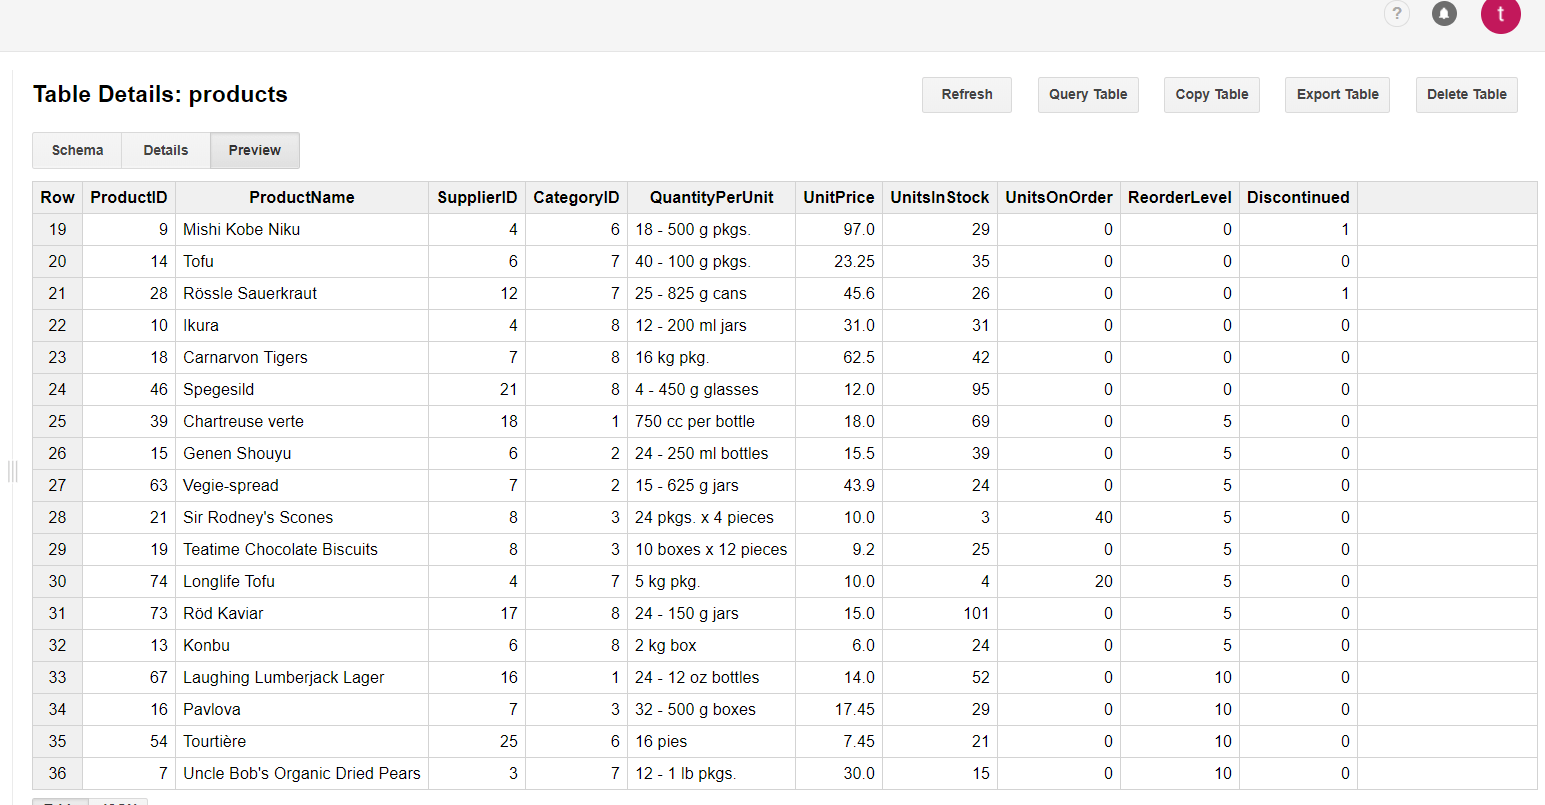
Figure 5: Data of the Products Table in the KendoDS DataSet
Configuring the Grid to Consume and Manipulate Available BigQuery Data
- Configure the page to load Google APIs, jQuery, and Kendo UI, and set OAuthorization
- Configure the Kendo UI Grid and its data operations with BigQuery
Configuring the Google APIs, jQuery, and Kendo UI Loading and Setting OAuthorization
- In the
<head>of your HTML page, load the Kendo UI styles. - Load the Google APIs, jQuery, and Kendo UI scripts.
- Add a button on your page to trigger the authentication and to load the Google API.
For more information on how to create the client_id, refer to the section on client-side authorization and access through OAuth 2.0
<head>
    <meta charset="utf-8">
    <title>Kendo Grid BigQuery Integration</title>
    <link rel="stylesheet" href="https://kendo.cdn.telerik.com/themes/10.2.0/default/default-main.css" />
    <script src="https://apis.google.com/js/api.js"></script>
    <script src="https://code.jquery.com/jquery-3.1.1.min.js"></script>
    <script src="https://kendo.cdn.telerik.com/2025.1.227/js/kendo.all.min.js"></script>
</head>
<script>

    var client_id = 'XXXXXXXXXXXXXXXXXXXXXXXXXXXXXXXXXXX.apps.googleusercontent.com';
    var project_id = 'XXXXXXXXXXXXXXXXXX';


function authenticate() {
    return gapi.auth2.getAuthInstance()
        .signIn({scope: "https://www.googleapis.com/auth/bigquery https://www.googleapis.com/auth/cloud-platform https://www.googleapis.com/auth/cloud-platform.read-only"})
        .then(function() { console.log("Sign-in successful"); },
              function(err) { console.error("Error signing in", err); });
  }
  function loadClient() {
    return gapi.client.load("https://content.googleapis.com/discovery/v1/apis/bigquery/v2/rest")
        .then(function() { console.log("GAPI client loaded for API"); },
              function(err) { console.error("Error loading GAPI client for API", err); });
  }
  gapi.load("client:auth2", function() {
    gapi.auth2.init({client_id: client_id});
  });
</script>

<button class="k-button" onclick="authenticate().then(loadClient)">authorize and load</button>

</script>
Configuring the Grid and Its Data Operations with BigQuery
-
In the
<body>of the page, place a<div>element to initialize the Grid from. Add a button which will create and populate the Grid with data on click.<div id="grid"></div> <button class="k-button" onclick="execute()">execute</button> -
In the
clickhandler of the Execute button, initialize the Grid.function execute() { $("#grid").kendoGrid({ toolbar: ["create"], columns: [ { field: "productid", title: "ProductID", width: "100px", editable: function (dataItem) { return dataItem.isNew(); } }, { field: "productname", title: "ProductName", width: "200px" }, { field: "unitsinstock", title: "UnitsInStock", width: "120px" }, { field: "unitprice", title: "UnitPrice", format: "{0:c}", width: "120px" }, { command: ["edit", "destroy"], title: " ", width: "250px" }], editable: "inline", dataSource: { sort: {field: "productid", dir: "asc"}, transport: { read: function(options) { ... }, update: function(options){ ... }, create: function(options){ ... }, destroy: function(options){ ... } }, schema: { model: { id: "productid", fields: { productid: { editable: true, type: "number", nullable: true, defaultValue: -1 }, ProductName: { validation: { required: true } }, UnitPrice: { type: "number", validation: { required: true, min: 1} }, UnitsInStock: { type: "number", validation: { min: 0, required: true } } } } } } })To manage the BigQuery data, you have to handle the
read,create,update, anddestroyfunctions of the Grid Data Source. For that purpose, the example uses the BigQuery Jobs objects which manage asynchronous tasks such as running queries, loading data, and exporting data. To directly implement the query for the BigQuery data in the functions of the Grid DataSource, use the Query Job objects. -
To trigger a
SELECTquery to the BigQuery table, implement thereadfunction. Once the response is received, the data is returned in the response. You can manipulate it in a preferable manner and provide it to the Grid.read: function(options) { return gapi.client.bigquery.jobs.query({ 'projectId': project_id, 'query': 'SELECT * FROM KendoDS.products' }) .then(function(response) { var gridData = []; $.each(response.result.rows, function(i, item) { var productid = item.f[0].v; var productname = item.f[1].v; var unitsinstock = item.f[6].v; var unitprice = item.f[5].v; gridData.push({ productid: productid, productname: productname, unitsinstock: unitsinstock, unitprice: unitprice }); }); options.success(gridData) // provides the data to the Grid }, function(err) { console.error("Execute error", err); }); } -
With the
createfunction you can add a new item to the table. For that purpose, construct anINSERTquery to inject it in the table. Make sure that theuseLegacySqlis set tofalse. Otherwise aninsertwill not be authorized.create: function(options) { var grid = $("#grid").data("kendoGrid"); var content = grid.element.find("tbody"); var row = $(content).find('tr').last(); var dataItem = grid.dataItem(row); var productid = dataItem.productid; var productname = '"' + options.data.productname + '"'; var unitsinstock = options.data.unitsinstock; var unitprice = options.data.unitprice; return gapi.client.bigquery.jobs.query({ 'projectId': project_id, "useLegacySql": false, "query": "INSERT KendoDS.products (ProductID, ProductName, UnitsInStock, UnitPrice) VALUES(" + productid + ", " + productname + ", " + unitsinstock + ", " + unitprice + ");" }) .then(function(response) { options.success(options.data); }, function(err) { console.error("Execute error", err); }); } -
With the
updatefunction you can manage the altering of data for a specific record. For that purpose, construct anUPDATEquery to alter the certain record. Make sure that theuseLegacySqlis set tofalse. Otherwise, the operation will not be authorized.update: function(options) { var productid = options.data.productid; var productname = '"' + options.data.productname + '"'; var unitsinstock = options.data.unitsinstock; var unitprice = options.data.unitprice; return gapi.client.bigquery.jobs.query({ "projectId": project_id, "useLegacySql": false, "query": "UPDATE KendoDS.products SET ProductName = " + productname + " , UnitsInStock = " + unitsinstock + ", UnitPrice = " + unitprice + " WHERE ProductID = " + productid + ";" }) .then(function(response) { options.success(options.data); }, function(err) { console.error("Execute error", err); }); } -
In the
destroyfunction, implement thedeleterecord operation. For that purpose, construct aDELETEquery to remove the certain record. Make sure that theuseLegacySqlis set tofalse. Otherwise, the operation will not be authorized.destroy: function(options) { var productid = options.data.productid; return gapi.client.bigquery.jobs.query({ 'projectId': project_id, "useLegacySql": false, 'query': "DELETE KendoDS.products WHERE ProductID = " + productid + ";" }) .then(function(response) { alert("item deleted") options.success(response) }, function(err) { console.error("Execute error", err); }); }
Now, you have a runnable example which uses the Grid, is capable of read and edit operations on a BigQuery table, and is entirely implemented on the client side.