Editing
By default, the editing feature of the ListView is disabled.
For a runnable example on a ListView with editing enabled refer to the Editing official demo page.
Getting Started
To enable editing, use the Boolean options. For more information, refer to the article on editing components.
  $(document).ready(function() {
      $("#listView").kendoListView({
         selectable: true,
         navigatable: true,
         editable: true,
         template: "<li>${FirstName}</li>",
         editTemplate: '<li><input type="text" data-bind="value:FirstName" name="FirstName" required="required"/></li>'
      });
  });
Advanced Configuration
The ListView provides the editTemplate property, which defines a template for this mode. Once defined, the ListView can render out this editing template through the edit method. When invoked, the editTemplate for the ListView is applied against the target item. In most scenarios, you have to implement this through an event model that is triggered when the user selects an item to modify.
The ListView encapsulates operations for adding, removing, selecting, and editing items. These methods enable you to modify the underpinning list of items through a series of user-initiated actions or events. Regarding inline editing, you need to define a template that will be used when you edit the items.
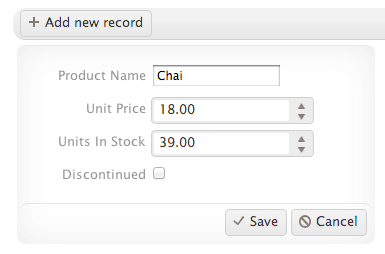
<script type="text/x-kendo-tmpl" id="editTemplate">
    <div class="product-view k-widget">
        <div class="edit-buttons">
            <a class="k-button k-button-icontext k-update-button" href="\\#"><span class="k-icon k-update"></span></a>
            <a class="k-button k-button-icontext k-cancel-button" href="\\#"><span class="k-icon k-cancel"></span></a>
        </div>
        <dl>
            <dt>Product Name</dt>
            <dd>
                <input type="text" class="k-textbox" data-bind="value:ProductName" name="ProductName" required="required" validationMessage="required" />
                <span data-for="ProductName" class="k-invalid-msg"></span>
            </dd>
            <dt>Unit Price</dt>
            <dd>
                <input type="text" data-bind="value:UnitPrice" data-role="numerictextbox" data-type="number" name="UnitPrice" required="required" min="1" validationMessage="required" />
                <span data-for="UnitPrice" class="k-invalid-msg"></span>
            </dd>
            <dt>Units In Stock</dt>
            <dd>
                <input type="text" data-bind="value:UnitsInStock" data-role="numerictextbox" name="UnitsInStock" required="required" data-type="number" min="0" validationMessage="required" />
                <span data-for="UnitsInStock" class="k-invalid-msg"></span>
            </dd>
            <dt>Discontinued</dt>
            <dd><input type="checkbox" name="Discontinued" data-bind="checked:Discontinued"></dd>
        </dl>
    </div>
</script>

$(document).ready(function(){
    $("#listView").kendoListView({
        selectable: true,
        navigatable: true,
        template: kendo.template($("#template").html()),
        editTemplate: kendo.template($("#editTemplate").html())
    });
});
The template you define for the inline editing of items may include other Kendo UI components. For more information, refer to demo on defining a series of components for editing an item.
The new add record functionality of ListView items is triggered by a click event that is initiated by a user and is wired up through .click() in jQuery.
$(".k-add-button").click(function(e) {
    listView.add();
    e.preventDefault();
});