DataForm for Xamarin.iOS: Getting Started
This quick start tutorial demonstrates how you can add TKDataForm to your Xamarin.iOS application.
Setting up TKDataForm
There are two approaches you can use - either add a TKDataForm instance to an existing UIViewController or utilize our predefined TKDataFormViewController.
Either way you choose, first you will need to reference Telerik.Xamarin.iOS.dll into the Xamarin.iOS project.
Adding TKDataForm instance
Open your UIViewController file and add a reference to the TelerikUI namespace:
using TelerikUI;
You should create a business object that will be displayed and edited by TKDataForm. Let's create a class called PersonalInfo:
public class PersonalInfo : NSObject
{
    [Export("Server")]
    public string Server { get; set;}

    [Export("Details")]
    public string Details { get; set;}

    [Export("Account")]
    public string Account { get; set;}

    [Export("Secure")]
    public bool Secure { get; set;}

    [Export("Password")]
    public string Password { get; set;}

    [Export("EncryptionLevel")]
    public int EncryptionLevel { get; set;}

    [Export("SendAllTraffic")]
    public bool SendAllTraffic { get; set;}

    [Export("InfoProtocol")]
    public int InfoProtocol{ get; set;}

    public PersonalInfo ()
    {
        this.InfoProtocol = 0;
        this.Details = "";
        this.Server = "";
        this.Secure = false;
        this.Password = "";
        this.EncryptionLevel = 0;
        this.Account = "";
        this.SendAllTraffic = true;
    }
}
The TKDataForm object should be created in ViewDidLoad method of the UIViewController:
public override void ViewDidLoad ()
{
    base.ViewDidLoad ();
    // Perform any additional setup after loading the view, typically from a nib.
    var dataForm = new TKDataForm(this.View.Bounds)
    {
        WeakDataSource = new TKDataFormEntityDataSource(new PersonalInfo())
    };
    this.View.AddSubview(dataForm);
}
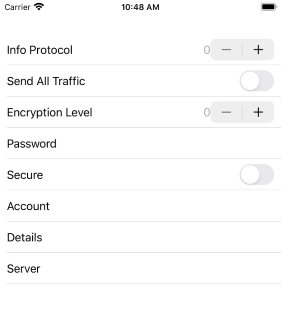
And here is the result:
Utilizing TKDataFormViewController
The other option is to utilize the TKDataFormViewController - it inherits from UIViewController and contains a predefined TKDataForm instance.
For the example below the same PersonalInfo class is used as a source of the DataForm.
public partial class MyViewController : TKDataFormViewController
{
    public MyViewController(IntPtr handle) : base(handle)
    {
    }

    public override void ViewDidLoad()
    {
        base.ViewDidLoad();

        // Perform any additional setup after loading the view, typically from a nib.
        this.DataForm.WeakDataSource = new TKDataFormEntityDataSource(new PersonalInfo());
    }
}
Customize the editors
TKDataForm chooses a default editor based on each property's type. You have the option to change the default editors by utilizing the TKDataFormEntityDataSourceHelper class and set it as the DataSource of the DataForm. TKDataFormEntityDataSourceHelper gives access to each dataform entity for each property of the source object, so you can modify its editor, provide predefined values, and more.
In addition, if you would like to customize the editors, you would need to adopt TKDataFormDelegate and override its UpdateEditor method. Then you just need to set thus created delegate to the Delegate property of the TKDataForm instance.
Check below an example of TKDataFormEntityDataSourceHelper and TKDataFormDelegate:
public override void ViewDidLoad ()
{
    base.ViewDidLoad ();
    // Perform any additional setup after loading the view, typically from a nib.

    var dataSource = new TKDataFormEntityDataSourceHelper(new PersonalInfo());

    dataSource["Password"].EditorClass = new Class(typeof(TKDataFormPasswordEditor));
    dataSource["InfoProtocol"].ValuesProvider = NSArray.FromStrings(new string[] { "L2TP", "PPTP", "IPSec" });
    dataSource["EncryptionLevel"].ValuesProvider = NSArray.FromStrings(new string[] { "FIPS Compliant", "High", "Client Compatible", "Low" });

    dataSource.AddGroup(" ", new string[] { "InfoProtocol" });
    dataSource.AddGroup(" ", new string[] {  "Details", "Server", "Account", "Secure", "Password", "EncryptionLevel", "SendAllTraffic" });

    var dataForm = new TKDataForm(this.View.Bounds)
    {
        BackgroundColor = new UIColor(0.937f, 0.937f, 0.960f, 1.0f),
        GroupSpacing = 20,
        Delegate = new MydDataFormDelegate(),
        WeakDataSource = dataSource.NativeObject
    };
    this.View.AddSubview(dataForm);
}
where MydDataFormDelegate is defined as below:
class MydDataFormDelegate : TKDataFormDelegate
{
    public override void UpdateEditor(TKDataForm dataForm, TKDataFormEditor editor, TKEntityProperty property)
    {
        TKGridLayoutCellDefinition feedbackDef = editor.GridLayout.DefinitionForView(editor.FeedbackLabel);
        editor.GridLayout.SetHeight(0, feedbackDef.Row.Int32Value);

        if (property.Name == "InfoProtocol")
        {
            editor.Style.TextLabelDisplayMode = TKDataFormEditorTextLabelDisplayMode.Hidden;
            TKGridLayoutCellDefinition textLabelDef = editor.GridLayout.DefinitionForView(editor.TextLabel);
            editor.GridLayout.SetWidth(0, textLabelDef.Column.Int32Value);
        }

        if (editor.IsKindOfClass(new Class(typeof(TKDataFormTextFieldEditor))) && !(property.Name.Equals("Password")))
        {
            property.HintText = "Required";
        }
    }
}
The images below show the result after applying the snippet:
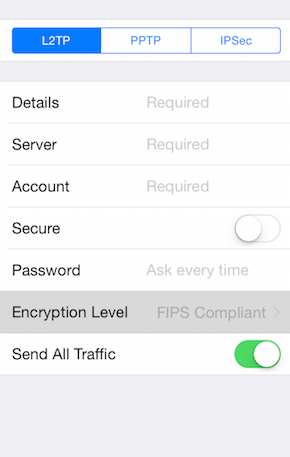 |
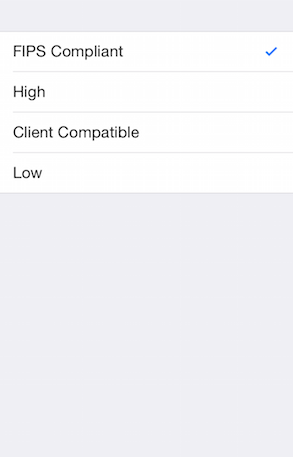 |