Tools
RadImageEditor provides a set of tools that allows you to customize the image element.
The tools are activating UI which enables live preview of the operations executed by the image editor commands. When you adjust the image preview, the tool can be committed which will execute the corresponding command and register the action in the history stack.
The following list shows the available ITool implementations.
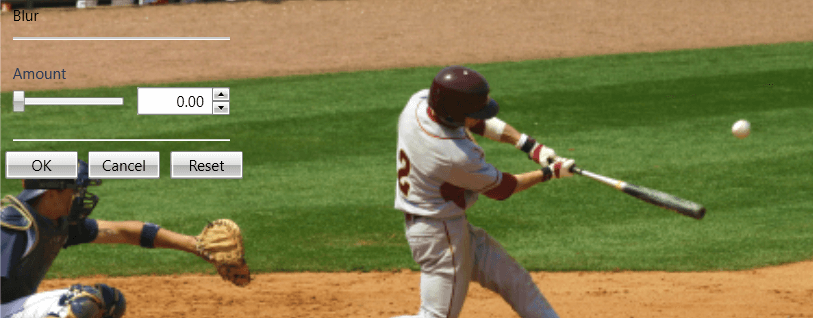
BlurTool: Uses 2 pixel shaders.
CanvasResizeTool
ContrastTool
CropTool
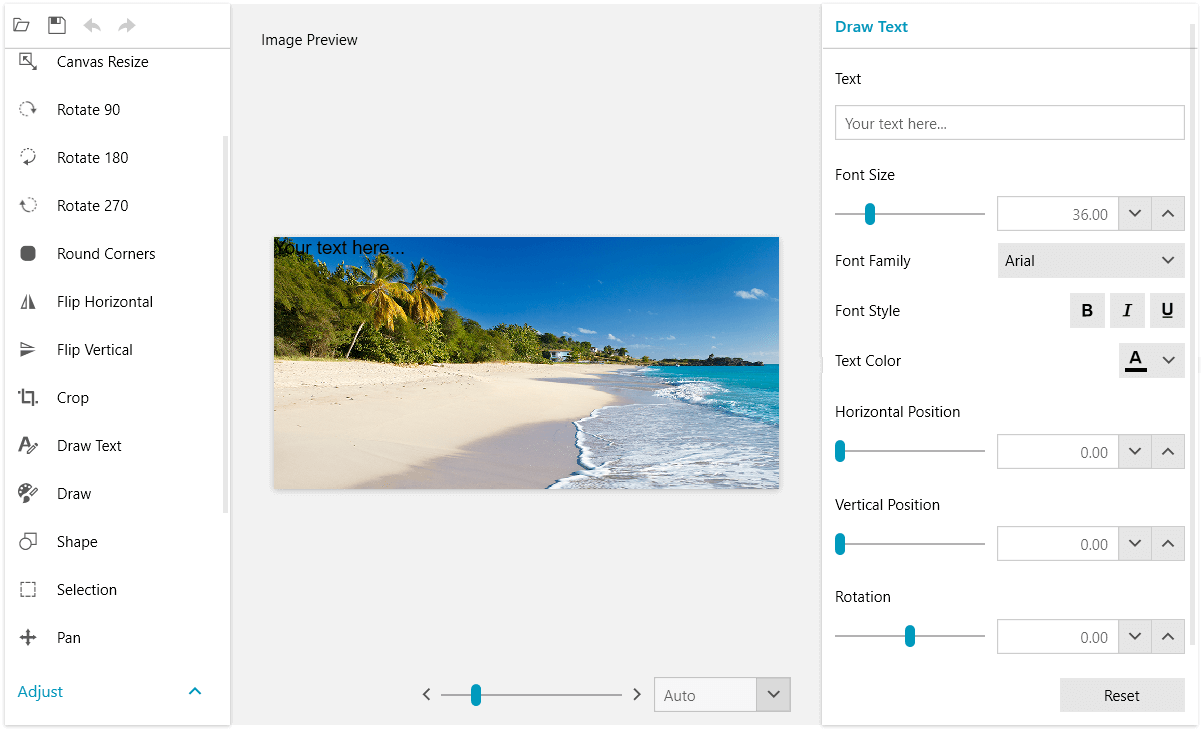
DrawTextTool
HueShiftTool
PanTool (not registered in the history stack)
ResizeTool
RoundCornersTool
SaturationTool
SharpenTool
The effects in RadImageEditor that are implemented using pixel shaders enable the use of hardware acceleration whenever the platform supports it. This result in most effects being applied almost instantly, enabling real-time preview with sliders for the parameter values. You can easily create a command using your own custom shader by implementing EffectCommandBase. This approach is shown in this blog post with a sample implementation of a blur command.
See the different tool setting UIs in the ImageEditor demo of RadImageEditorUI.
Excecuting Tools
To execute a tool and display its UI, call the ExecuteCommand method of RadImageEditor with an instance of the corresponding tool as parameter. A tool can be excecuted also by using the ExecuteTool command.
Example 1: Executing a tool in code
this.radImageEditor.ExecuteTool(new BlurTool());
Example 2: Executing a tool using the ExecuteTool command
 <Grid>
    <telerik:RadImageEditor x:Name="radImageEditor" />
    <telerik:RadButton Content="Blur Tool"
                       Command="commands:ImageEditorRoutedCommands.ExecuteTool"
                       CommandTarget="{Binding ElementName=radImageEditor}">
        <telerik:RadButton.CommandParameter>
            <tools:BlurTool />
        </telerik:RadButton.CommandParameter>
    </telerik:RadButton>
</Grid>
xmlns:tools="clr-namespace:Telerik.Windows.Media.Imaging.Tools;assembly=Telerik.Windows.Controls.ImageEditor"
The commands namespace declaration points to the following namespace: xmlns:commands="clr-namespace:Telerik.Windows.Media.Imaging.ImageEditorCommands.RoutedCommands;assembly=Telerik.Windows.Controls.ImageEditor"
The tool settings UI is displayed over the image in a special container - InlineToolSettings element. The container is positioned over the RadImageEditor at its top left corner.
Figure 1: Blur inline settings UI
When using RadImageEditorUI the settings UI is displayed aligned at the right side of the control.
Figure 2: Blur settings UI in RadImageEditorUI