Filter Editor
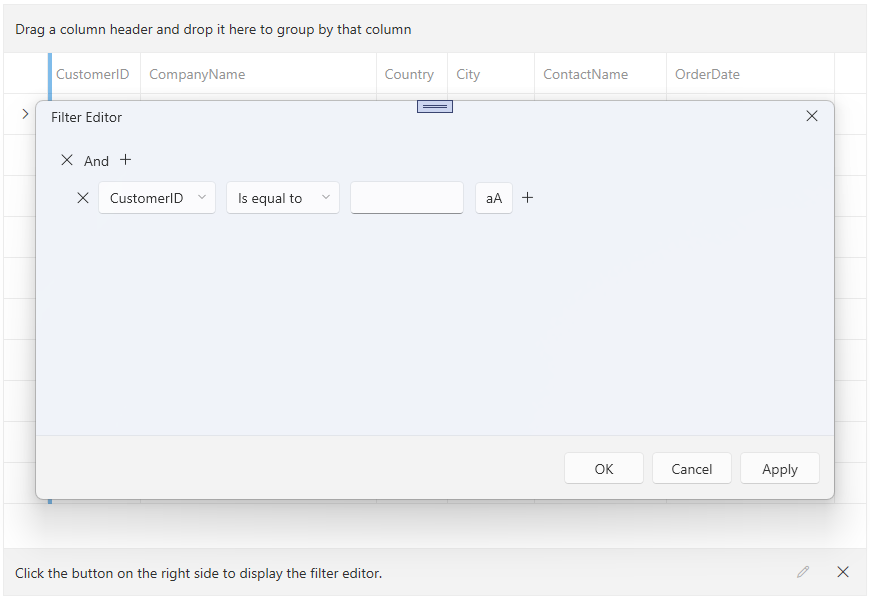
Filter Editor is one of the filtering modes of RadGridView, which allows you to create complex filter expressions. The visualization of the editor consists of a panel displaying an overview of the filtering criterias and a dialog with embedded RadDataFilter control that is used to add, remove and modify the filters.
Visual Structure
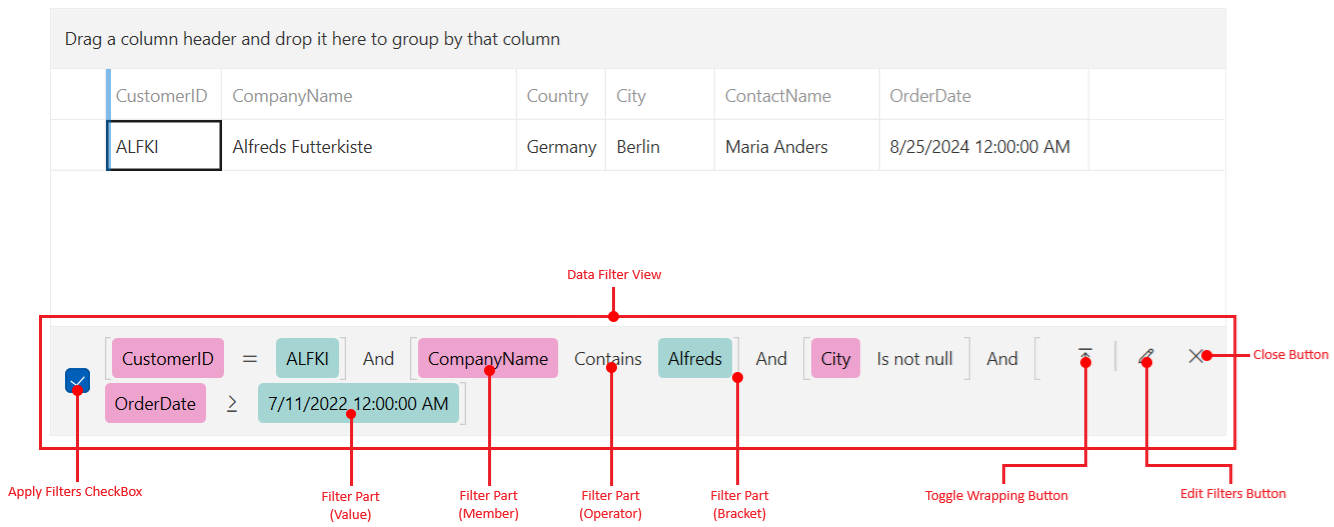
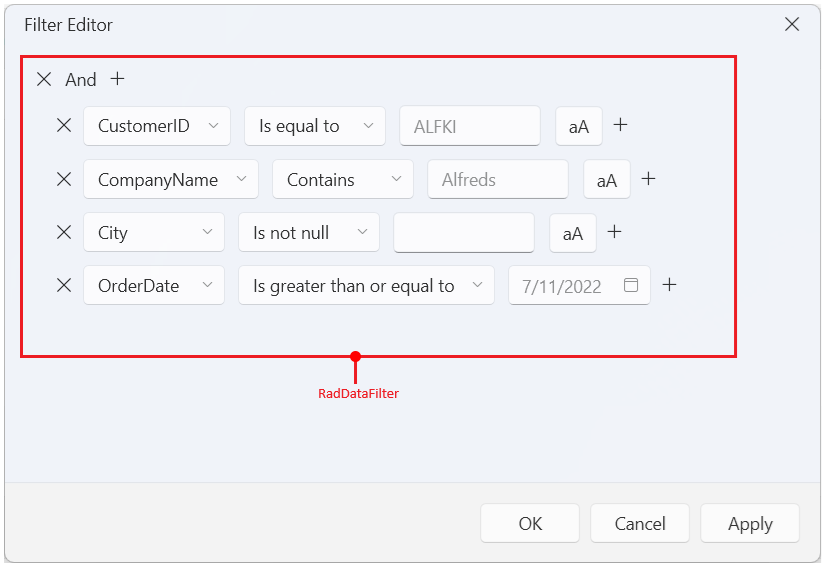
- Data Filter View—The panel displaying the applied filters and the related options.
- Apply Filters CheckBox—A CheckBox that enables/disables the selected filters in the associated RadGridView instances.
- Toggle Wrapping Button—A toggle button that enables/disables the wrapping of the filtering criterias.
-
Edit Filters Button—A button that opens a dialog that allows editing of the filters using a
RadDataFiltercontrol. - Close Button—A button that hides the Data Filter View panel.
- Filter Part—The parts of the field criterias, the associated operators and parenting.
- RadDataFilter—A data filter editor.
Enabling the Filter Editor
To show the Data Filter View panel, set the FilteringMode property of RadGridView to FilterEditor. Additional to that the following Telerik assemblies needs to be referenced in the project.
Telerik.Windows.Controls.Data.dllTelerik.Windows.Controls.Navigation.dll
Enabling the filter editor
<telerik:RadGridView FilteringMode="FilterEditor"/>
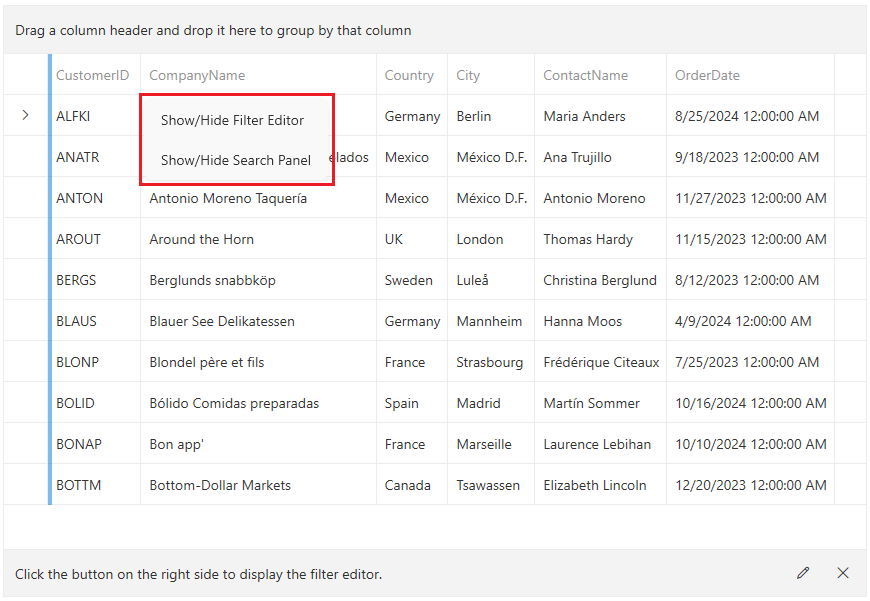
RadGridViewCommands.ToggleFilterEditor command, or alternatively use the column headers context menu.
Filter Editor Position
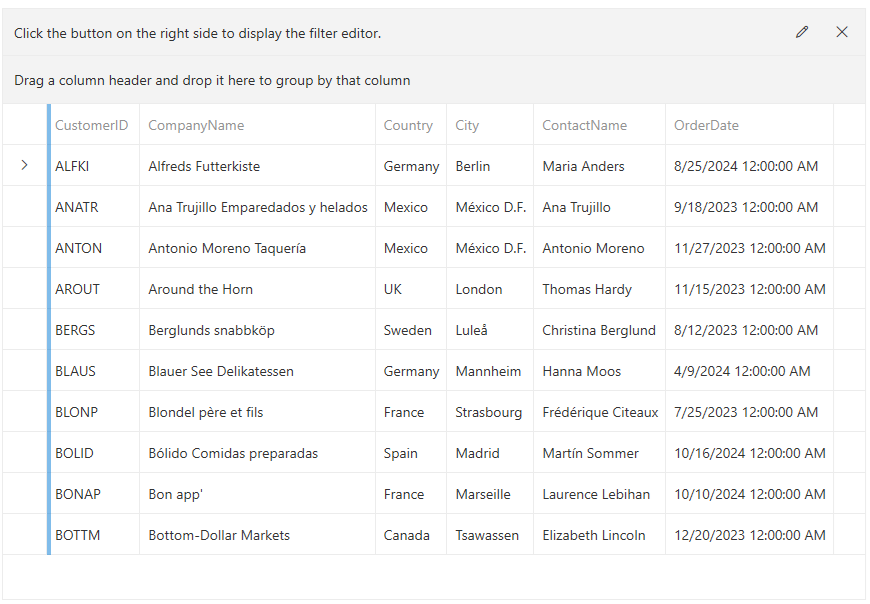
The editor is positioned at the bottom of the data grid component, but this can be changed with the FilterEditorPosition property of RadGridView. The available positions are Top and Bottom (default).
Setting the filter editor position
<telerik:RadGridView FilteringMode="FilterEditor" FilterEditorPosition="Top"/>
Toggling the Filters
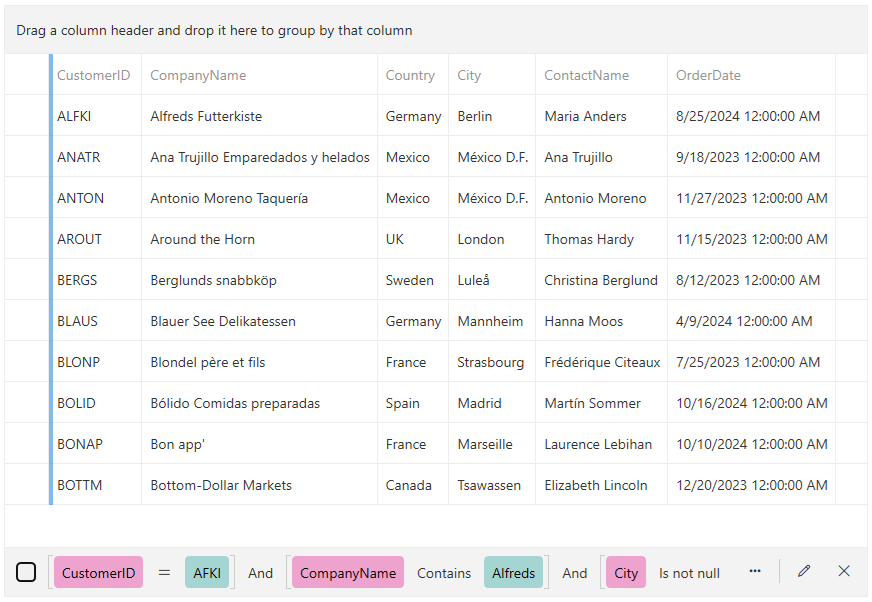
The filters can be enabled or disabled with the Apply Filters CheckBox. Deselecting the CheckBox will disable the filters and update the RadGridView's data view accordingly.
Enable/disable filters check box
Toggling the Filter Editor Panel Visibility
The panel can be hidden with the RadGridViewCommands.ToggleFilterEditor command and the Close Button.
Executing the RadGridViewCommands.ToggleFilterEditor command
this.gridView.PendingCommands.Add(RadGridViewCommands.ToggleFilterEditor);
this.gridView.ExecutePendingCommand();
EnableHeaderContextMenu property of RadGridView to true.
Enabling the column header context menu
<telerik:RadGridView EnableHeaderContextMenu="True" FilteringMode="FilterEditor" />
Removing Filters on Panel Close
By default closing the panel (with the close button or the command), won't clear the applied filters. To change this behavior and clear the filters, set the ShouldRemoveFiltersOnClose property of RadDataFilterView to True.
Setting the ShouldRemoveFiltersOnClose property
<telerik:RadGridView FilteringMode="FilterEditor">
    <telerik:RadGridView.Resources>
        <!-- Add the following setting to the Style tag if using the Telerik NoXaml dlls: -->
        <!--BasedOn="{StaticResource RadDataFilterViewStyle}"-->
        <Style TargetType="telerik:RadDataFilterView">
            <Setter Property="ShouldRemoveFiltersOnClose" Value="True" />
        </Style>
    </telerik:RadGridView.Resources>
</telerik:RadGridView>
No Filters Content
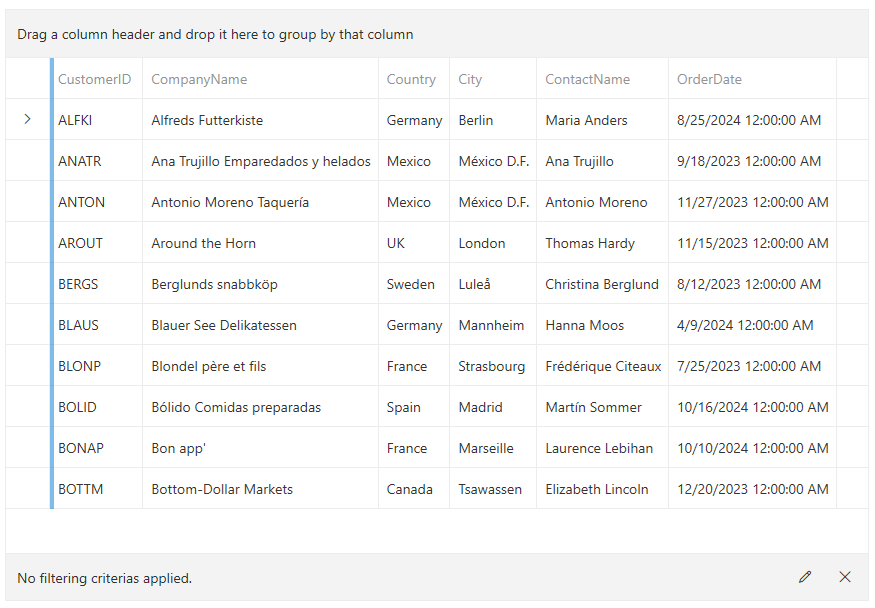
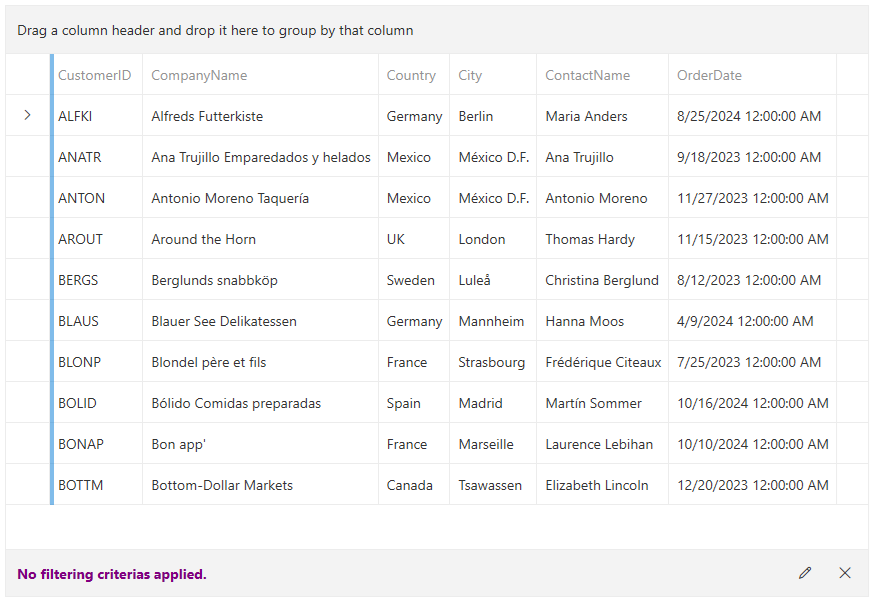
The message displayed when no filters are applied can be customized with the EmptyFiltersContent and EmptyFiltersContentTemplate properties of RadDataFilterView.
Setting the EmptyFiltersContent property
<telerik:RadGridView FilteringMode="FilterEditor">
    <telerik:RadGridView.Resources>
        <!-- Add the following setting to the Style tag if using the Telerik NoXaml dlls -->
        <!--BasedOn="{StaticResource RadDataFilterViewStyle}"-->
        <Style TargetType="telerik:RadDataFilterView">
            <Setter Property="EmptyFiltersContent" Value="No filtering criterias applied." />
        </Style>
    </telerik:RadGridView.Resources>
</telerik:RadGridView>
Setting the EmptyFiltersContentTemplate property
<telerik:RadGridView FilteringMode="FilterEditor">
    <telerik:RadGridView.Resources>
        <!-- Add the following setting to the Style tag if using the Telerik NoXaml dlls -->
        <!--BasedOn="{StaticResource RadDataFilterViewStyle}"-->
        <Style TargetType="telerik:RadDataFilterView">
            <Setter Property="EmptyFiltersContent" Value="No filtering criterias applied." />
             <Setter Property="EmptyFiltersContentTemplate">
             <Setter.Value>
                 <DataTemplate>
                     <TextBlock Text="{Binding}" Foreground="Purple" FontWeight="Bold"/>
                 </DataTemplate>
             </Setter.Value>
         </Setter>
        </Style>
    </telerik:RadGridView.Resources>
</telerik:RadGridView>
Commands
The filter editor feature provides the following set of commands that can be utilized.
-
RadGridViewCommands.ToggleFilterEditor—Hides and shows the filter editor view. -
FilterEditorDialogCommands.SelectFilters—Applies the selection in the filter editor dialog and closes it. -
FilterEditorDialogCommands.CancelFilters—Cancels the selection in the filter editor dialog and closes it. -
FilterEditorDialogCommands.ApplyFilters—Applies the selection in the filter editor dialog without closing it. -
RadDataFilterViewCommands.OpenFilterEditor—Opens the filter editor dialog. -
RadDataFilterViewCommands.ToggleWrapping—Toggles the filter criterias wrapping.
Events
The RadDataFilterView control exposes several properties of type EventHandler that can be used to assign handlers invoked when specific actions in the RadDataFilter control occur.
The FilterOperatorsLoadingHandler property allows to set a handler of type EventHandler<FilterOperatorsLoadingEventArgs> that is invoked when the filter operators starts loading. This allows you to remove operators from the collection with the available operators.
The EditorCreatedHandler property allows to set a handler of type EventHandler<EditorCreatedEventArgs> that is invoked when the filter starts loading. This allows you to remove operators from the collection with the available operators.
The AutoGeneratingItemPropertyDefinitionHandler property allows to set a handler of type EventHandler<DataFilterAutoGeneratingItemPropertyDefinitionEventArgs> that is invoked when the filter operators starts loading. This allows you to remove operators from the collection with the available operators.
Assigning the handler objects in code behind
private void RadGridView_Loaded(object sender, RoutedEventArgs e)
{
    var gridView = (RadGridView)sender;
    var dataFilterView = gridView.FindChildByType<RadDataFilterView>();
    dataFilterView.FilterOperatorsLoadingHandler = new EventHandler<Telerik.Windows.Controls.Data.DataFilter.FilterOperatorsLoadingEventArgs>(OnFilterOperatorsLoading);
    dataFilterView.EditorCreatedHandler = new EventHandler<Telerik.Windows.Controls.Data.DataFilter.EditorCreatedEventArgs>(OnEditorCreated);
    dataFilterView.AutoGeneratingItemPropertyDefinitionHandler = new EventHandler<Telerik.Windows.Controls.Data.DataFilter.DataFilterAutoGeneratingItemPropertyDefinitionEventArgs>(OnAutoGeneratingItemPropertyDefinition);
}
Defining a handler property in a view model
public EventHandler<Telerik.Windows.Controls.Data.DataFilter.FilterOperatorsLoadingEventArgs> MyEditorCreatedHandler { get; set; }
Assigning the handler object with data binding
<telerik:RadGridView FilteringMode="FilterEditor">
    <telerik:RadGridView.Resources>
        <!-- Add the following setting to the Style tag if using the Telerik NoXaml dlls -->
        <!--BasedOn="{StaticResource RadDataFilterViewStyle}"-->
        <Style TargetType="telerik:RadDataFilterView">
            <Setter Property="EditorCreatedHandler" Value="{Binding MyEditorCreatedHandler}" />
        </Style>
    </telerik:RadGridView.Resources>
</telerik:RadGridView>
Defining event handlers
private void OnAutoGeneratingItemPropertyDefinition(object? sender, DataFilterAutoGeneratingItemPropertyDefinitionEventArgs e)
{
    if (e.ItemPropertyDefinition.PropertyType == typeof(DateTime))
    {
        e.Cancel = true;
    }
}

private void OnEditorCreated(object? sender, Telerik.Windows.Controls.Data.DataFilter.EditorCreatedEventArgs e)
{
    if (e.ItemPropertyDefinition.PropertyName == "MyTitlesCollection")
    {
        var editor = (RadComboBox)e.Editor;
        //editor.ItemsSource = this.GetMyCustomTitlesCollection();
    }
}

private void OnFilterOperatorsLoading(object? sender, Telerik.Windows.Controls.Data.DataFilter.FilterOperatorsLoadingEventArgs e)
{
    if (e.ItemPropertyDefinition.PropertyType == typeof(double))
    {
        e.AvailableOperators.RemoveAt(2);
        e.DefaultOperator = Telerik.Windows.Data.FilterOperator.IsEqualTo;
    }

}
Customizing Filter Editor Parts
The filter editor elements can be customized with several properties exposed by the RadDataFilterView control.
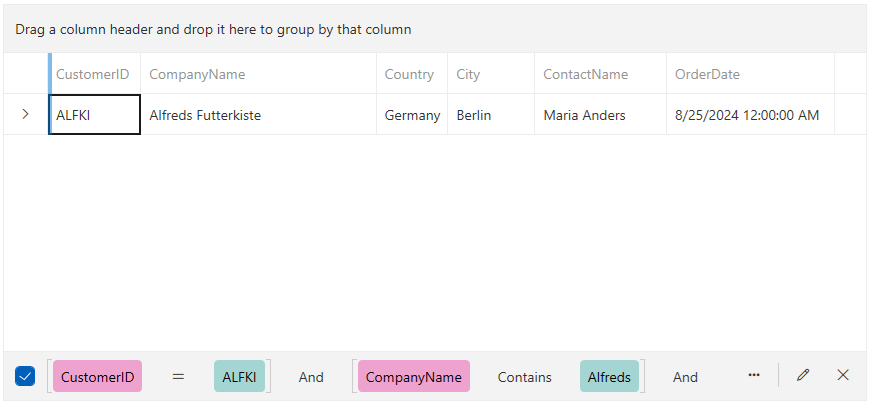
To change the spacing between the filter criteria visuals, set the FilterPartsSpacing property.
Setting the FilterPartsSpacing
<telerik:RadGridView FilteringMode="FilterEditor">
    <telerik:RadGridView.Resources>
        <!-- Add the following setting to the Style tag if using the Telerik NoXaml dlls -->
        <!--BasedOn="{StaticResource RadDataFilterViewStyle}"-->
        <Style TargetType="telerik:RadDataFilterView">
            <Setter Property="FilterPartsSpacing" Value="20" />
        </Style>
    </telerik:RadGridView.Resources>
</telerik:RadGridView>
To hide the close button, set the CloseButtonVisibility property to Collapsed.
Setting the CloseButtonVisibility
<telerik:RadGridView FilteringMode="FilterEditor">
    <telerik:RadGridView.Resources>
        <!-- Add the following setting to the Style tag if using the Telerik NoXaml dlls -->
        <!--BasedOn="{StaticResource RadDataFilterViewStyle}"-->
        <Style TargetType="telerik:RadDataFilterView">
            <Setter Property="CloseButtonVisibility" Value="Collapsed" />
        </Style>
    </telerik:RadGridView.Resources>
</telerik:RadGridView>
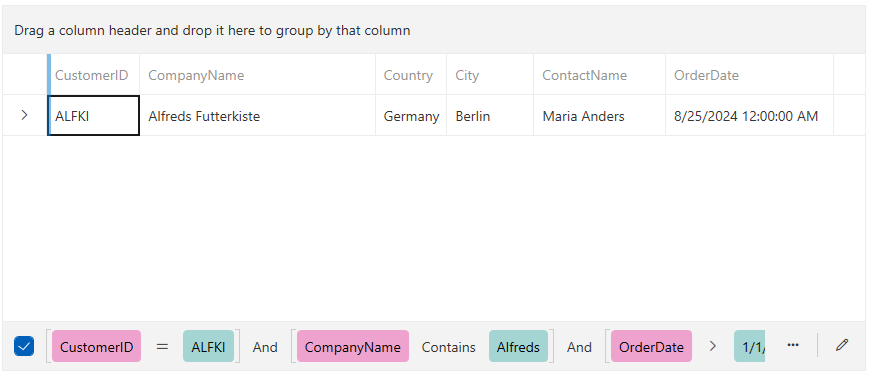
To change the layout behavior of the panel that displays the filtering criterias, change the IsWrappingEnabled property. By default, when the criteria visuals go outside of the available width, they will get clipped. Setting IsWrappingEnabled to true will wrap the visuals and display them on multiple rows.
Enabling wrapping
<telerik:RadGridView FilteringMode="FilterEditor">
    <telerik:RadGridView.Resources>
        <!-- Add the following setting to the Style tag if using the Telerik NoXaml dlls -->
        <!--BasedOn="{StaticResource RadDataFilterViewStyle}"-->
        <Style TargetType="telerik:RadDataFilterView">
            <Setter Property="IsWrappingEnabled" Value="True" />
        </Style>
    </telerik:RadGridView.Resources>
</telerik:RadGridView>
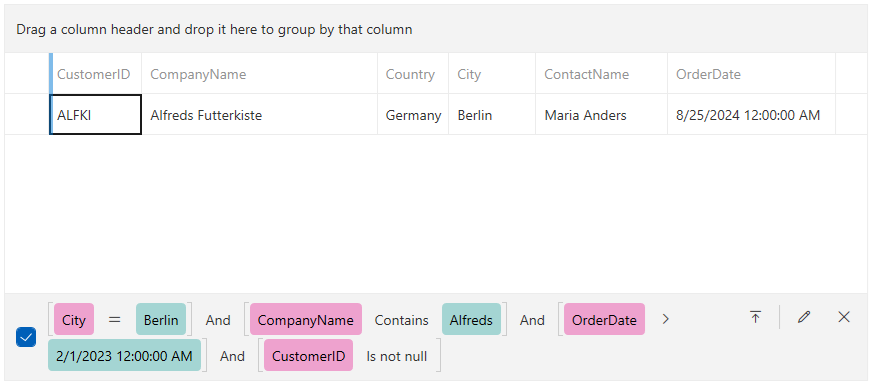
The wrapping behavior can be enabled and disabled also with the Toggle Wrapping Button. When there is enough width to display all filtering criterias the button won't be displayed and the CanToggleWrapping property of RadDataFilterView will return false.
To change the default size of the dialog with the RadDataFilter control, set the FilterEditorWindowWidth and FilterEditorWindowHeight properties of RadDataFilterView.
Setting the filter editor dialog size
<telerik:RadGridView FilteringMode="FilterEditor">
    <telerik:RadGridView.Resources>
        <!-- Add the following setting to the Style tag if using the Telerik NoXaml dlls -->
        <!--BasedOn="{StaticResource RadDataFilterViewStyle}"-->
        <Style TargetType="telerik:RadDataFilterView">
            <Setter Property="FilterEditorWindowWidth" Value="800" />
            <Setter Property="FilterEditorWindowHeight" Value="300" />
        </Style>
    </telerik:RadGridView.Resources>
</telerik:RadGridView>
Customizing Filtering Criteria Visuals
The filtering criteria visuals are represented by the FilterPart element. To apply custom settings to this visual, an implicit style defined in the RadGridView.Resources can be used.
To change the member and value backgrounds, set the MemberBackground and ValueBackground properties of FilterPart.
Setting the backgrounds of the member and value filter parts
<telerik:RadGridView FilteringMode="FilterEditor">
    <telerik:RadGridView.Resources>
        <!-- Add the following setting to the Style tag if using the Telerik NoXaml dlls -->
        <!--BasedOn="{StaticResource FilterPartStyle}"-->
        <Style TargetType="filterView:FilterPart">
            <Setter Property="MemberBackground" Value="Salmon" />
            <Setter Property="ValueBackground" Value="LightSeaGreen" />
        </Style>
    </telerik:RadGridView.Resources>
</telerik:RadGridView>
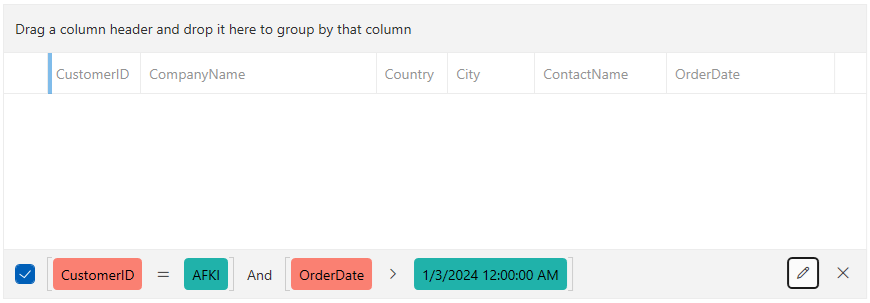
The FilterPart can be further customized by setting its ContentTemplate property.
Customizing the FilePart elements using the ContentTemplate
<telerik:RadGridView.Resources>
<!-- Add the following setting to the Style tag if using the Telerik NoXaml dlls -->
<!--BasedOn="{StaticResource FilterPartStyle}"-->
<Style TargetType="filterView:FilterPart">
<Setter Property="ContentTemplate">
<Setter.Value>
<DataTemplate>
<TextBlock Text="{Binding Content}" x:Name="textBlock"/>
<DataTemplate.Triggers>
<MultiDataTrigger>
<MultiDataTrigger.Conditions>
<Condition Binding="{Binding ElementName=textBlock, Path=DataContext.Type}" Value="Operator"/>
<Condition Binding="{Binding ElementName=textBlock, Path=DataContext.Content}" Value="IsEqualTo"/>
</MultiDataTrigger.Conditions>
<Setter TargetName="textBlock" Property="Text" Value="=" />
</MultiDataTrigger>
<MultiDataTrigger>
<MultiDataTrigger.Conditions>
<Condition Binding="{Binding ElementName=textBlock, Path=DataContext.Type}" Value="Operator"/>
<Condition Binding="{Binding ElementName=textBlock, Path=DataContext.Content}" Value="IsNotEqualTo"/>
</MultiDataTrigger.Conditions>
<Setter TargetName="textBlock" Property="Text" Value="≠" />
</MultiDataTrigger>
<MultiDataTrigger>
<MultiDataTrigger.Conditions>
<Condition Binding="{Binding ElementName=textBlock, Path=DataContext.Type}" Value="LogicalOperator"/>
<Condition Binding="{Binding ElementName=textBlock, Path=DataContext.Content}" Value="And"/>
</MultiDataTrigger.Conditions>
<Setter TargetName="textBlock" Property="Text" Value="&&" />
</MultiDataTrigger>
<MultiDataTrigger>
<MultiDataTrigger.Conditions>
<Condition Binding="{Binding ElementName=textBlock, Path=DataContext.Type}" Value="LogicalOperator"/>
<Condition Binding="{Binding ElementName=textBlock, Path=DataContext.Content}" Value="Or"/>
</MultiDataTrigger.Conditions>
<Setter TargetName="textBlock" Property="Text" Value="||" />
</MultiDataTrigger>
</DataTemplate.Triggers>
</DataTemplate>
</Setter.Value>
</Setter>
</Style>
</telerik:RadGridView.Resources>

The data context in the ContentTemplate is an object of type FilterPartViewModel which contains the following information:
-
Type—This is the type of part's content represented by theFilterPartTypeenum. It can be aLogicalOperator,Operator,Member,Value,OpeningBracketorClosingBracket. -
Content—This is the content that will be displayed in the content area. It can be an operator name (And, Or, StartsWith, Contains, etc.), member (property name), value or a opening/closing bracket.
The view model gives information also for the current level of the filtering part in the composite filter's hierarchy through the Level property.
Customizing the Display Names of Properties
By default the data filer will use associated the property names in the dropdown that allows you to select a field. To change this and use a custom display name, either use the System.ComponentModel.DisplayName attribute on the corresponding property in the model, or use the AutoGeneratingItemPropertyDefinitionHandler.
Using the DisplayName attribute
[DisplayName("Est.")]
public DateTime Established
{
    get { return this.established; }
    set
    {
        if (value != this.established)
        {
            this.established = value;
            this.OnPropertyChanged("Established");
        }
    }
}
Using the AutoGeneratingItemPropertyDefinitionHandler to synchronize the field display name in the RadDataFiler with the Header of the GridViewColumn
private void OnAutoGeneratingPropertyDefinition(object sender, DataFilterAutoGeneratingItemPropertyDefinitionEventArgs e)
{
    if (e.ItemPropertyDefinition.PropertyName == "MyProperty")
    {
        var column = this.gridView.Columns.OfType<GridViewBoundColumnBase>().FirstOrDefault(c => c.DataMemberBinding.Path.Path == e.ItemPropertyDefinition.PropertyName);
        e.ItemPropertyDefinition.DisplayName = column.Header.ToString();
    }
}