TFS 2010
JustMock Code Activity Workflow is designed to deploy your JustMock test projects to TFS 2010 with zero manual configurations for setting up your build environment.
It breaks you free from tedious configuration of environment variables and provides you simple options that can get you on the move in no time. In this topic we will focus on what are the required configuration steps when working with JustMock Code Activity Workflow.
Important
Be sure, you have referred to the Integrating Telerik JustMock in TFS 2010 Code Activity Workflow before continuing with the steps below.
Note
You could also check the step-by-step video about How to configure JustMock test execution within TFS code activity workflow.
Configuration Steps
First, you need to point the custom assemblies folder that contains Telerik.JustMock.Build.Workflow.dll to your build controller.
Note
The DLL is included in the JustMock installation directory under the Libraries folder.
You can do this by editing your build controller properties. Go to Team Explorer, then Builds and from the Actions menu select *
Manage Build Controllers *. You will be prompted with a dialog similar to the one below:
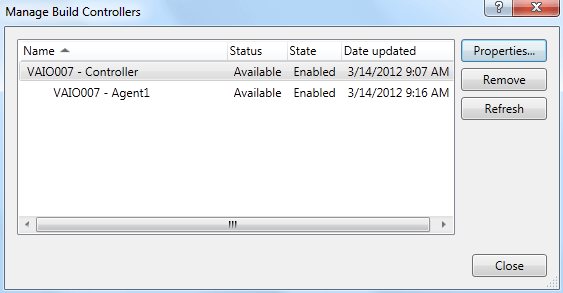 Select the main controller for your build and click properties. Then you have to set the
- "Version control path to custom assemblies"
- property to the location of the folder containg the Telerik.JustMock.Build.Workflow.dll.
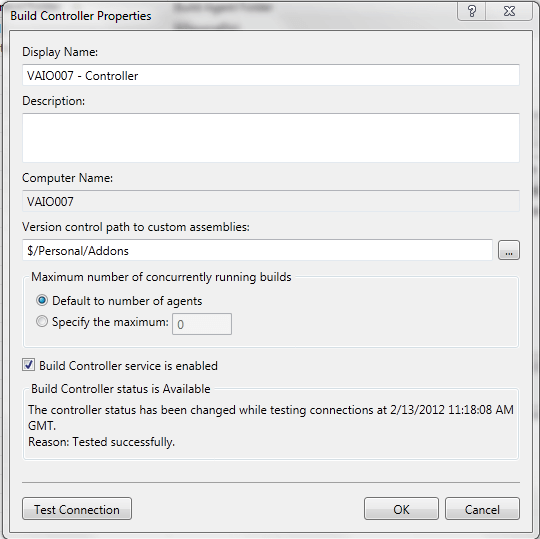 Here we have set the following properties:
- Version control path to custom assemblies - $/Personal/Addons
Continue by configuring the Default Template of your team project.
To make changes to your DefaultTemplate you will need to:
Check out for editing the BuildProcessTemplates from the Source Control.
Create new class library project (This will be a dummy project. Its only purpose is for editing the template. You don`t need to add it to your solution or team collection).
Refer Telerik.JustMock.Build.Workflow.dll.
Include the Default Template in your project, using the Add as Link option. If you are new to TFS, the DefaultTemplate is a xaml file where the activity is dropped. You can find it under the BuildProcessTemplates folder of your TFS:
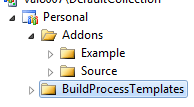
Once added, set its Build Action to None.
For changes to take effect in the original template, you will just need to save them in this "dummy" project. Then check-in your DefaultTemplate. Below is a screenshot of a section from the Default Template:
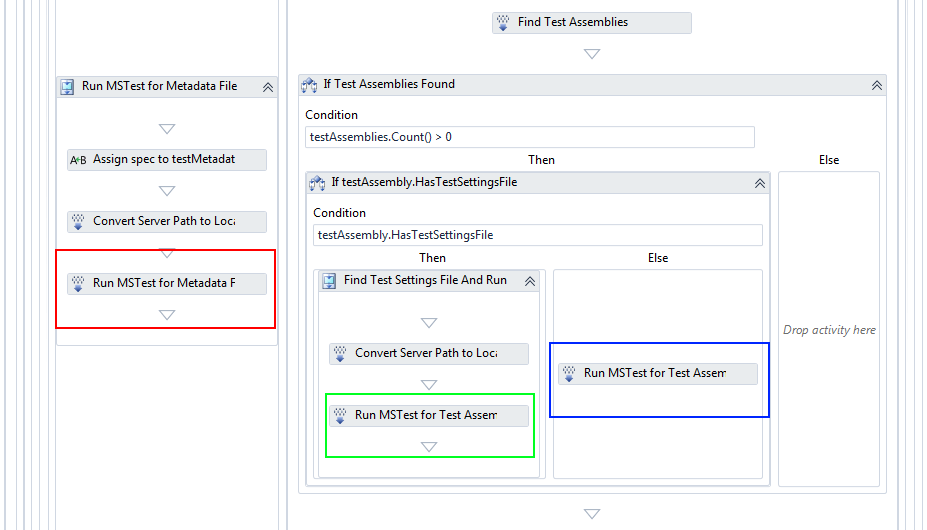
Next, you will have to replace some of the default activities. The activities to be replaced are marked with red, green and blue boxes . On their places you will need to put the JustMockTestRunner activity.
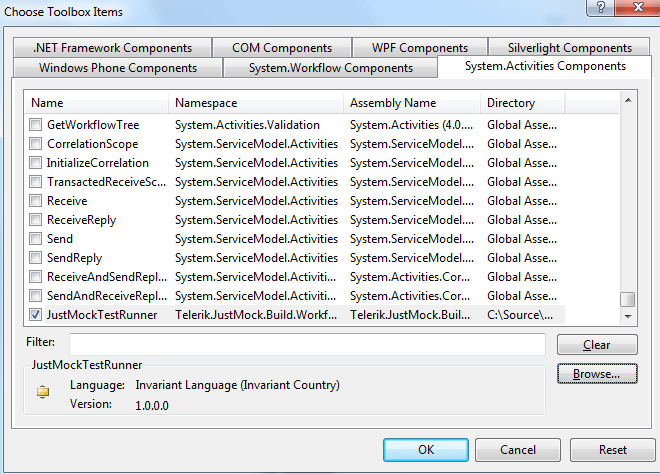
In order to drag/drop the JustMockTestRunner activity to your build template (having the appropriate Telerik.JustMock.Build.Workflow DLL refered to your project, as explained above). You also need to add the assembly into your Toolbox pane by choosing Tools > Choose Toolbox Items. Then, select Browse and point to the DLL in your custom assemblies folder (in this example: $/Personal/Addons).
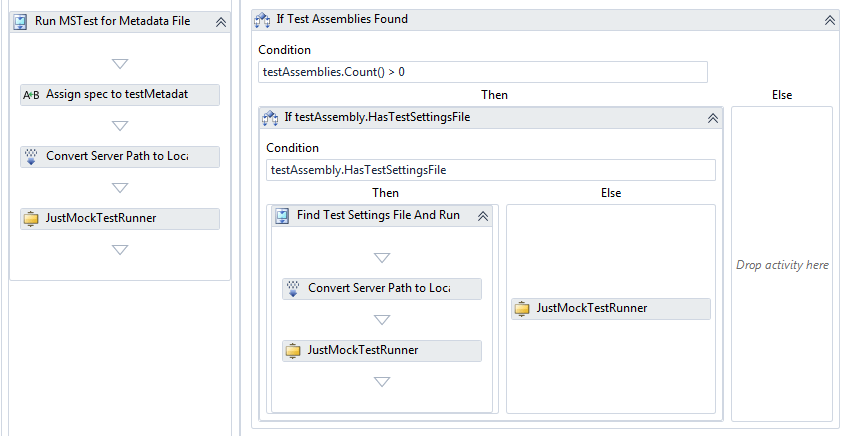
After replacing the activities, your template must look like this:
Before configuring each of the above added JustMockTestRunner activities settings, you must define the ResultSummary variable. It is used by JustMock to store the test result (Passed / Failed) and as such it will flag test status in later stage. The variable must be of type Telerik.JustMock.Build.Workflow.ReturnCodes and its scope must be Sequence.

Then, you can continue with configuring the JustMockTestRunner activities settings.
Start by setting the values of the red activity (from step 2) as shown in the screenshot below. It is for metadata based testing. Therefore, you set the TestMetaData along with TestLists variables.

Here we have set the following properties:
BuildNumber - BuildDetail.Uri.ToString()
Category - testMetadataFile.CategoryFilter
DisplayName - JustMockTestRunner
Flavor - platformConfiguration.Configuration
Platform - platformConfiguration.Platform
ProjectCollection - "http://vaio007:8080/tfs/DefaultCollection/"
Result - ResultSummary
SearchPathRoot - outputDirectory
TeamProjectName - BuildDetail.TeamProject
TestLists - testMetadataFile.TestLists.ToArray()
TestMetadata - localTestMetadata
TestSettings - String.Empty
Continue by setting the values of the green activity (from step 2). The activity looks for a test settings defined by your MS Test project. Therefore, you must point the test assemblies and settings via the TestAssembilyNames and TestSettings variables. Check the screenshot and the details below:

Here we have set the following properties:
BuildNumber - BuildDetail.Uri.ToString()
Category - testAssembly.CategoryFilter
DisplayName - JustMockTestRunner
Flavor - platformConfiguration.Configuration
Platform - platformConfiguration.Platform
ProjectCollection - "http://vaio007:8080/tfs/DefaultCollection/"
Result - ResultSummary
SearchPathRoot - outputDirectory
TeamProjectName - BuildDetail.TeamProject
TestAssemblyNames - testAssemblies.ToArray()
TestSettings - localTestSettings
Finally, for the blue activity (from step 2) you must specify the test assemblies as shown in the next screenshot:
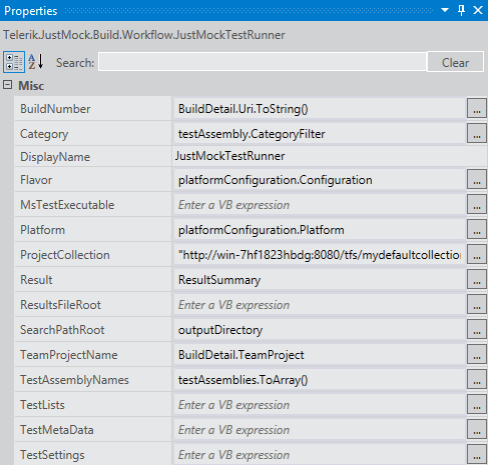
Here we have set the following properties:
BuildNumber - BuildDetail.Uri.ToString()
Category - testAssembly.CategoryFilter
DisplayName - JustMockTestRunner
Flavor - platformConfiguration.Configuration
Platform - platformConfiguration.Platform
ProjectCollection - "http://vaio007:8080/tfs/DefaultCollection/"
Result - ResultSummary
SearchPathRoot - outputDirectory
TeamProjectName - BuildDetail.TeamProject
TestAssemblyNames - testAssemblies.ToArray()
Moving forward, you have to specify the condition on which the build will pass/fail.
Drag an "If" activity (you can find it under Toolbox > Control Flow) between "If TestStatus = Unknown" and "If TreatTestFailureAsBuildFailure And (TestStatus = Failed)" activities. Set its properties as follows:
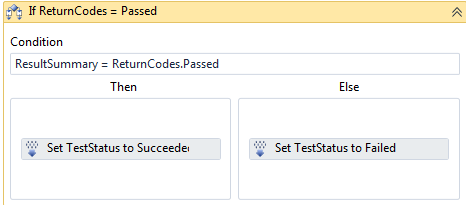
For Set TestStatus to Succeeded: * PropertiesToSet - TestStatus
- TestStatus - Microsoft.TeamFoundation.Build.Client.BuildPhaseStatus.Succeeded
For Set TestStatus to Failed: * PropertiesToSet - TestStatus
- TestStatus - Microsoft.TeamFoundation.Build.Client.BuildPhaseStatus.Failed
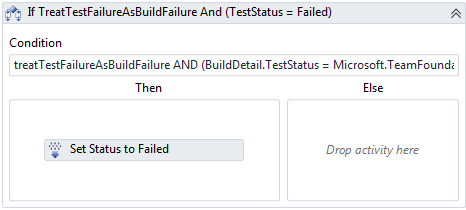
This will be used by the next block that will modify the build based on the value returned by the activity:
Once all three sections are set, your JustMock tests that require profiler will work as expected. You can further expand the build to check test status and view the test results file that is created by the activity.
