Getting Started with the TaskBoard
This tutorial explains how to set up the Telerik UI for ASP.NET Core TaskBoard and highlights the major steps in the configuration of the component.
In this tutorial, you will declare two view models for the TaskBoard and initialize the component. Then, you will bind the TaskBoard to visualize the tasks in separate columns and utilize the Template Component to customize the cards of the tasks. Next, you will handle events triggered by the user and reference a client-side instance of the component. Finally, you can run the sample code in Telerik REPL and continue exploring the components.
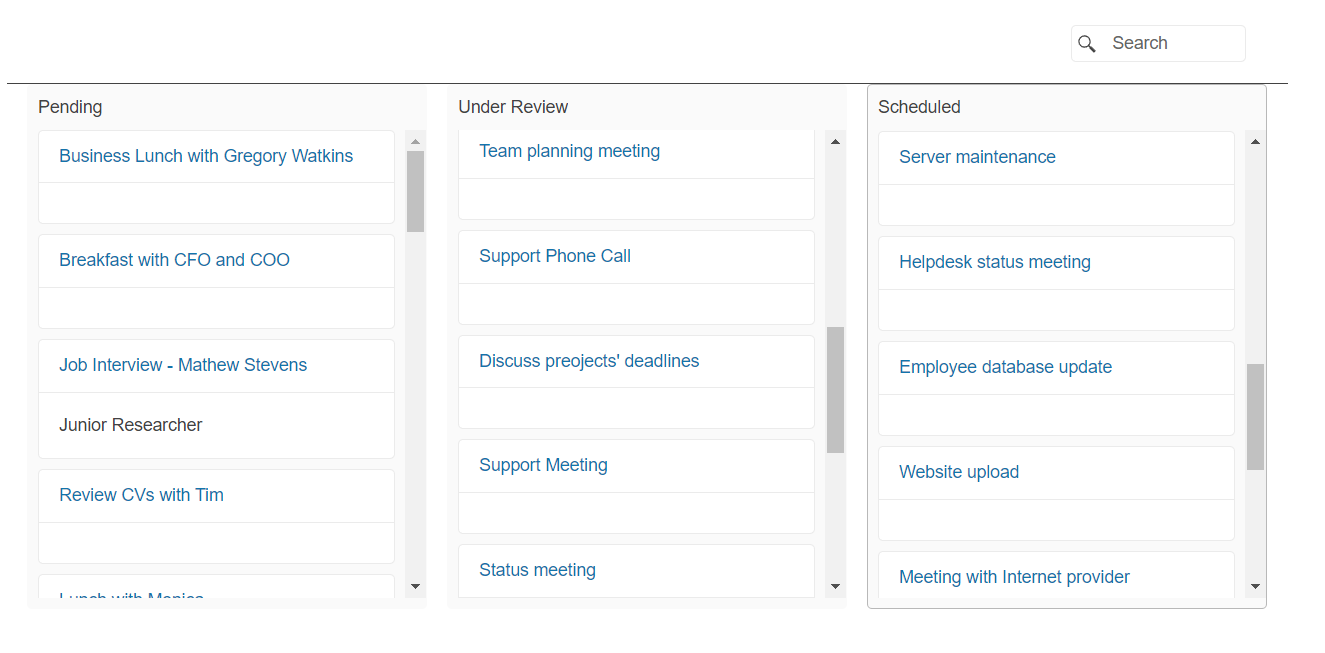
After completing this guide, you will achieve the following results:
Prerequisites
To successfully complete the tutorial, you need a project that is already configured to use the Telerik UI for ASP.NET Core components:
You can use the Telerik REPL playground and skip installing the components on your system and configuring a project.
-
You can prepare a Visual Studio project by following the following guide:
- Creating a new pre-configured project for the Telerik UI for ASP.NET Core components from a project template.
1. Prepare the CSHTML File
The first step is to add the required directives at the top of the .cshtml document:
-
To use the Telerik UI for ASP.NET Core HtmlHelpers:
@using Kendo.Mvc.UI -
To use the Telerik UI for ASP.NET Core TagHelpers:
@addTagHelper *, Kendo.Mvc
Optionally, you can structure the document by adding the desired HTML elements like headings, divs, paragraphs, and others.
2. Declare the View Models
The TaskBoard binds to two View Models. In this guide, the Column model determines the available task columns. The TaskViewModel specifies the data fields available for each task. Optionally, the TaskViewModel can implement the ISchedulerEvent interface to ensure that task instances can be consumed by both the TaskBoard and the Scheduler Components.
Declare the ProductViewModel view model.
    public class Column
    {
        public int ID { get; set; }
        public string Text { get; set; }
        public string Status { get; set; }
        public string Image { get; set; }
    }
    using Kendo.Mvc.UI;

    public class TaskViewModel : ISchedulerEvent
    {
        public int TaskID { get; set; }
        public string Title { get; set; }
        public string Description { get; set; }

        private DateTime start;
        public DateTime Start
        {
            get
            {
                return start;
            }
            set
            {
                start = value.ToUniversalTime();
            }
        }

        public string StartTimezone { get; set; }

        private DateTime end;
        public DateTime End
        {
            get
            {
                return end;
            }
            set
            {
                end = value.ToUniversalTime();
            }
        }

        public string EndTimezone { get; set; }

        public string RecurrenceRule { get; set; }
        public int? RecurrenceID { get; set; }
        public string RecurrenceException { get; set; }
        public bool IsAllDay { get; set; }
        public int? OwnerID { get; set; }

        public Task ToEntity()
        {
            return new Task
            {
                TaskID = TaskID,
                Title = Title,
                Start = Start,
                StartTimezone = StartTimezone,
                End = End,
                EndTimezone = EndTimezone,
                Description = Description,
                RecurrenceRule = RecurrenceRule,
                RecurrenceException = RecurrenceException,
                RecurrenceID = RecurrenceID,
                IsAllDay = IsAllDay,
                OwnerID = OwnerID
            };
        }
    }
    public interface ISchedulerEvent
    {
        string Title { get; set; }
        string Description { get; set; }
        bool IsAllDay { get; set; }
        DateTime Start { get; set; }
        DateTime End { get; set; }
        string StartTimezone { get; set; }
        string EndTimezone { get; set; }
        string RecurrenceRule { get; set; }
        string RecurrenceException { get; set; }
    }
3. Initialize the TaskBoard
Use the TaskBoard HtmlHelper or TagHelper to add the component to a page and set some of its options:
- Bind the TaskBoard to the designated View Models.
- Use the
Name()configuration method to assign a name to the instance of the helper—this is mandatory as its value is used for theidof the TaskBoard element. - Configure the
ColumnSettingsproperty to set up the data fields of the columns and theColumnsproperty to specify aDataSourcethat handles the remote data binding. - Set up the data field properties of the cards.
@using Kendo.Mvc.UI

(Html.Kendo().TaskBoard<Kendo.Mvc.Examples.Models.Scheduler.TaskViewModel, Kendo.Mvc.Examples.Models.TaskBoard.Column>()
        .Name("taskBoard")
        .ColumnSettings(columnSettings => columnSettings
            .DataTextField("Text")
            .DataStatusField("ID")
        )
        .Columns(dataSource => dataSource
            .Ajax()
            .Read("Remote_Data_Binding_Columns_Read", "TaskBoard")
        )
        .DataTitleField("Title")
        .DataStatusField("OwnerID")
        .DataDescriptionField("Description")
        .DataCategoryField("ID")
        .Template(Html.Kendo().Template().AddHtml(templateHtml))
        .DataSource(dataSource => dataSource
            .Ajax()
            .Model(model => model.Id(p => p.TaskID))
            .Read(read => read.Action("Remote_Data_Binding_Read", "TaskBoard"))
            .Update(update => update.Action("Remote_Data_Binding_Update", "TaskBoard"))
        )
        .Editable(false)
        .Height("500")
    )
    @using Kendo.Mvc.UI
    @addTagHelper *, Kendo.Mvc

    <kendo-taskboard
        datacategoryfield="ID"
        datadescriptionfield="Description"
        datastatusfield="OwnerID"
        datatitlefield="Title"
        height="500"
        name="taskBoard" >
        <taskboard-columns>
            <datasource type="DataSourceTagHelperType.Ajax">
                <transport>
                    <read url="@Url.Action("Remote_Data_Binding_Columns_Read", "TaskBoard")"/>
                </transport>
            </datasource>
        </taskboard-columns>
        <datasource type="DataSourceTagHelperType.Ajax">
            <schema data="Data" total="Total" errors="Errors">
                 <model id="TaskID"></model>
            </schema>
            <transport>
                <read url="@Url.Action("Remote_Data_Binding_Read", "TaskBoard")" />
                <update url="@Url.Action("Remote_Data_Binding_Update", "TaskBoard")" />
            </transport>
        </datasource>
        <column-settings datastatusfield="ID" datatextfield="Text">
        </column-settings>
        <editable enabled="false">
        </editable>
    </kendo-taskboard>
4. Configure a Custom Template to Visualize Task Cards
This example showcases an integrated ASP.NET Core Template component that renders each TaskBoard card.
    string templateHtml = "<div class='template-container'>"+
            "<div>"+
                "<div class='k-card-header k-hbox'>"+
                    "<a class='k-card-title k-link' href='' data-command='SelectCardCommand'>${data.Title}</a><span class='k-spacer'></span>"+
                "</div>"+
                "<div class='k-card-body'>"+
                    "<p>${ (data.Description == null) ? ' ' : data.Description }</p>"+
                "</div>"+
            "</div>"+
        "</div>";
    @using Kendo.Mvc.UI

    @(Html.Kendo().TaskBoard<Kendo.Mvc.Examples.Models.Scheduler.TaskViewModel, Kendo.Mvc.Examples.Models.TaskBoard.Column>()
        .Name("taskBoard")
        .ColumnSettings(columnSettings => columnSettings
            .DataTextField("Text")
            .DataStatusField("ID")
        )
        .Columns(dataSource => dataSource
            .Ajax()
            .Read("Remote_Data_Binding_Columns_Read", "TaskBoard")
        )
        .DataTitleField("Title")
        .DataStatusField("OwnerID")
        .DataDescriptionField("Description")
        .DataCategoryField("ID")
        .Template(Html.Kendo().Template()
            .AddHtml(templateHtml)
        )
        .DataSource(dataSource => dataSource
            .Ajax()
            .Model(model => model.Id(p => p.TaskID))
            .Read(read => read.Action("Remote_Data_Binding_Read", "TaskBoard"))
            .Update(update => update.Action("Remote_Data_Binding_Update", "TaskBoard"))
        )
        .Editable(false)
        .Height("500")
    )
    <kendo-taskboard
        datacategoryfield="ID"
        datadescriptionfield="Description"
        datastatusfield="OwnerID"
        datatitlefield="Title"
        height="500"
        name="taskBoard" >
        <taskboard-columns>
            <column>
                <column-template>
                    <div class="template-container">
                        <div>
                            <div class="k-card-header k-hbox">
                                <a class="k-card-title k-link" href="" data-command="SelectCardCommand">${ Title }</a><span class="k-spacer"></span>
                            </div>
                            <div class="k-card-body">
                                <p>${ (Description == null) ? ' ' : Description }</p>
                            </div>
                        </div>
                    </div>
                </column-template>
            </column>
            <datasource type="DataSourceTagHelperType.Ajax">
                <transport>
                    <read url="@Url.Action("Remote_Data_Binding_Columns_Read", "TaskBoard")"/>
                </transport>
            </datasource>
        </taskboard-columns>
        <datasource type="DataSourceTagHelperType.Ajax">
            <schema data="Data" total="Total" errors="Errors">
                 <model id="TaskID"></model>
            </schema>
            <transport>
                <read url="@Url.Action("Remote_Data_Binding_Read", "TaskBoard")" />
                <update url="@Url.Action("Remote_Data_Binding_Update", "TaskBoard")" />
            </transport>
        </datasource>
        <column-settings datastatusfield="ID" datatextfield="Text">
        </column-settings>
        <editable enabled="false">
        </editable>
    </kendo-taskboard>
5. Handle a TaskBoard Event
The TaskBoard exposes different client-side events that you can handle and use to customize the component's functions. In this tutorial, you will use the Execute event to prevent the selection of tasks by the user.
To achieve the desired behavior, attach a handler in the declaration of the TaskBoard, declare the onExecute JavaScript function and prevent the event for the SelectCardCommand's execution.
    @using Kendo.Mvc.UI

    @(Html.Kendo().TaskBoard<Kendo.Mvc.Examples.Models.Scheduler.TaskViewModel, Kendo.Mvc.Examples.Models.TaskBoard.Column>()
        .Name("taskBoard")
        .ColumnSettings(columnSettings => columnSettings
            .DataTextField("Text")
            .DataStatusField("ID")
        )
        .Columns(dataSource => dataSource
            .Ajax()
            .Read("Remote_Data_Binding_Columns_Read", "TaskBoard")
        )
        .DataTitleField("Title")
        .DataStatusField("OwnerID")
        .DataDescriptionField("Description")
        .DataCategoryField("ID")
        .Template(Html.Kendo().Template().AddHtml(templateHtml))
        .DataSource(dataSource => dataSource
            .Ajax()
            .Model(model => model.Id(p => p.TaskID))
            .Read(read => read.Action("Remote_Data_Binding_Read", "TaskBoard"))
            .Update(update => update.Action("Remote_Data_Binding_Update", "TaskBoard"))
        )
        .Editable(false)
        .Height("500")
        .Events(ev =>
        {
            ev.Execute("onExecute");
        })
    )
@using Kendo.Mvc.UI
@addTagHelper *, Kendo.Mvc

    <kendo-taskboard
        datacategoryfield="ID"
        datadescriptionfield="Description"
        datastatusfield="OwnerID"
        datatitlefield="Title"
        height="500"
        template-id="card-template"
        name="taskBoard"
        on-execute="onExecute">
        <taskboard-columns>
            <column>
                <column-template>
                    <div class="template-container">
                        <div>
                            <div class="k-card-header k-hbox">
                                <a class="k-card-title k-link" href="" data-command="SelectCardCommand">${ Title }</a><span class="k-spacer"></span>
                            </div>
                            <div class="k-card-body">
                                <p>${ (Description == null) ? ' ' : Description }</p>
                            </div>
                        </div>
                    </div>
                </column-template>
            </column>
            <datasource type="DataSourceTagHelperType.Ajax">
                <transport>
                    <read url="@Url.Action("Remote_Data_Binding_Columns_Read", "TaskBoard")"/>
                </transport>
            </datasource>
        </taskboard-columns>
        <datasource type="DataSourceTagHelperType.Ajax">
            <schema data="Data" total="Total" errors="Errors">
                 <model id="TaskID"></model>
            </schema>
            <transport>
                <read url="@Url.Action("Remote_Data_Binding_Read", "TaskBoard")" />
                <update url="@Url.Action("Remote_Data_Binding_Update", "TaskBoard")" />
            </transport>
        </datasource>
        <column-settings datastatusfield="ID" datatextfield="Text">
        </column-settings>
        <editable enabled="false">
        </editable>
    </kendo-taskboard>
    function onExecute(ev) {
        if (ev.command === "SelectCardCommand") {
            ev.preventDefault();
        }
    }
(Optional) Reference Existing TaskBoard Instances
Referencing existing instances of a component allows you to build on top of their configuration. To reference an existing Grid instance, use the jQuery.data() method:
-
To reference an existing TaskBoard instance, use the
idprovided to the component by theNameconfiguration property.<script> $(document).ready(function(){ var taskBoardReference = $("#taskBoard").data("kendoTaskBoard"); // taskBoardReference is a reference to the existing instance of the helper. }) </script> -
Use the TaskBoard client-side API to control the behavior of the widget. In this example, you will preview a task's card with the
previewCardmethod.<script> var taskBoard = $("#taskBoard").data("kendoTaskBoard"); taskBoard.previewCard(taskBoard.items().eq(3)); </script>
Explore this Tutorial in REPL
You can continue experimenting with the code sample above by running it in the Telerik REPL server playground: