Telerik UI for ASP.NET Core First Steps with CLI
Welcome to the First Steps with CLI guide on getting started with Progress® Telerik® UI for ASP.NET Core by using the command-line interface (CLI)!
The guide creates a use-case scenario which demonstrates how to start working with the suite and implements the Kendo UI DatePicker for ASP.NET Core in your project by using the DatePicker HtmlHelper or TagHelper.
The suggested approach is platform-agnostic—you can apply it for macOS, Linux, and Windows. The steps are applicable for .NET Core projects in Visual Studio Code.
To get up and running with the project:
- Download the controls
- Meet the requirements
- Create the ASP.NET Core application
- Integrate UI for ASP.NET Core in the project
- Add a license file to your app
Meeting the Requirements
Install the appropriate .Net Core SDK 2.0 or later for your platform.
Creating the Application
- If you are configuring an existing project, skip this step.
- For the full list of current commands, refer to the Microsoft guide on getting started with .NET Core.
-
Navigate to the folder of your choice by using the Terminal (cmd). Create a new folder and navigate in it.
mkdir MyASPNETCoreProject cd MyASPNETCoreProject -
Create a .NET Core application with the default web MVC template by running
dotnet new mvc. The following example demonstrates a sample response that you are expected to receive.dotnet new mvc Getting ready... The template "ASP.NET Core Web App (Model-View-Controller)" was created successfully. -- Restore succeeded. -
Start the application by running
dotnet run. The following example demonstrates a sample response that you are expected to receive.dotnet run Now listening on: http://localhost:5000 Application started. Press Ctrl+C to shut down. By using the browser, navigate to the above location and make sure that the application is properly running. After you check the application in the browser, stop the server with
Ctrl+C.
Integrating UI for ASP.NET Core
-
Configure the private Telerik NuGet feed and use either of the following approaches:
- Globally include the
telerik.comcredentials to the NuGet configuration of the user. To do that, modify (or create) theNuGet.Configfile for the user. On Windows machines, that file is located in the%appdata%\NuGet\folder. On Mac and Linux machines and depending on the exact OS distribution, the file is located in the~/.config/NuGet/or the~/.nuget/NuGet/folder. - Create a local
NuGet.Configfile in the project folder.
In all cases, the
NuGet.Configfile has to include yourtelerik.comcredentials.<?xml version="1.0" encoding="utf-8"?> <configuration> <packageSources> ... <add key="telerik.com" value="https://nuget.telerik.com/v3/index.json" /> </packageSources> <packageSourceCredentials> <telerik.com> <add key="Username" value="[ your.telerik.com@email.login ]" /> <add key="ClearTextPassword" value="[ your.telerik.com.password.in.clear.text ]" /> </telerik.com> </packageSourceCredentials> </configuration> - Globally include the
Install Telerik UI for ASP.NET Core through the CLI by running
dotnet add package Telerik.UI.for.AspNet.Core.-
Open the
Startup.csfile and register the Kendo UI services in theConfigureServicesmethod.public void ConfigureServices(IServiceCollection services) { // Add the Kendo UI services to the services container. services.AddKendo(); } -
Import the
Kendo.Mvc.UInamespace in~/Views/_ViewImports.cshtmlthrough@using Kendo.Mvc.UI. If you intend to use the Telerik UI ASP.NET Core Tag Helpers, add them with@addTagHelper *, Kendo.Mvc.@using MyASPNETCoreProject @using MyASPNETCoreProject.Models @addTagHelper *, Microsoft.AspNetCore.Mvc.TagHelpers @addTagHelper *, Kendo.Mvc @using Kendo.Mvc.UI -
Include the client-side resources.
- The CDN links and/or package versions have to point to the same UI for ASP.NET Core version which your project references.
- The Kendo UI scripts have to be placed after
jQuery. - As of R3 2023 the Kendo UI bundles do not include the jQuery library in their
jsdirectories and you can use any available jQuery source you prefer (https://jquery.com/download/).
5.1 Go to
~\Views\Shared\_Layout.cshtmland add the theme of your choice to the<head>of the document. Since the Microsoft project uses Bootstrap, you can use the Telerik UI Bootstrap theme to match it.5.2 The Microsoft template comes with a jQuery script reference in the body. Find it and move it to the head.
5.3 After
jQuery, copy and paste the scripts from this snippet. Make sure that the versions matchKendo.Mvc.dll.<link rel="stylesheet" href="https://kendo.cdn.telerik.com/themes/10.0.1/bootstrap/bootstrap-main.css" /> <script src="https://kendo.cdn.telerik.com/2024.4.1112/js/kendo.all.min.js"></script> <script src="https://kendo.cdn.telerik.com/2024.4.1112/js/kendo.aspnetmvc.min.js"></script> If you prefer to include the client-side resources from a local source instead of CDNs, consider the following article: [Local Client-side Resources](https://docs.telerik.com/aspnet-core/installation/getting-started-copy-client-resources#including-client-side-resources) -
Use a Kendo UI widget by adding the snippet from the following example to
~/Views/Home/Index.cshtml.<div class="text-center"> <h2>Kendo UI DatePicker</h2> @(Html.Kendo().DatePicker() .Name("my-picker") ) </div><div class="text-center"> <h2>Kendo UI DatePicker</h2> <kendo-datepicker name="my-picker"/> </div> -
Navigate to the project folder by using the Terminal (cmd) and run it by using the
dotnet runcommand. The Index page will display a Kendo UI DatePicker. As a result, the following sample page is created.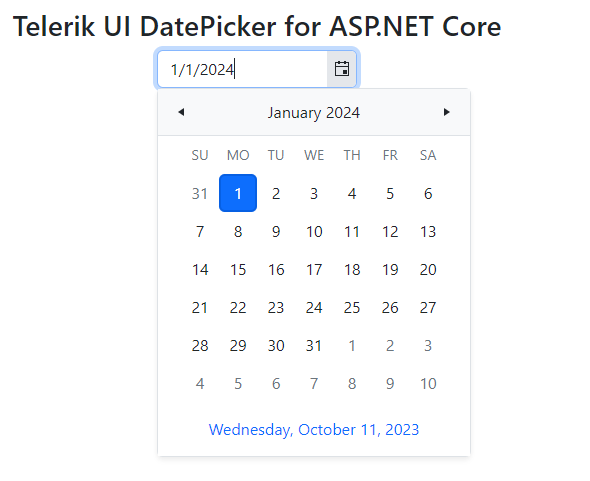
The default casing for JSON strings in ASP.NET Core is camelCase. The Telerik UI components that are data-bound depend on PascalCase formatted response from the server. If the JSON serialization isn't configured properly, the UI components will display wrong data. To find out how to configure the application to return the data in Pascal-case, refer to the JSON Serialization article.
Adding Your License File
Using any client-side assets from the Kendo UI CDN or the @progress/kendo-ui NPM package requires you to add a Kendo UI for jQuery license file to your application. A missing license file triggers a banner, a watermark, and causes a warning message in the browser's console.
To generate your license file and add it to your application, follow the instructions in the Adding a License File article.
Next Steps
- Use data-bound widgets
- Ways to download and install UI for ASP.NET Core (overview)
- Create your own custom bundles
- Explore the helper script dependencies
- How to update UI for ASP.NET Core to a new version
- Switch from Trial to Commercial License