Radial Gauge
The RadRadialGauge control allows you to display the scale's range in a radial form.
Setting up the gauge
The following example shows a RadRadialGauge's basic set up.
<telerikGauges:RadRadialGauge x:Name="gauge">
<telerikGauges:RadRadialGauge.Axis>
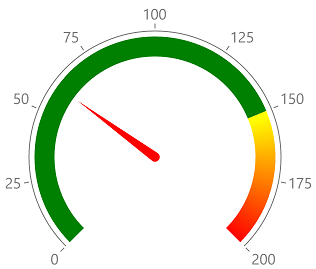
<telerikGauges:GaugeLinearAxis Maximum="200"
Minimum="0"
Step="25" />
</telerikGauges:RadRadialGauge.Axis>
<telerikGauges:RadRadialGauge.Indicators>
<telerikGauges:GaugeNeedleIndicator Offset="30" Value="60" />
</telerikGauges:RadRadialGauge.Indicators>
<telerikGauges:RadRadialGauge.Ranges>
<telerikGauges:GaugeRangesDefinition>
<telerikGauges:GaugeRange Color="Green"
From="0"
To="150" />
<telerikGauges:GaugeGradientRange From="150" To="200">
<telerikCommon:RadGradientStop Offset="150" Color="Yellow" />
<telerikCommon:RadGradientStop Offset="200" Color="Red" />
</telerikGauges:GaugeGradientRange>
</telerikGauges:GaugeRangesDefinition>
</telerikGauges:RadRadialGauge.Ranges>
</telerikGauges:RadRadialGauge>
RadRadialGauge radRadialGauge = new RadRadialGauge();
radRadialGauge.Axis = new GaugeLinearAxis() { Minimum = 0, Maximum = 200, Step = 25 };
radRadialGauge.Indicators.Add(new GaugeNeedleIndicator() { Value = 60, Offset = 30 });
GaugeRangesDefinition rangesDefinition = new GaugeRangesDefinition();
rangesDefinition.Ranges.Add(new GaugeRange() { From = 0, To = 150, Color = Color.Green });
GaugeGradientRange gradientRange = new GaugeGradientRange() { From = 150, To = 200 };
gradientRange.GradientStops.Add(new RadGradientStop(Color.Yellow, 150));
gradientRange.GradientStops.Add(new RadGradientStop(Color.Red, 200));
rangesDefinition.Ranges.Add(gradientRange);
radRadialGauge.Ranges = rangesDefinition;
This is the result:
A sample Radial Gauge example can be found in the Gauge/GaugeTypes folder of the SDK Samples Browser application.
Setting rotation and radius
The radial gauge allows you to define the radius of its axis. This can be done via the AxisRadiusFactor property of RadRadialGauge. Read more about the property in the Positioning help article.
You can also control the start angle, the sweep angle and sweep direction of the axis. This can be done via the following properties:
- StartAngle: The start angle determines the origin position of the axis.
- SweepAngle: The sweep angle defines the size of the axis' arc. For example, if the start angle is 90 and the sweep angle is 30, the axis will be drawn between the 90th and 120th angle. If the sweep direction is counter-clockwise, the axis will be drawn between 60 and 90.
- SweepDirection: You can use this property to set the axis sweep direction - clockwise or counter-clockwise.