Create Master-Detail Reports with Tables
Environment
| Product | Progress® Telerik® Reporting |
Description
How can I create a Master-Detail report by using a Table report item that contains the detail data in Visual Studio Report Designer?
Solution
To achieve the desired scenario:
The master report data in this example consists of product categories from the AdventureWorks database. The detail table displays product names and numbers. The example uses the ReportItem.DataObject to filter the detail table by a product category.
Creating the Master Report
The master report will contain only a simple listing of product categories.
- Create a new Telerik Report Library to contain the report. As a result, the Choose Report Type dialog opens.
- Select Band Report Wizard and enter a name for the report class.
On the Choose Data Source page of the Band Report Wizard, click the Add New Data Source button and select the SqlDataSource Component. On the Choose Your Data Connection page of the wizard, set up the data connection to the AdventureWorks database, save it so you can use it later when creating the Table item. Click Next.
-
Enter the SQL statement below and click the Next button.
SELECT ProductCategoryID, Name FROM Production.ProductCategory In the Design Data Layout page of the wizard, add the Name column to the detail section and click the Next button. Continue taking the defaults until you finish the Wizard.
Creating the Detail Table
- Resize the detail section to create some vertical space for the Table item.
- Drag the Table Wizard item from the Visual Studio Toolbox to the detail section of the report.
- On the Choose Data Source page of the Table Wizard, click the Add New Data Source button and select the SqlDataSource Component. On the Choose Your Data Connection page of the wizard, select the already created data connection and click Next.
-
Enter the following SQL statement. Click Finish.
SELECT
    P.Name,ProductID,ProductNumber,PC.ProductCategoryID
FROM
    Production.Product P,
    Production.ProductSubcategory PS,
    Production.ProductCategory PC
WHERE
    P.ProductSubcategoryID=PS.ProductSubcategoryID
    AND PS.ProductCategoryID=PC.ProductCategoryID
In the Arrange Fields page of the Table Wizard, add the ProductNumber and Name fields to the Table columns and click the Next button. Continue taking the defaults until you finish the process.
Configuring the Table Filter
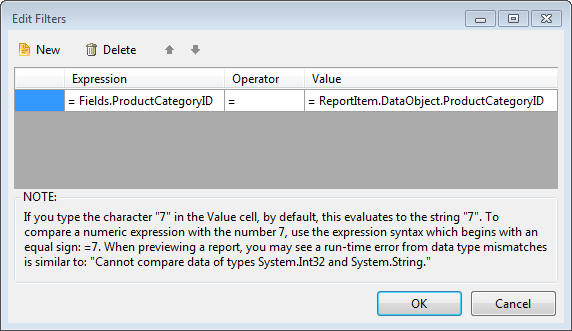
This step creates a filter that uses the ReportItem.DataObject property to pass in the current ProductCategoryID for each record and the detail table prints all products that have that ProductCategoryID.
- Select the Table item.
- In the Property window, navigate to the Filters property and click the ellipses.
-
Click the New button to create a new filter. In the Expression drop-down for the filter, select
=Fields.ProductCategoryID. Leave the operator at the default equals to (=) sign. In the Value property drop-down, enter the=ReportItem.DataObject.ProductCategoryIDexpression.
Click the OK button to close the dialog.
Click the Preview button to preview the report. Note that product numbers and names from the detail table are displayed under each product category from the master report.

You can create the same report layout with the Standalone Report Designer.