Item Alignment
Since our Q3 2014 official release the RadToolBar provides a mechanism to customize the alignment of the elements inside it. The default alignment is left. This means that the first element is hosted on the leftmost side of the toolbar and each next is visualized on the right of the previous one. Refer to Figure 1 for clarification.

The code that produces this layout is the following:
<telerik:RadToolBar>
    <telerik:RadButton Content="FILE" />
    <telerik:RadButton Content="EDIT " />
    <telerik:RadButton Content="VIEW" />
    <telerik:RadButton Content="BUILD" />
    <telerik:RadButton Content="DEBUG" />
    <telerik:RadButton Content="HELP" />
 </telerik:RadToolBar>

<telerik:RadToolBar>
    <telerik:RadButton Content="FILE" />
    <telerik:RadButton Content="EDIT " />
    <telerik:RadButton Content="VIEW" />
    <telerik:RadButton Content="BUILD" />
    <telerik:RadButton Content="DEBUG" />
    <telerik:RadButton Content="HELP" telerik:RadToolBar.ItemAlignment="Right"/>
</telerik:RadToolBar>
This code will produce the result in Figure 3.
<telerik:RadToolBar>
    <telerik:RadButton Content="FILE"/>
    <telerik:RadButton Content="EDIT "/>
    <telerik:RadButton Content="VIEW" />
    <telerik:RadButton Content="BUILD"/>
    <telerik:RadButton Content="DEBUG" telerik:RadToolBar.ItemAlignment="Right"/>
    <telerik:RadButton Content="HELP" telerik:RadToolBar.ItemAlignment="Right"/>
</telerik:RadToolBar>

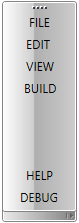
If you configure the RadToolBar to be vertical, the Left setting of the ItemAlignment property will act as Top and the Right - as Bottom. The result of the following code is visualized on Figure 4.
<telerik:RadToolBar Orientation="Vertical">
    <telerik:RadButton Content="FILE"/>
    <telerik:RadButton Content="EDIT "/>
    <telerik:RadButton Content="VIEW" />
    <telerik:RadButton Content="BUILD"/>
    <telerik:RadButton Content="DEBUG" telerik:RadToolBar.ItemAlignment="Right"/>
    <telerik:RadButton Content="HELP" telerik:RadToolBar.ItemAlignment="Right"/>
</telerik:RadToolBar>