Create Custom Editor with RadGridView
The purpose of this tutorial is to show you how to create a custom editor with RadGridView. If you need a custom editor to edit specific data, you can use one of the following approaches:
Use the CellEditTemplate property of GridViewColumn.
Create a custom column by inheriting from GridViewBoundColumnBase.
Both approaches have some advantages and disadvantages. Although it is quite easy to implement the first option, you cannot easily apply this to all RadGridView instances in your application, and more importantly - this bypasses RadGridView's validation and editing engine.
This tutorial will demonstrate you the second approach by creating a column with an embedded color picker control as an editor.
- The first step is to create a class that inherits from GridViewBoundColumnBase (this is the base class used to create a column with editing capabilities). Name the class RadColorPickerColumn.
Example 1: Creating the RadColorPickerColumn class
There are several methods you should override:
- CreateCellElement() – override this method if you want to customize how cells that belongs to this column will look like. This method is called when GridViewCell is prepared and returned element will be used as a ContentPresenter. If you do not override this method a TextBlock control will be used as a default presenter.
Example 2: Overriding the CreateCellElement method
You should note two things here: first, a border with bound background to the color from data item is created and second, a custom converter is used. The next code snippet shows you the code for the ColorToBrushConverter.
Example 3: The ColorToBrushConverter class
- CreateCellEditElement() – override this method to create custom editor element (according to type of the property or some other business logic). This method must be overridden otherwise GridViewCell will have no content when enters into edit mode.
Example 4: Overriding the CreateCellEditElement method
In this method an instance of a RadColorPicker control is created and returned. In order to work properly as an editor you have to bind this editor to the underlying data property. This is done in the CreateValueBinding() method:
Example 5: The CreateValueBinding() method
You should set BindingMode to TwoWay, because this is an editor and you need to update data property which is bound to the parent GridViewColumn. The NotifyOnValidationError and ValidatesOnExceptions properties are related to validation engine (if any error or exception occurs while you set new value to the data object will result as validation error and editor will enter into invalid state (if editor has such state)). Set UpdateSourceTrigger to Explicit and allow RadGridView to validate and update the value of the data item at the right moment. Of course every TwoWay binding requires a path, so you take the path from the DataMemberBinding property.
Another interesting line of the CreateCellEditElement() method is: cellEditElement.MainPalette = this.MainPalette. This line shows how you can transfer properties from column to the actual editor. In order to allow such properties and transfer them to custom column instance you have to override CopyPropertiesFrom() method.
- CopyPropertiesFrom()
Example 6: Overriding the CopyPropertiesFrom method
Here is the full code for the RadColorPickerColumn class:
Example 7: The final RadColorPickerColumn class
- Use the just created custom column in XAML like the code below:
Example 8: Defining a RadColorPickerColumn in XAML
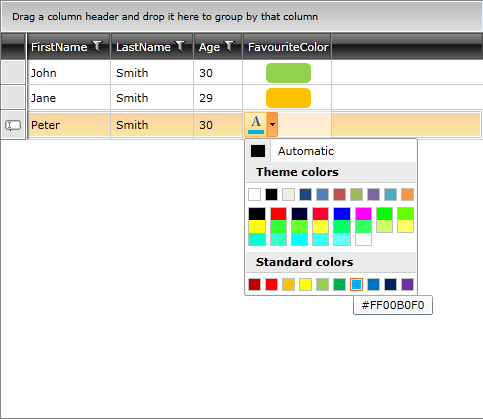
The final result should be similar to the image below:
Figure 1: The RadColorPickerColumn
Integrating the RadColorPickerColumn into the Validation and Editing Engine
In order to integrate the RadColorPickerColumn into RadGridView's validation and editing engine, you should override two additional methods:
- UpdateSourceWithEditorValue()
Example 9: Overriding the UpdateSourceWithEditorValue method
- GetNewValueFromEditor()
Example 10: Overriding the GetNewValueFromEditor method
As you can see first method gathers required information from the actual editor (used by the validation engine), after UI validation is successful then new value is submitted to the data item via second method. This second method returns errors (if any) that occurred while new value is set to the data item (Data layer validation).
In a scenario when there is a column.CellEditTemplate defined, the new value of the editor is not available in the arguments of the CellEditEnded event raised when commiting an edit. To get the right value in e.NewValue, you should override the column's GetNewValueFromEditor method.