Getting Started with WPF DataForm
This article will walk your through the creation of a sample application that contains RadDataForm and will show you how to:
Assembly References
To use the RadDataForm in your projects you have to add references to the following assemblies:
- Telerik.Windows.Controls
- Telerik.Windows.Controls.Data
- Telerik.Windows.Controls.Input
- Telerik.Windows.Data
You can find the required assemblies for each control from the suite in the Controls Dependencies help article.
Adding Telerik Assemblies Using NuGet
To use RadDataForm when working with NuGet packages, install the Telerik.Windows.Controls.Data.for.Wpf.Xaml package. The package name may vary slightly based on the Telerik dlls set - Xaml or NoXaml
Read more about NuGet installation in the Installing UI for WPF from NuGet Package article.
Adding RadDataForm to the Project
Create a new WPF project;
Add the RadDataForm to the Grid:
Example 1: Adding RadDataForm in XAML
  <UserControl xmlns:telerik="http://schemas.telerik.com/2008/xaml/presentation">
    <Grid x:Name="LayoutRoot" Background="White">
      <telerik:RadDataForm x:Name="RadDataForm1" />
    </Grid>
  </UserControl>
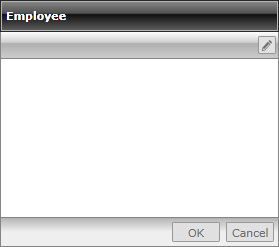
Now if you run the application, you will see the empty RadDataForm:
Figure 1: Empty RadDataForm
Binding RadDataForm to a Single Item
Firstly, for the purpose of this tutorial, we will create a new Employee class with a couple of exposed properties:
Example 2: Creating an Employee Class with Some Exposed Properties
public class Employee
{
    public string FirstName
    {
        get;
        set;
    }
    public string LastName
    {
        get;
        set;
    }
    public string Occupation
    {
        get;
        set;
    }
    public DateTime StartingDate
    {
        get;
        set;
    }
    public bool IsMarried
    {
        get;
        set;
    }
    public int Salary
    {
        get;
        set;
    }
    public Gender Gender
    {
        get;
        set;
    }
}
Public Class Employee
    Public Property FirstName() As String
        Get
            Return m_FirstName
        End Get
        Set(value As String)
            m_FirstName = value
        End Set
    End Property
    Private m_FirstName As String
    Public Property LastName() As String
        Get
            Return m_LastName
        End Get
        Set(value As String)
            m_LastName = value
        End Set
    End Property
    Private m_LastName As String
    Public Property Occupation() As String
        Get
            Return m_Occupation
        End Get
        Set(value As String)
            m_Occupation = value
        End Set
    End Property
    Private m_Occupation As String
    Public Property StartingDate() As DateTime
        Get
            Return m_StartingDate
        End Get
        Set(value As DateTime)
            m_StartingDate = value
        End Set
    End Property
    Private m_StartingDate As DateTime
    Public Property IsMarried() As Boolean
        Get
            Return m_IsMarried
        End Get
        Set(value As Boolean)
            m_IsMarried = value
        End Set
    End Property
    Private m_IsMarried As Boolean
    Public Property Salary() As Integer
        Get
            Return m_Salary
        End Get
        Set(value As Integer)
            m_Salary = value
        End Set
    End Property
    Private m_Salary As Integer
    Public Property Gender() As Gender
        Get
            Return m_Gender
        End Get
        Set(value As Gender)
            m_Gender = value
        End Set
    End Property
    Private m_Gender As Gender
End Class
In the example above Gender is of type enum:
Example 3: Create Gender Enumeration
public enum Gender
{
    Female,
    Male
}
Public Enum Gender
    Female
    Male
End Enum
Note that in case you want to be notified on the changes made on the data item, the class Employee should implement the INotifyPropertyChanged interface and raise the PropertyChanged event every time a property value changes.
Once the class Employee is defined, you may use it for creating an object of this type and bind it to RadDataForm:
Example 4: Binding a Single Item to RadDataForm
Employee employee = new Employee()
{
    FirstName = "Sarah",
    LastName = "Blake",
    Occupation = "Supplied Manager",
    StartingDate = new DateTime(2005, 04, 12),
    IsMarried = true,
    Salary = 3500,
    Gender = Gender.Female
};
this.RadDataForm1.CurrentItem = employee;
Dim employee As New Employee() With {
 .FirstName = "Sarah",
 .LastName = "Blake",
 .Occupation = "Supplied Manager",
 .StartingDate = New DateTime(2005, 4, 12),
 .IsMarried = True,
 .Salary = 3500,
 .Gender = Gender.Female
}
Me.RadDataForm1.CurrentItem = employee
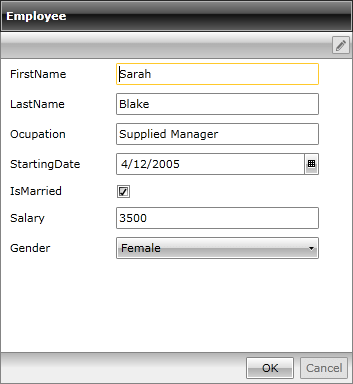
After you run the application you should see the following:
Figure 2: RadDataForm bound to a single item
Binding RadDataForm to a collection of custom objects
We will create a simple EmployeeService class with a single static method - GetEmployees() that will return an ObservableCollection<Employee>, containing several hard-coded employees:
Example 5: Creating an EmployeeService class with a static GetEmployees() method
public class EmployeeService
{
    public static ObservableCollection<Employee> GetEmployees()
    {
        ObservableCollection<Employee> employees = new ObservableCollection<Employee>();
        employees.Add(new Employee()
        {
            FirstName = "Sarah",
            LastName = "Blake",
            Occupation = "Supplied Manager",
            StartingDate = new DateTime(2005, 04, 12),
            IsMarried = true, Salary = 3500,
            Gender = Gender.Female
        });
        employees.Add(new Employee()
        {
            FirstName = "Jane",
            LastName = "Simpson",
            Occupation = "Security",
            StartingDate = new DateTime(2008, 12, 03),
            IsMarried = true,
            Salary = 2000,
            Gender = Gender.Female
        });
        employees.Add(new Employee()
        {
            FirstName = "John",
            LastName = "Peterson",
            Occupation = "Consultant",
            StartingDate = new DateTime(2005, 04, 12),
            IsMarried = false, Salary = 2600,
            Gender = Gender.Male
        });
        employees.Add(new Employee()
        {
            FirstName = "Peter",
            LastName = "Bush",
            Occupation = "Cashier",
            StartingDate = new DateTime(2005, 04, 12),
            IsMarried = true,
            Salary = 2300,
            Gender = Gender.Male
        });
        return employees;
    }
}
Public Class EmployeeService
    Public Shared Function GetEmployees() As ObservableCollection(Of Employee)
        Dim employees As New ObservableCollection(Of Employee)()
        employees.Add(New Employee() With { _
          .FirstName = "Sarah", _
          .LastName = "Blake", _
          .Occupation = "Supplied Manager", _
          .StartingDate = New DateTime(2005, 4, 12), _
          .IsMarried = True, _
          .Salary = 3500, _
          .Gender = Gender.Female _
        })
        employees.Add(New Employee() With { _
          .FirstName = "Jane", _
          .LastName = "Simpson", _
          .Occupation = "Security", _
          .StartingDate = New DateTime(2008, 12, 3), _
          .IsMarried = True, _
          .Salary = 2000, _
          .Gender = Gender.Female _
        })
        employees.Add(New Employee() With { _
          .FirstName = "John", _
          .LastName = "Peterson", _
          .Occupation = "Consultant", _
          .StartingDate = New DateTime(2005, 4, 12), _
          .IsMarried = False, _
          .Salary = 2600, _
          .Gender = Gender.Male _
        })
        employees.Add(New Employee() With { _
          .FirstName = "Peter", _
          .LastName = "Bush", _
          .Occupation = "Cashier", _
          .StartingDate = New DateTime(2005, 4, 12), _
          .IsMarried = True, _
          .Salary = 2300, _
          .Gender = Gender.Male _
        })
        Return employees
    End Function
End Class
Afterwards, all you need to do is to set the ItemsSource of RadDataForm:
Example 6: Set the ItemsSource of the RadDataForm to the Observable Collection
this.RadDataForm1.ItemsSource = EmployeeService.GetEmployees();
Me.RadDataForm1.ItemsSource = EmployeeService.GetEmployees()
On running the application, you should see the following:
Figure 3: RadDataForm bound to a collection of items
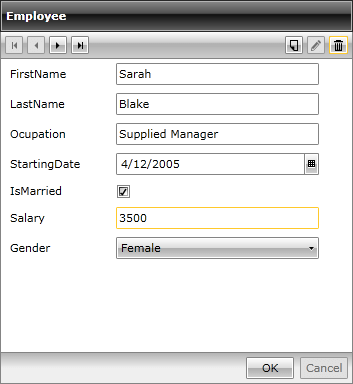
As you may see, in this case the navigation buttons are displayed, thus allowing you to run through all the objects in the collection. Furthermore, you are allowed to add new item, delete and edit the current one.
Setting a Theme
The controls from our suite support different themes. You can see how to apply a theme different than the default one in the Setting a Theme help article.
Changing the theme using implicit styles will affect all controls that have styles defined in the merged resource dictionaries. This is applicable only for the controls in the scope in which the resources are merged.
To change the theme, you can follow the steps below:
Choose between the themes and add reference to the corresponding theme assembly (ex: Telerik.Windows.Themes.Windows8.dll). You can see the different themes applied in the Theming examples from our WPF Controls Examples application.
-
Merge the ResourceDictionaries with the namespace required for the controls that you are using from the theme assembly. For the RadDataForm, you will need to merge the following resources:
- Telerik.Windows.Controls
- Telerik.Windows.Controls.Input__
- Telerik.Windows.Controls.Data
Example 7 demonstrates how to merge the ResourceDictionaries so that they are applied globally for the entire application.
Example 7: Merge the ResourceDictionaries
<Application.Resources>
    <ResourceDictionary>
        <ResourceDictionary.MergedDictionaries>
            <ResourceDictionary Source="/Telerik.Windows.Themes.Windows8;component/Themes/System.Windows.xaml"/>
            <ResourceDictionary Source="/Telerik.Windows.Themes.Windows8;component/Themes/Telerik.Windows.Controls.xaml"/>
            <ResourceDictionary Source="/Telerik.Windows.Themes.Windows8;component/Themes/Telerik.Windows.Controls.Input.xaml"/>
            <ResourceDictionary Source="/Telerik.Windows.Themes.Windows8;component/Themes/Telerik.Windows.Controls.Data.xaml"/>
        </ResourceDictionary.MergedDictionaries>
    </ResourceDictionary>
</Application.Resources>
Alternatively, you can use the theme of the control via the StyleManager.
Figure 4 shows a RadDataBar with the Windows8 theme applied.
Figure 4: RadDataForm with the Windows8 theme

Telerik UI for WPF Learning Resources
- Telerik UI for WPF DataForm Component
- Getting Started with Telerik UI for WPF Components
- Telerik UI for WPF Installation
- Telerik UI for WPF and WinForms Integration
- Telerik UI for WPF Visual Studio Templates
- Setting a Theme with Telerik UI for WPF
- Telerik UI for WPF Virtual Classroom (Training Courses for Registered Users)
- Telerik UI for WPF License Agreement