Formatting Appointments
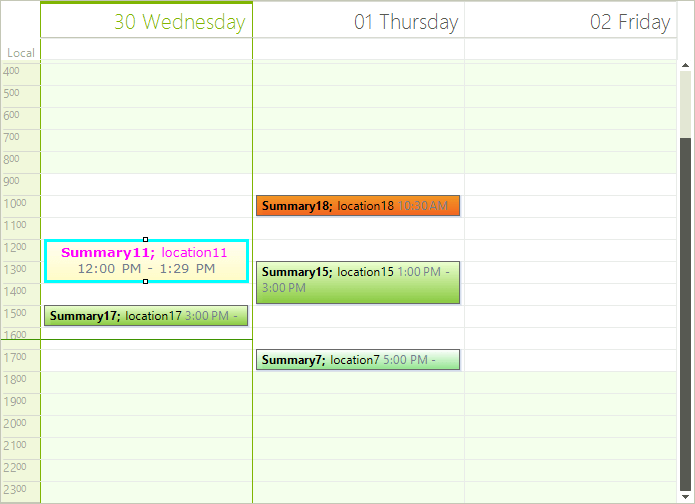
Appointments appearance in RadScheduler can be customized using the AppointmentFormatting event.
Appointment elements are created only for the currently visible cells and are being reused when scrolling or navigating backwards/forwards in the RadScheduler . In order to prevent applying the formatting to other appointment elements, all styles should be reset for the rest of the appointment elements.
The code snippet below demonstrates how to change the font, fore color, border color and text alignment for the selected appointment element:
Formatting Appointments
Font font = new Font("Verdana", 10f, FontStyle.Bold);

private void radScheduler1_AppointmentFormatting(object sender, Telerik.WinControls.UI.SchedulerAppointmentEventArgs e)
{
    if (e.AppointmentElement.Selected)
    {
        e.AppointmentElement.Font = font;
        e.AppointmentElement.ForeColor = Color.Fuchsia;
        e.AppointmentElement.TextAlignment = ContentAlignment.MiddleCenter;
        e.AppointmentElement.UseDefaultPaint = true;
        e.AppointmentElement.BorderColor = Color.Aqua;
        e.AppointmentElement.BorderBoxStyle = BorderBoxStyle.SingleBorder;
        e.AppointmentElement.BorderWidth = 3;
    }
    else
    {
        e.AppointmentElement.ResetValue(VisualElement.FontProperty, ValueResetFlags.Local);
        e.AppointmentElement.ResetValue(VisualElement.ForeColorProperty, ValueResetFlags.Local);
        e.AppointmentElement.ResetValue(LightVisualElement.TextAlignmentProperty, ValueResetFlags.Local);
        e.AppointmentElement.UseDefaultPaint = false;
        e.AppointmentElement.ResetValue(LightVisualElement.BorderColorProperty, ValueResetFlags.Local);
        e.AppointmentElement.ResetValue(LightVisualElement.BorderWidthProperty, ValueResetFlags.Local);
        e.AppointmentElement.ResetValue(LightVisualElement.BorderBoxStyleProperty, ValueResetFlags.Local);
    }
}
Private font As New Font("Verdana", 10.0F, FontStyle.Bold)
Private Sub RadScheduler1_AppointmentFormatting(sender As Object, e As Telerik.WinControls.UI.SchedulerAppointmentEventArgs) Handles RadScheduler1.AppointmentFormatting
    If e.AppointmentElement.Selected Then
        e.AppointmentElement.Font = font
        e.AppointmentElement.ForeColor = Color.Fuchsia
        e.AppointmentElement.TextAlignment = ContentAlignment.MiddleCenter
        e.AppointmentElement.UseDefaultPaint = True
        e.AppointmentElement.BorderColor = Color.Aqua
        e.AppointmentElement.BorderBoxStyle = BorderBoxStyle.SingleBorder
        e.AppointmentElement.BorderWidth = 3
    Else
        e.AppointmentElement.ResetValue(VisualElement.FontProperty, ValueResetFlags.Local)
        e.AppointmentElement.ResetValue(VisualElement.ForeColorProperty, ValueResetFlags.Local)
        e.AppointmentElement.ResetValue(LightVisualElement.TextAlignmentProperty, ValueResetFlags.Local)
        e.AppointmentElement.UseDefaultPaint = False
        e.AppointmentElement.ResetValue(LightVisualElement.BorderColorProperty, ValueResetFlags.Local)
        e.AppointmentElement.ResetValue(LightVisualElement.BorderWidthProperty, ValueResetFlags.Local)
        e.AppointmentElement.ResetValue(LightVisualElement.BorderBoxStyleProperty, ValueResetFlags.Local)
    End If
End Sub
Figure 1: Formatting Appointments
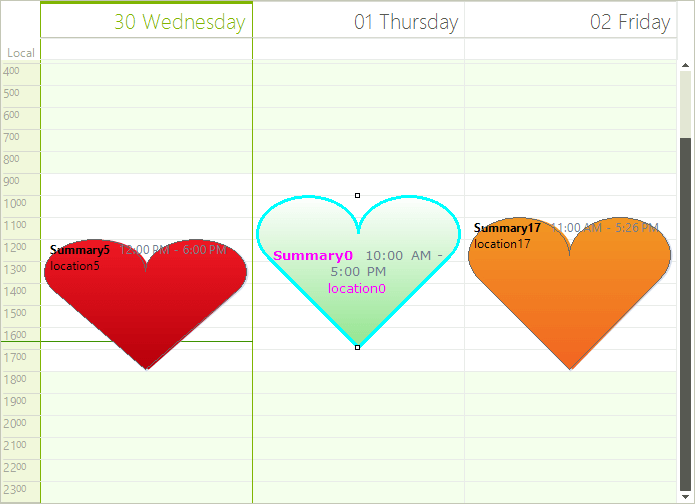
It is possible to change the appointments’ shape setting the SchedulerElement.AppointmentShape property to the desired shape. Changing the AppointmentShape will also change the shape of the shadow and the appointment type indicator (tentative/busy).#_[C#] _
this.radScheduler1.SchedulerElement.AppointmentShape = new HeartShape();
Me.RadScheduler1.SchedulerElement.AppointmentShape = New HeartShape()
Figure 2: Custom Shapes