Adding a Custom Panel Between Dates Area and Footer in UI for WinForms Calendar
Environment
| Product Version | Product | Author |
|---|---|---|
| 2025.3.812 | RadCalendar for WinForms | Dinko Krastev |
Description
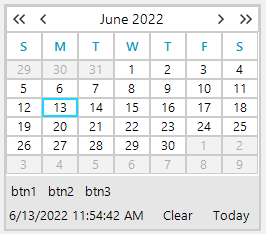
In this tutorial, we will demonstrate how to add a custom panel above the elements inside the footer (where the <Today> button resides) in the UI for WinForms Calendar. This panel can be populated with additional buttons that, when clicked, can select a specific date in the calendar.
Solution
To create a custom space above the footer, use a StackLayoutElement and add it to the CalendarStatusElement.Children collection. Follow these steps:
Here is an example:
public Form1()
{
    InitializeComponent();
    this.radCalendar1.ShowFooter = true; // Enable the footer

    // Create a panel and set its orientation
    StackLayoutElement panel = new StackLayoutElement();
    panel.Orientation = Orientation.Horizontal;

    // Add child elements to the panel
    RadButtonElement btn1 = new RadButtonElement() { Text = "btn1" };
    RadButtonElement btn2 = new RadButtonElement() { Text = "btn2" };
    RadButtonElement btn3 = new RadButtonElement() { Text = "btn3" };
    panel.Children.Add(btn1);
    panel.Children.Add(btn2);
    panel.Children.Add(btn3);

    // Dock the panel at the top of the footer area
    DockLayoutPanel.SetDock(panel, Telerik.WinControls.Layouts.Dock.Top);

    // Insert the panel into the footer's children collection
    this.radCalendar1.CalendarElement.CalendarStatusElement.Children[0].Children.Insert(0, panel);
}
You can subscribe to the Click event on each button and add your custom logic in the event handlers, then further manipulate the RadCalendar dates. Customize the StackLayoutElement further to match your requirements.