Customizing Markers in RadMap
This article explains how to customize the appearance of the Markers on RadMap.
You can quickly navigate through the sections in this list:
Marker as a DOM Element—explains how a Marker is rendered so you can know how to modify it.
Change Marker’s Color and Size—the basic scenario where you only need to change the color and, optionally, the size.
Change Marker’s Image—replace the marker icon with a custom image.
-
Fine-tune Tooltip’s and Marker’s Positions—handling side effects from the customization
Marker as a DOM Element
RadMap’s Marker, as part of the HTML page, is rendered as a plain <span>tag. By design, the Shape property defines the look of the Marker. Behind the scenes, this is achieved just by modifying the default class name of the <span> tag.
For example, a Shape property with value myCustomShape or my-custom-shape will render this Marker element - <span class="k-marker k-icon k-i-marker-my-custom-shape"></span>. As you can see, values with camelCase style are converted to words separated with dashes. The function used to convert the words is as follows:
function toHyphens(str) {
    return str.replace(/([a-z][A-Z])/g, function (g) {
        return g.charAt(0) + '-' + g.charAt(1).toLowerCase();
    });
}
Note: In versions prior R3 2018 the generated element is
<span class="k-marker k-marker-my-custom-shape"></span>.
Later, this class can be used to specify the look of the Marker using a CSS rule.
Example 1: Setting the Shape property to a custom value
<telerik:RadMap RenderMode="Lightweight" runat="server" ID="RadMap1">
    <MarkersCollection>
        <telerik:MapMarker Shape="myCustomShape"></telerik:MapMarker>
        <telerik:MapMarker Shape="my-custom-shape"></telerik:MapMarker>
    </MarkersCollection>
</telerik:RadMap>
Change Marker’s Color and Size
This is the most basic scenario and it is the easiest one to implement. With the information from the Marker as a DOM Element section, you can see how a Marker can be identified in the DOM,in order to be targeted by a CSS selector.
It is important to note that, by default, Marker icons are rendered via glyph icons under modern browsers, and fall back to plain images when glyph icons are not supported by the browser. The solution here works only for modern browsers where glyph icons are supported. If you need a solution for IE versions prior toIE9, see the Change Marker’s Image section.
In order to change the marker color, you will need to decorate the :before pseudo element of the Marker’s span tag.
Figure 1: The result from the code in Example 2.
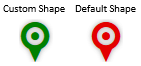
Example 2: Setting a custom color to a marker.
<style type="text/css">
    .RadMap .k-marker.k-i-marker-my-custom-shape:before {
        color: green;
    }
</style>

<telerik:RadMap RenderMode="Lightweight" runat="server" ID="RadMap1" Zoom="1">
    <MarkersCollection>
        <telerik:MapMarker Shape="myCustomShape">
            <LocationSettings Latitude="0" Longitude="0"/>
        </telerik:MapMarker>
        <telerik:MapMarker Shape="pinTarget">
            <LocationSettings Latitude="0" Longitude="50"/>
        </telerik:MapMarker>
    </MarkersCollection>
</telerik:RadMap>
Optionally, you can also change the marker size (Figure 2) by changing the font-size value of the :before pseudo element (Example 3).
Changing the marker’s size will always cause the marker to be rendered at an incorrect position according the longitude and latitude values. The Fine-tune Marker’s and Tooltip’s Position section explains how to handle this situation.
Figure 2: Reduced Marker’s size using the CSS from Example 3.

Example 3: Using the font-size CSS property to change the size of the Marker’s pseudo element.
.RadMap .k-marker.k-i-marker-my-custom-shape:before {
    color: green;
    font-size:25px;
}
Change Marker’s Image
In order to replace the Marker’s glyph icon with an actual image, you should first reset the :before pseudo element’s decoration, and use the CSS selector to apply the styles needed to show the image.
In order to apply the image, the Marker ’s span element should be resized. This will break the position of the marker. To fix that, see the Fine-tune Marker’s and Tooltip’s Position section.
Example 4: Replacing the glyph icon with an image.
<style type="text/css">
    .RadMap .k-marker.k-i-marker-my-custom-shape:before {
        content:none;
        font-size:0;
        margin:0;
        padding:0;
        height:0;
        width:0;
    }

    .RadMap .k-marker.k-i-marker-my-custom-shape {
        background-image:url('[Path-to-Image]');
        background-repeat:no-repeat;
        background-position: 0 0;
        width:[Image-Width];
        height:[Image-Height];
    }
</style>

<telerik:RadMap RenderMode="Lightweight" runat="server" ID="RadMap1" Zoom="1">
    <MarkersCollection>
        <telerik:MapMarker Shape="myCustomShape">
            <LocationSettings Latitude="0" Longitude="0" />
        </telerik:MapMarker>
        <telerik:MapMarker Shape="pinTarget">
            <LocationSettings Latitude="0" Longitude="50" />
        </telerik:MapMarker>
    </MarkersCollection>
</telerik:RadMap>
Fine-tune Tooltip’s and Marker’s Positions
Changing the size of the Marker element will always lead to incorrect position of the marker itself and its tooltip. You can see Figure 3 and Figure 4.
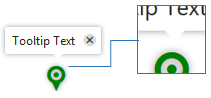
Figure 3 showcases the wrong tooltip appearance after changing the marker size(Example 3) in Change Marker’s Color and Size. You can fix that by following the instructions in the Fine-tune the Tooltip Appearance section.
Figure 3: Incorrect tooltip appearance for a resized marker—callout is not aligned to the marker.
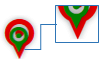
In Figure 4, you can see the wrong Marker’s position,showcased by using two markers—a custom one and a default one. They are placed at the same geographic location, but the custom Marker’s position is incorrect. You can fix that by following the instructions in Fine-tune the Marker’s Position section
Figure 4: Incorrect Marker’s position for a resized marker.
The list below explains the sections that you need to follow based on the situation.
-
When the Marker’s icon size is changed:
-
When the Marker’s icon is replaced with a custom image:
1. Fine-tune the Tooltip Appearance
To make sure the tooltip looks as expected when its marker size is changed,you should set the same height to the :before pseudo element and to the marker’s span element. Afterwards, you should modify the left and top margins of the :before pseudo element to align the glyph icon according to the marker’s element.
Figure 5: Using the CSS from Example 5 to fine-tune the tooltip.

Example 5: Fine-tuning the tooltip’s appearance.
<style type="text/css">
    .RadMap .k-marker.k-i-marker-my-custom-shape:before {
        color: green;
        font-size: 25px;
        margin-left: -19px;
        margin-top: -9px;
    }

    .RadMap .k-marker.k-i-marker-my-custom-shape {
        height: 25px;
    }
</style>

<telerik:RadMap RenderMode="Lightweight" runat="server" ID="RadMap1" Zoom="1">
    <MarkersCollection>
        <telerik:MapMarker Shape="myCustomShape" Title="Tooltip Text">
            <LocationSettings Latitude="0" Longitude="0" />
            <TooltipSettings AutoHide="false"></TooltipSettings>
        </telerik:MapMarker>
    </MarkersCollection>
</telerik:RadMap>
2. Fine-tune the Marker’s Position
After changing the height of the span element rendered by the Marker, in order to fine-tune the marker’s position, you should fine-tune the marker element’s top and left margins. The values that lead to the proper layout depend on the differences between the original and the custom size used.
Use two Marker items—a default one and a custom one, set to the same coordinate position. This will help you to properly fine-tune the Marker’s position.
Use the browser’s HTML inspector to change the margin values, and directly see the results in the browser. This will enable you to easily distinguish the correct position.
Figure 6: Correct Marker’s position after using the CSS rules from Example 6.

Example 6: Fine-tune the Marker’s position.
<style type="text/css">
    .RadMap .k-marker.k-i-marker-my-custom-shape:before {
        color: green;
        font-size: 25px;
        margin-left: -19px;
        margin-top: -9px;
    }

    .RadMap .k-marker.k-i-marker-my-custom-shape {
        height: 25px;
        margin-left: -14px;
        margin-top: -28px;
    }
</style>

<telerik:RadMap RenderMode="Lightweight" runat="server" ID="RadMap1" Zoom="1">
    <MarkersCollection>
        <telerik:MapMarker Shape="pinTarget" >
            <LocationSettings Latitude="0" Longitude="50" />
        </telerik:MapMarker>
        <telerik:MapMarker Shape="myCustomShape" Title="Tooltip Text">
            <LocationSettings Latitude="0" Longitude="50" />
            <TooltipSettings AutoHide="false"></TooltipSettings>
        </telerik:MapMarker>
    </MarkersCollection>
</telerik:RadMap>