Appearance
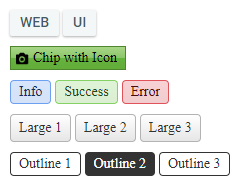
The ChipList provides predefined appearance options such as different sizes, border radiuses, fill modes and theme colors.

For a live example, visit the Appearance Demo of the ChipList.
Options
The Telerik WebForms ChipList supports the following styling options:
-
Size—Configures the overall size of the component. -
ItemSize—Configures what color will be applied to the component. -
ThemeColor—Configures how the color is applied to the component. -
FillMode—Configures how the color is applied to the component. -
Rounded—Configures the border radius of the component. -
Icon—Displays an icon.
Size
Specifies the gap between the Chips in the ChipList.

The following values are available for the Size option:
Small-
Medium(default) Large-
None—No gaps between the Chips
Example
<telerik:RadChipList ID="RadChipList1" runat="server" Size="None">
    <Items>
        <telerik:ChipListItem Label="Chip 1" />
        <telerik:ChipListItem Label="Chip 2" />
        <telerik:ChipListItem Label="Chip 3" />
    </Items>
</telerik:RadChipList>

<telerik:RadChipList ID="RadChipList2" runat="server" Size="Large">
    <Items>
        <telerik:ChipListItem Label="Chip 1" />
        <telerik:ChipListItem Label="Chip 2" />
        <telerik:ChipListItem Label="Chip 3" />
    </Items>
</telerik:RadChipList>
ItemSize
The ItemSize option controls how big or small the rendered chip items look.

The following values are available for the ItemSize option:
Small-
Medium(default) Large-
None—The chip will naturally resize based on the content
Example
<telerik:RadChipList ID="RadChipList1" runat="server" ItemSize="Small">
    <Items>
        <telerik:ChipListItem Label="Chip 1" />
        <telerik:ChipListItem Label="Chip 2" />
        <telerik:ChipListItem Label="Chip 3" />
    </Items>
</telerik:RadChipList>

<telerik:RadChipList ID="RadChipList2" runat="server" ItemSize="Large">
    <Items>
        <telerik:ChipListItem Label="Chip 1" />
        <telerik:ChipListItem Label="Chip 2" />
        <telerik:ChipListItem Label="Chip 3" />
    </Items>
</telerik:RadChipList>
ThemeColor
The ThemeColor option controls the color of the chips in the ChipList. This option is applied to the ChipListItem, therefore, each item can be individually colored.

The following values are available for the ThemeColor option:
-
Base(default) InfoSuccessWarningError
Example
<telerik:RadChipList ID="RadChipList1" runat="server">
    <Items>
        <telerik:ChipListItem Label="Base" ThemeColor="Base" />
        <telerik:ChipListItem Label="Info" ThemeColor="Info" />
        <telerik:ChipListItem Label="Success" ThemeColor="Success" />
        <telerik:ChipListItem Label="Warning" ThemeColor="Warning" />
        <telerik:ChipListItem Label="Error" ThemeColor="Error" />
    </Items>
</telerik:RadChipList>
FillMode
The FillMode specifies the background and border styles of the Chip items in the ChipList.

The following values are available for the FillMode option:
-
Solid(default) Outline
Example
<telerik:RadChipList ID="RadChipList1" runat="server" FillMode="Solid">
    <Items>
        <telerik:ChipListItem Label="Chip 1" />
        <telerik:ChipListItem Label="Chip 2" />
        <telerik:ChipListItem Label="Chip 3" />
    </Items>
</telerik:RadChipList>

<telerik:RadChipList ID="RadChipList2" runat="server" FillMode="Outline">
    <Items>
        <telerik:ChipListItem Label="Chip 1" />
        <telerik:ChipListItem Label="Chip 2" />
        <telerik:ChipListItem Label="Chip 3" />
    </Items>
</telerik:RadChipList>
Rounded
The Rounded option controls how much border radius is applied to the Chips inside the ChipList.

The following values are available for the Rounded option:
Small-
Medium(default) LargeFullNone
Example
<telerik:RadChipList ID="RadChipList1" runat="server" Rounded="None">
    <Items>
        <telerik:ChipListItem Label="Chip 1" />
        <telerik:ChipListItem Label="Chip 2" />
        <telerik:ChipListItem Label="Chip 3" />
    </Items>
</telerik:RadChipList>

<telerik:RadChipList ID="RadChipList2" runat="server" Rounded="Full">
    <Items>
        <telerik:ChipListItem Label="Chip 1" />
        <telerik:ChipListItem Label="Chip 2" />
        <telerik:ChipListItem Label="Chip 3" />
    </Items>
</telerik:RadChipList>
Icon
To enable icons for the items in the ChipList, set the Icon property to the name of the embedded icon. This option is applied to ChipListItem, therefore, each individual item can have its own icon.
![]()
Visit the Web Font Icons - List of Font Icons page and find the icon of your choice then copy its name without the .k-i- prefix.
For example, if the icon is called .k-i-plus-outline the name would be plus-outline.
![]()
Example
<telerik:RadChipList ID="RadChipList1" runat="server">
    <Items>
        <telerik:ChipListItem runat="server" Icon="plus-outline" Label="plus-outline"></telerik:ChipListItem>
        <telerik:ChipListItem runat="server" Icon="bell" Label="bell"></telerik:ChipListItem>
        <telerik:ChipListItem runat="server" Icon="youtube" Label="youtube"></telerik:ChipListItem>
        <telerik:ChipListItem runat="server" Icon="shapes" Label="shapes"></telerik:ChipListItem>
        <telerik:ChipListItem runat="server" Icon="file-wrench" Label="file-wrench"></telerik:ChipListItem>
        <telerik:ChipListItem runat="server" Icon="heart-outline" Label="heart-outline"></telerik:ChipListItem>
        <telerik:ChipListItem runat="server" Icon="clipboard" Label="clipboard"></telerik:ChipListItem>
        <telerik:ChipListItem runat="server" Icon="anchor" Label="anchor"></telerik:ChipListItem>
        <telerik:ChipListItem runat="server" Icon="user" Label="user"></telerik:ChipListItem>
    </Items>
</telerik:RadChipList>