Creating a New Telerik® Data Access Web Application
This article is relevant to entity models that utilize the deprecated Visual Studio integration of Telerik Data Access. The current documentation of the Data Access framework is available here.
In this tutorial, you will create a new ASP.NET Web Application that you can use as a starting point for your application. You are going to use the Telerik Data Access Web Application project template. This template will create a new ASP.NET Web Application, and open the Telerik Data Access New Domain Model Wizard. Once you run through the wizard, the new domain model will be added to the web project.
Creating a New ASP.NET Application
In this task, you use a Telerik Data Access project template in Microsoft Visual Studio to create a new ASP.NET Web Application that you can use as a starting point.
To Create the ASP.NET Application:
- Start Visual Studio, on the File menu select New, and then select Project.
- In the New Project dialog box, select Visual Basic or Visual C# as the programming language.
-
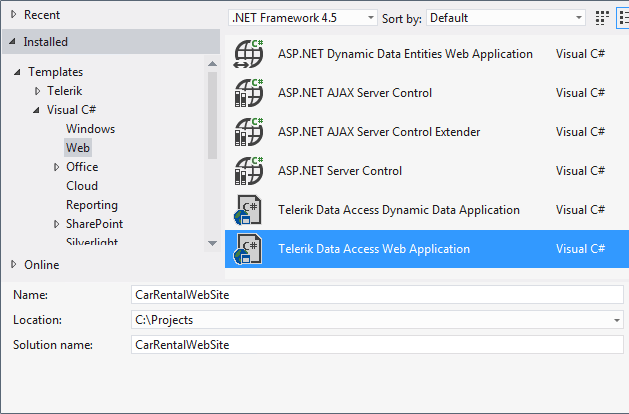
In the Templates pane, select Telerik Data Access Web Application.
The Telerik Data Access Web Application template is available only in Visual Studio 2010/2012 for applications that use .NET version 4/4.5.
-
Type CarRentWebSite as the name of the project.

Click OK.
- The ASP.NET Web Application is created.
- The New Domain Model Wizard appears automatically. In the Select Domain Model Type screen, select Populate from database. Enter SofiaCarRentalContext for Model name. Click Next to continue.
- In the Setup Database Connection screen, create a data connection to the SofiaCarRental database and click Next.
- In the Choose Database Items screen, select all tables.
-
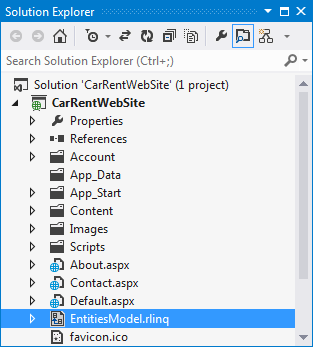
Click Finish to generate your model. Persistent classes are generated for all tables from the SofiaCarRental database. The wizard adds the EntitiesModel.rlinq file to the CarRentWebSite project. Also references to the Telerik.OpenAccess.dll and Telerik.OpenAccess.35.Extensions.dll assemblies are added.

And finally, a new connection string for the SofiaCarRental database is added to the Web.config file.
<?xml version="1.0"?>
<configuration>
 <connectionStrings>

   <add name="SofiaCarRental21Connection"
        connectionString="data source=.\sqlexpress;initial catalog=SofiaCarRental21;integrated security=True"
        providerName="System.Data.SqlClient" />

 </connectionStrings>
</configuration>
Select the Telerik.OpenAccess.dll reference and press F4 to open the Properties pane. Set the Copy Local property to True.
-
Open the Default.aspx page and delete the predefined content, so you end up with the following:
<%@ Page Title="Home Page" Language="C#" MasterPageFile="~/Site.Master"
   AutoEventWireup="true" CodeBehind="Default.aspx.cs" Inherits="CarRentWebSite._Default" %>
<asp:Content runat="server" ID="BodyContent" ContentPlaceHolderID="MainContent">
</asp:Content>
<%@ Page Title="Home Page" Language="VB" MasterPageFile="~/Site.Master" AutoEventWireup="true" CodeBehind="Default.aspx.vb" Inherits="CarRentWebSite._Default" %> <asp:Content runat="server" ID="BodyContent" ContentPlaceHolderID="MainContent"> </asp:Content> -
Open the Site.master and delete the ScriptManager declaration at the beginning of the <body></body> tag. This is required because in the next task, you are going to use a RadScriptManager for the Default.aspx page. And in the same time, only one instance of a ScriptManager can be added to a page. You need to delete the following:
<asp:ScriptManager runat="server">
   <Scripts>
       <asp:ScriptReference Name="jquery" />
       <asp:ScriptReference Name="jquery.ui.combined" />
   </Scripts>
</asp:ScriptManager>
Build the Solution.
In this task, you created a new ASP.NET Web Application by using the Telerik Data Access Web Application project template. Then, you created a new domain model based on the SofiaCarRental database and added it to the CarRentWebSite project. Next, you will start implementing the user interface.
