How to: Add Dynamic Data to Existing Web Applications
This article is relevant to entity models that utilize the deprecated Visual Studio integration of Telerik Data Access. The current documentation of the Data Access framework is available here.
This topic demonstrates how to add dynamic behavior to an existing Telerik Data Access Web Application. The ASP.NET Web Application that is created in this example enables the user to perform CRUD operations.
For the purpose of this topic, you will need to create two Web projects. The first project will act as the existing Web Application, i.e. the application that you want to add Dynamic Data to. The second project that you create will be an ASP.NET Dynamic Data Web Application. The second project will help you to copy some Dynamic Data functionality that you require into the existing web application. This is the easiest way; otherwise, you would have to create pages by hand in order to add that functionality to an existing web application. This walkthrough uses an ASP.NET Web Application. You could use an ASP.NET Web Site instead. For more information about the differences between these project types, read here.
Also, you will need to use the Dynamic Data Wizard to include Dynamic Data functionality based on a Telerik Data Access Domain Model. The Dynamic Data Wizard allows you to create custom data pages, containing List or Details forms that are implemented using the GridView and FormView controls. The wizard provides customization options, such as choosing specific columns/properties, and enabling edit, insert, and delete operations.
The Dynamic Data Wizard is available only for Visual Studio 2010 for web applications or web sites that use .NET version 4.
Creating an ASP.NET Web Application and Adding a Telerik Data Access Domain Model
You will need to create an empty ASP.NET Web Application project and add a new Telerik Data Access Domain Model based on the SofiaCarRental database. You could use the Telerik Data Access Web Application project template to create a new ASP.NET Web Application that will act as your existing web site. The site will have no real functionality when you create it, and it will not use Dynamic Data. The idea is just to illustrate the actions, you need to perform in order to add dynamic data functionality based on Telerik Data Access in an existing web application.
Create a new ASP.NET Web Application by using the Telerik Data Access Web Application project template. In the Create New Domain Model Wizard, connect the domain model to the SofiaCarRental database. For the sake of simplicity, detailed explanations will be omitted. If you are experiencing any problems, see Creating a New Telerik Data Access Web Application.

Adding References
The next step is to add references to the required assemblies in the existing web application. First, add a reference to the Telerik.OpenAccess.Web.40.dll assembly. Why this reference is needed? In subsequent tasks you will use the Dynamic Data Wizard to create custom pages for all entities/tables from the SofiaCarRental demo database. Internally, the generated pages will use the OpenAccessLinqDataSource control to perform CRUD operations. Add references to System.ComponentModel.DataAnnotations.dll and System.Data.Entity.dll. The System.ComponentModel.DataAnnotations.dll assembly provides attribute classes that are used to define metadata for Dynamic Data controls. In summary, you need to add references to the following assemblies:
- Telerik.OpenAccess.Web.40.dll
- System.ComponentModel.DataAnnotations.dll
- System.Data.Entity.dll
Registering the OpenAccessContext
The next step is to register the OpenAccessContext for being used by Dynamic Data:
- Open the Global.asax file.
-
In the Application_Start method, add the following code:
- C#
- VB
private static System.Web.DynamicData.MetaModel s_defaultModel = new System.Web.DynamicData.MetaModel();
public static System.Web.DynamicData.MetaModel DefaultModel
{
   get
   {
       return s_defaultModel;
   }
}

void Application_Start(object sender, EventArgs e)
{
   DefaultModel.RegisterContext(new Telerik.OpenAccess.DynamicData.
       OpenAccessDataModelProvider(new EntitiesModel(),
           () => new EntitiesModel()),
           new System.Web.DynamicData.ContextConfiguration() { ScaffoldAllTables = true });
   System.Web.Routing.RouteTable.Routes.Add(new System.Web.
       DynamicData.DynamicDataRoute("{table}/{action}.aspx")
   {
       Constraints = new System.Web.Routing.RouteValueDictionary(new
           { action = "List|Details|Edit|Insert" }),
       Model = DefaultModel
   });
}
Private Shared s_defaultModel As New System.Web.DynamicData.MetaModel() Public Shared ReadOnly Property DefaultModel() As System.Web.DynamicData.MetaModel Get Return s_defaultModel End Get End Property Sub Application_Start(ByVal sender As Object, ByVal e As EventArgs) DefaultModel.RegisterContext(New Telerik.OpenAccess.DynamicData._ OpenAccessDataModelProvider(New EntitiesModel(), _ Function() New EntitiesModel()), _ New System.Web.DynamicData.ContextConfiguration() _ With {.ScaffoldAllTables = True}) System.Web.Routing.RouteTable.Routes.Add(New System.Web.DynamicData._ DynamicDataRoute("{table}/{action}.aspx") _ With {.Constraints = New System.Web.Routing._ RouteValueDictionary(New _ With {Key .Action = "List|Details|Edit|Insert"}), _ .Model = DefaultModel}) End SubEntitiesModel is your OpenAccessContext class.
Creating a Second Web Application (ASP.NET Dynamic Data Web Application)
The easiest way to add Dynamic Data functionality to an existing web application is to copy some elements from an existing ASP.NET Dynamic Data Web Application.
To create a new ASP.NET Dynamic Data Web Application:
- Open Visual Studio. On the File menu select New, and then select Project.
- In the New Project dialog box, select Visual Basic or Visual C# as the programming language.
- In the Templates pane, select ASP.NET Dynamic Data Entities Web Application.
- Click OK. Visual Studio creates the Dynamic Data Web Application.
Adding Dynamic Data Functionality to the Existing Web Application
Your web application requires a few dynamic data elements that enable the user to perform CRUD operations:
-
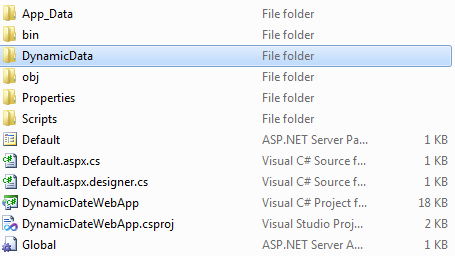
In Windows Explorer, open the folder that contains the Dynamic Data Web project. This is the web project that you created in the preceding step.

In Windows Explorer, copy the DynamicData folder.
-
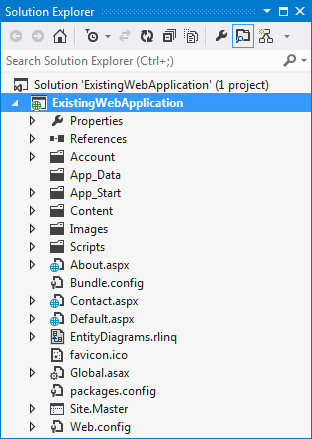
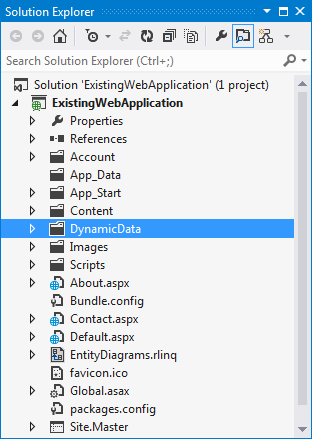
Open your existing ASP.NET Web Application. In Solution Explorer, right-click the web project name, and then click Paste.

Generating Data Pages by Using the Dynamic Data Wizard
The next step is to create data pages for your domain model entities. The Dynamic Data Wizard will assist you in this task. The Dynamic Data Wizard allows you to create custom data pages, containing List or Details forms that are implemented using the GridView and FormView controls. The wizard provides customization options, such as choosing specific columns/properties, and enabling edit, insert, and delete operations. Follow the steps, described in the How to: Create a New Dynamic Data Web Application topic.
By default, pages are created under the DynamicData\CustomPages folder of the Web Application project.

Creating a Test Web Form
In your existing web application, add a new Web Form using Master Page. Open it and paste the following markup in the MainContent region.
<asp:ScriptManagerProxy ID="ScriptManagerProxy1" runat="server" />
<asp:GridView ID="Menu1" runat="server" AutoGenerateColumns="false" CellPadding="6">
   <Columns>
       <asp:TemplateField HeaderText="Table Name" SortExpression="TableName">
           <ItemTemplate>
               <asp:DynamicHyperLink ID="HyperLink1" runat="server"><%# Eval("DisplayName") %></asp:DynamicHyperLink>
           </ItemTemplate>
       </asp:TemplateField>
   </Columns>
</asp:GridView>
Switch to the code-behind and add the following code in the Page_Load method.
protected void Page_Load(object sender, EventArgs e)
{
   System.Collections.IList visibleTables = Global.DefaultModel.VisibleTables;
   if (visibleTables.Count == 0)
   {
       throw new InvalidOperationException("There are no accessible tables.");
   }

   Menu1.DataSource = visibleTables;
   Menu1.DataBind();
}
Protected Sub Page_Load(ByVal sender As Object, ByVal e As System.EventArgs) Handles Me.Load
 Dim visibleTables As IList = Global_asax.DefaultModel.VisibleTables
 If visibleTables.Count = 0 Then
  Throw New InvalidOperationException("There are no accessible tables.")
 End If

 Menu1.DataSource = visibleTables
 Menu1.DataBind()
End Sub
The final step is to declare a new ScriptManager and add two ContentPlaceHolders in the Site.Master. Each of the generated custom data pages expects ContentPlaceHolder controls with ids "head" and "ContentPlaceHolder1".
Open the Site.Master. Locate the <head runat="server"></head> element and add the following ContentPlaceHolder definition:
<asp:ContentPlaceHolder ID="head" runat="server" />
Locate the <div class="main"></div> element and add the following ContentPlaceHolder and ScriptManager definitions:
<asp:ScriptManager ID="ScriptManager1" runat="server" EnablePartialRendering="false" />
<asp:ContentPlaceHolder ID="ContentPlaceHolder1" runat="server" />
Testing the Dynamic Data
You are now ready to test your demo page. In Solution Explorer, right-click the test page that you created in the preceding step and click View in Browser.
