ZIP Archive
This article explains what the zip archive for Telerik UI for Blazor components includes, and how to get it.
The most common way to install the Telerik UI for Blazor components is to use the Telerik NuGet feed. However, you can also use a wizard installer, or a ZIP archive.
The ZIP archive provides the following:
- The necessary
.nupkgfiles so you can setup a local feed in Visual Studio. You can find them in thepackagesfolder in the archive. - An offline version of our demos that you can run and inspect in your IDE. You can find them in the
demosfolder in the archive. - The document processing
.nupkgfiles (in thedplfolder). - The built-in themes and some of their most commonly used swatches. You can find them in the
stylesfolder in the archive.
How to Download the ZIP Archive
To download the manual zip archive:
Go to Downloads in your Telerik account.
On the loaded page choose from your purchased products or trial downloads Progress® Telerik® UI for Blazor, and click on it.
Download the ZIP file.
Once the download completes, open the archive and extract the files to a location of your choice.
Set Up a Local NuGet Feed in Visual Studio
To setup a local NuGet package source, so you can install the Telerik components without an active Internet connection and without setting up our private feed, do the following:
Copy all the
.nupkgfiles we provide from thepackagesanddplfolders of your Telerik UI for Blazor installation to your preferred local feed location. By default, the installation path isC:\Program Files (x86)\Progress\Telerik UI for Blazor <VERSION>or where you unzip the ZIP installer.Open Visual Studio and go to Tools > Options.
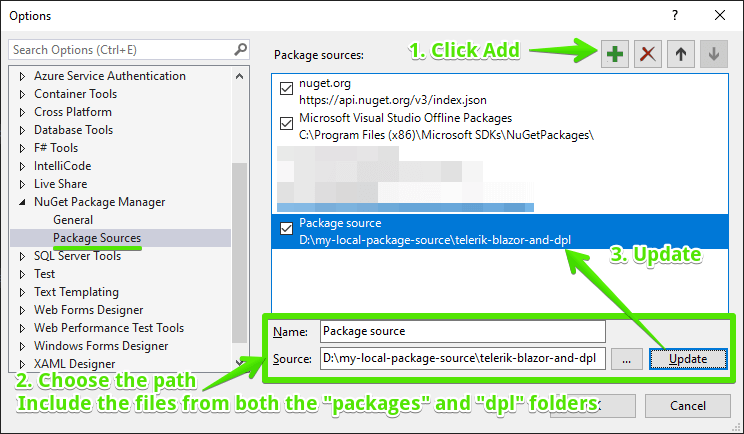
Find the NuGet Package Manager node, expand it, and select Package Sources.
-
Click the Add (
+) icon at the top to add the new local feed, select its name and point it to the path where you placed all the Telerik.nupkgfiles.Make sure to add the packages from both the
packagesanddplfolders to your custom feed. You can also point the package source to the Telerik installation folder to include all packages recursively.For example:
Next Steps
Once you have the Telerik NuGet source set up, follow the instructions to create a Telerik Blazor app.