Configuring Document Processing Libraries
This article demonstrates how to add a reference to the Telerik Document Processing Libraries (DPL) packages in an existing Telerik UI for Blazor application using the Document Processing Libraries Wizard. The wizard is included in the Telerik UI for Blazor Visual Studio extensions and enables you to easily add the required packages when working with the Telerik Document Processing Library.
Getting the Wizard
To use the Document Processing Libraries Wizard, install the Telerik UI for Blazor Visual Studio (VS) extensions. You can get the extension from:
- The Visual Studio Marketplace (for Visual Studio 2022 for Windows and Visual Studio 2019 for Windows).
- The Telerik UI for Blazor automated installer (for Windows and Mac).
- Your Telerik.com account (for Mac only). Download the
.mpackfile and use the "Install from file..." button on the Visual Studio Extensions dialog.
Our extention for Visual Studio for Mac will be discontinued in 2024 after Visual Studio for Mac is discontinued.
Starting the Wizard
To start the wizard, use either of the following options:
Project Context Menu
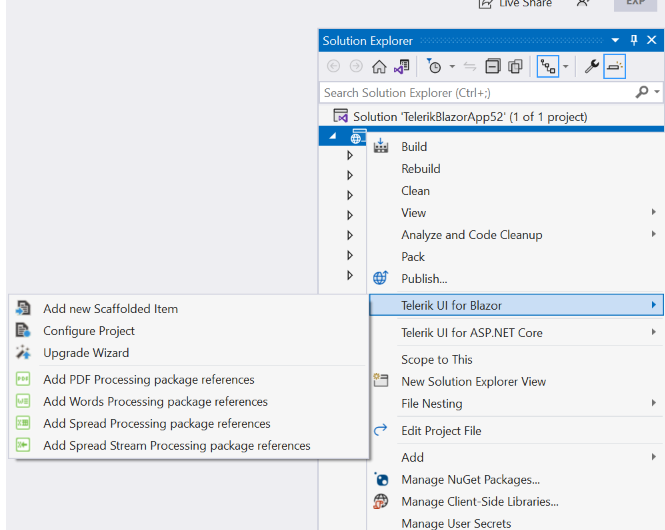
- In the Solution Explorer, right-click the Blazor app in which you want to add a Telerik DPL package.
- Right-click the project node and select Telerik UI for Blazor.
- Select the package you want to include.
Start the Document Processing Libraries Wizard from the Context Menu

Extensions Menu
- In the Solution Explorer, select the Blazor app in which you want to add a Telerik DPL package.
- Open the Extensions menu.
- Click Telerik > Telerik UI for Blazor.
- Select the package you want to include.
Start the Document Processing Libraries Wizard from the Extensions Menu

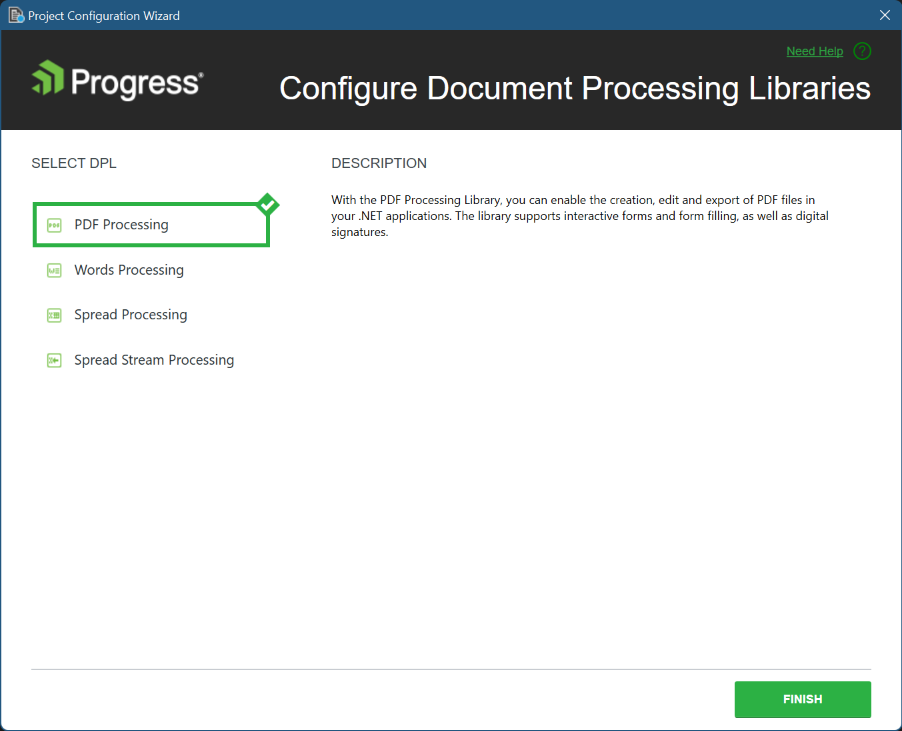
When you select a package, the main page of the Wizard will appear. In the SELECT DPL section, all available packages will be listed, and the one you selected will be highlighted. Clicking the FINISH button will install the selected package and add the necessary references to your application.
Document Processing Libraries Wizard Main Page
