First Steps with Client-Side UI for Blazor
This article explains how to get the Telerik UI for Blazor components in your Blazor WebAssembly app and start using them quickly. You will create a new application from scratch, learn how to add the UI for Blazor components to a project, and finally, add a UI component to a view.
This article applies only to the following Visual Studio project templates:
- Blazor WebAssembly App, which exists up to .NET 7.
- Blazor WebAssembly Standalone App for .NET 8.
If you prefer the .NET 8 Blazor Web App template, then follow the tutorial about .NET 8 Blazor Web App.
This step-by-step tutorial starts with the basics and is suitable for first-time Blazor or Telerik component users. If you are already familiar with the Telerik NuGet source, components, and Blazor in general, you may prefer the Telerik UI for Blazor Workflow Details article. It provides more setup options and suggests possible enhancements.
Prerequisites
To successfully complete the steps in this tutorial, make sure you have an up-to-date Visual Studio, which is compatible with the .NET version of your choice. If you are not using Visual Studio, some of the steps require using the .NET CLI or editing files manually. In this case, also refer to the Workflow Details tutorial.
To learn more about the compatibility of the Telerik UI for Blazor components with different browser and .NET versions, see the system requirements.
This online documentation covers the latest version of Telerik UI for Blazor, which is
5.1.1. If needed, download the offline PDF documentation for the required older product version.
Step 0: Download Telerik UI for Blazor
If you have already purchased a Telerik UI for Blazor license, continue with the next step and create a new project.
If you are new to UI for Blazor and haven't purchased a license yet, you must download and install the trial version of the UI for Blazor components—this will activate your free trial and allow you to use the components. During the installation, select the Set up Telerik NuGet package source checkbox and the installer will configure the Telerik online NuGet feed automatically. You will use this feed later in the tutorial.
Trial users must complete the installation of the components. Otherwise their trial license will not activate and you cannot complete the tutorial successfully.
Step 1: Create a New Project
Open Visual Studio and select Create a new project.
Select the Blazor WebAssembly App project type, enter a name for your project, and then click Next.
Select the ASP.NET Core hosted checkbox and the desired framework, and then click Create.
Step 2: Add the Telerik NuGet Feed to Visual Studio
In this tutorial, you will use the Telerik NuGet feed to download the UI for Blazor components. This NuGet feed is private and requires you to authenticate with your Telerik user name and password:
In Visual Studio and go to Tools > NuGet Package Manager > Package Manager Settings.
Select Package Sources and then click the + button to add a new package source.
Enter a Name for the new package source, for example,
telerik.com.-
Add the
https://nuget.telerik.com/v3/index.jsonURL as a Source. Click OK.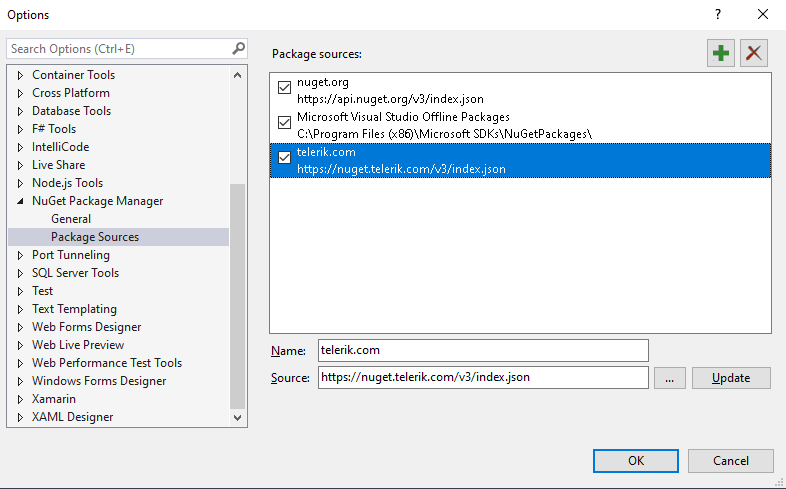
Whenever Visual Studio displays a dialog to enter credentials for
nuget.telerik.com, use your Telerik account email and password.
For alternative NuGet package download options, check the Workflow article. You can also authenticate with
nuget.telerik.comwith an API key.
Step 3: Install the Telerik UI for Blazor Components
-
Right-click the
.Clientproject in the solution and select Manage NuGet Packages.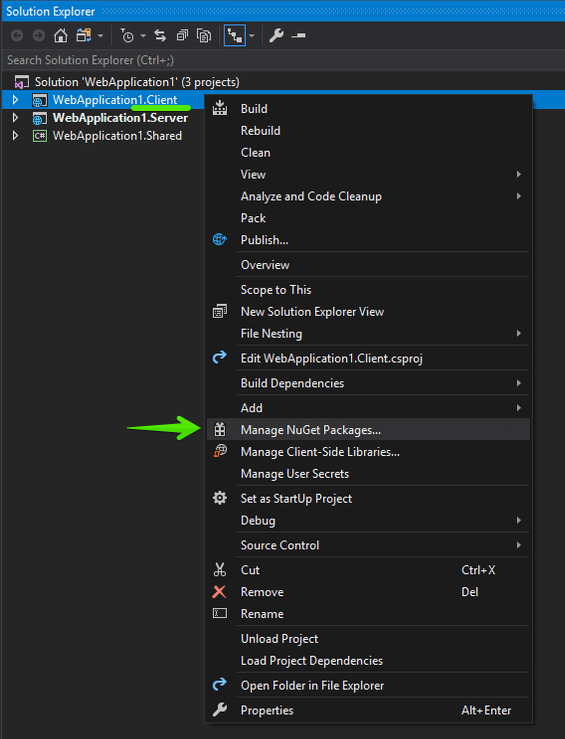
-
Install the Telerik Blazor NuGet package:
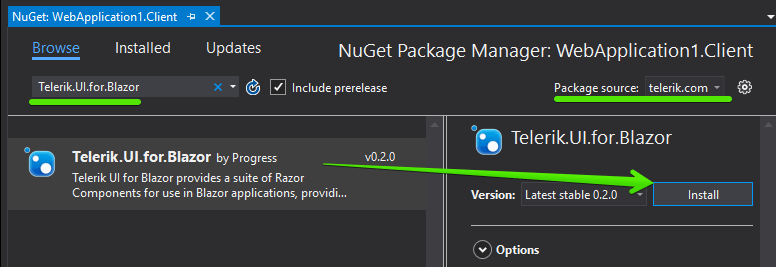
- Select the
telerik.comPackage source that you added earlier. As this is a private NuGet feed, you must authenticate with your Telerik account user name and password. - Select the Browse tab, find the NuGet package, and click Install. Commercial license holders should install
Telerik.UI.for.Blazor. Trial users should installTelerik.UI.for.Blazor.Trial.
- Select the
Step 4: Enable the Blazor UI Components
To enable the Telerik UI for Blazor components, you must add several client-side dependencies to the application, include the required @using statements, add the TelerikRootComponent component, and register the Telerik Blazor service.
4.1. Add the Telerik UI for Blazor Client Assets
1. Add the telerik-blazor.js file to your main index file—wwwroot/index.html.
HTML
<head>
    . . .
    <script src="_content/Telerik.UI.for.Blazor/js/telerik-blazor.js"></script>

    <!-- For Trial licenses, use
      <script src="_content/Telerik.UI.for.Blazor.Trial/js/telerik-blazor.js"></script>
    -->
</head>
2. In the ~/wwwroot/index.html file of the client web application, add the theme stylesheet as a static asset. The theme allows you to select the appearance and color scheme for the Telerik Blazor components.
<head>
    . . .
    <link rel="stylesheet" href="_content/Telerik.UI.for.Blazor/css/kendo-theme-default/all.css" />

    <!-- For Trial licenses, use
        <link rel="stylesheet" href="_content/Telerik.UI.for.Blazor.Trial/css/kendo-theme-default/all.css" />
      -->
</head>
4.2. Include @using Statements
In the ~/_Imports.razor file, add the @using directives below. This configures the project to recognize the Telerik components in all files. You can register one or both icon namespaces, depending on the icon type you will be using.
_Imports.razor
@using Telerik.Blazor
@using Telerik.Blazor.Components
@using Telerik.SvgIcons
@using Telerik.FontIcons
4.3. Add the TelerikRootComponent
Use a single TelerikRootComponent component as a top-level component in the app.
Add a <TelerikRootComponent> to the app layout file (by default, MainLayout.razor). Make sure that the TelerikRootComponent wraps all the content in the MainLayout.
MainLayout.razor
@inherits LayoutComponentBase

<TelerikRootComponent>
    @* existing MainLayout.razor content here *@
</TelerikRootComponent>
You can learn more about the TelerikRootComponent purpose and usage in its dedicated documentation.
4.4. Register the Telerik Blazor Service
In the ~/Program.cs file of the client web application, register the Telerik Blazor service.
C#
using ClientBlazorProject;
using Microsoft.AspNetCore.Components.Web;
using Microsoft.AspNetCore.Components.WebAssembly.Hosting;

// sample host builder for a WASM app, yours may differ
var builder = WebAssemblyHostBuilder.CreateDefault(args);
builder.RootComponents.Add<App>("#app");
builder.RootComponents.Add<HeadOutlet>("head::after");

builder.Services.AddScoped(sp => new HttpClient { BaseAddress = new Uri(builder.HostEnvironment.BaseAddress) });

// Register the Telerik services.
builder.Services.AddTelerikBlazor();

await builder.Build().RunAsync();
Now your project can use the Telerik UI for Blazor components.
Step 5: Add a Component to a View
The final step in this tutorial is to use a Telerik UI for Blazor component in a view and run it in the browser.
-
In the
~/Pages/Index.razorview, add aTelerikButtoncomponent.RAZOR
<TelerikButton>Say Hello</TelerikButton> -
Optionally, hook up a click handler that will show a message. The resulting view will look like this:
RAZOR
@page "/" <TelerikButton OnClick="@SayHelloHandler" ThemeColor="primary">Say Hello</TelerikButton> <br /> @helloString @code { MarkupString helloString; void SayHelloHandler() { string msg = string.Format("Hello from <strong>Telerik Blazor</strong> at {0}.<br /> Now you can use C# to write front-end!", DateTime.Now); helloString = new MarkupString(msg); } } -
Run the app in the browser by pressing
F5. You should see something like this: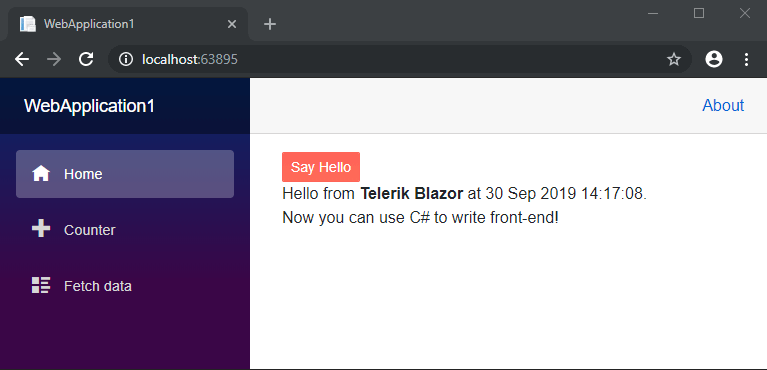
Well done! Now you have you first Telerik UI for Blazor component running in your Blazor app.
Next Steps
Video Tutorial
If you prefer video instructions, you can also check the video tutorial below.