Getting Started with the TileLayout
This tutorial explains how to set up a basic Telerik UI for ASP.NET Core TileLayout and highlights the major steps in the configuration of the component.
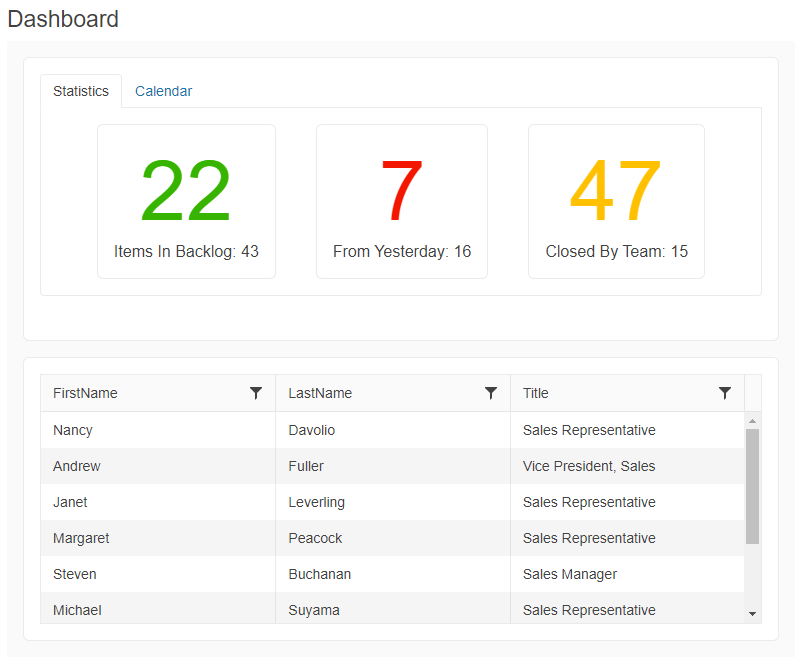
You will initialize a TileLayout component that contains two containers—a TabStrip component with integrated Cards and Calendar and a Data Grid component. Next, you will handle the TileLayout events and display the event data in the browser console. Also, you will learn how to reference the client-side instance of the component. Finally, you can run the sample code in Telerik REPL and continue exploring the component.
Prerequisites
To successfully complete the tutorial, you need a project that is already configured to use the Telerik UI for ASP.NET Core components:
You can use the Telerik REPL playground and skip installing the components on your system and configuring a project.
-
You can prepare a Visual Studio project by following the following guide:
- Creating a new pre-configured project for the Telerik UI for ASP.NET Core components from a project template.
1. Prepare the CSHTML File
The first step is to add the required directives at the top of the .cshtml document:
-
To use the Telerik UI for ASP.NET Core HtmlHelpers:
@using Kendo.Mvc.UI -
To use the Telerik UI for ASP.NET Core TagHelpers:
@addTagHelper *, Kendo.Mvc
Optionally, you can structure the View content by adding the desired HTML elements like headings, divs, paragraphs, and others.
    @using Kendo.Mvc.UI

    <h4>Dashboard</h4>
    <div>

    </div>
    @addTagHelper *, Kendo.Mvc

    <h4>Dashboard</h4>
    <div>

    </div>
2. Initialize the TileLayout
Use the TileLayout HtmlHelper or TagHelper to add the component to a page:
- The
Name()configuration method is mandatory as its value is used for theidand thenameattributes of the TileLayout element. - The
Containers()configuration specifies the tile containers. Each container has a header and body. - The
Columns()method lets you set the desired number of columns. The number of rows in which the tiles will be displayed will adjust automatically.
    @using Kendo.Mvc.UI

    @(Html.Kendo().TileLayout()
        .Name("tilelayout")
        .Columns(2)
        .Containers(c => {
            c.Add().Header(h => h.Text("Title 1")).BodyTemplate("Container 1");
            c.Add().Header(h => h.Text("Title 2")).BodyTemplate("Container 2");
            c.Add().Header(h => h.Text("Title 3")).BodyTemplate("Container 3");
        })
    )
    @addTagHelper *, Kendo.Mvc

    <kendo-tilelayout name="tilelayout" columns="2">
        <containers>
            <container>
                <container-body-template>Container 1</container-body-template>
                <container-header text="Title 1"/>
            </container>
            <container>
                <container-body-template>Container 2</container-body-template>
                <container-header text="Title 2"/>
            </container>
            <container>
                <container-body-template>Container 3</container-body-template>
                <container-header text="Title 3"/>
            </container>
        </containers>
    </kendo-tilelayout>
3. Integrate UI Components into the TileLayout
The next step is to integrate a TabStrip component with two tabs and a Data Grid component. Each component that is incorporated into the TileLayout will have the all the functionalities and options available in the stand-alone nested component. You can integrate any Telerik UI for ASP.NET Core component into the TileLayout.
-
Include the TabStrip component by creating an external Kendo UI template and setting the name of the template in the
BodyTemplateId()method of the TileLayout HtmlHelper or thebody-template-idattribute of the TileLayout TagHelper.@using Kendo.Mvc.UI <script id="tabStripContainer" type="text/x-kendo-template"> @(Html.Kendo().TabStrip() .Name("tabstrip") .Items(tabstrip => { tabstrip.Add().Text("Dashboard Information") .Selected(true) .Content(@<text> <div class="status-cards"> <div class="k-card"> <div class="k-card-body"> <div class="k-card-result on-track-tasks">22</div> <div class="k-card-title">Items in Backlog: 43</div> </div> </div> <div class="k-card"> <div class="k-card-body"> <div class="k-card-result overdue-tasks">7</div> <div class="k-card-title">From Yesterday: 16</div> </div> </div> <div class="k-card"> <div class="k-card-body"> <div class="k-card-result issues">47</div> <div class="k-card-title">Closed By Team: 15</div> </div> </div> </div> </text>); tabstrip.Add().Text("Calendar") .Content(@<text> <div class="calendar-widget"> @(Html.Kendo().Calendar() .Name("calendar") .ComponentType("modern") .ToClientTemplate() ) </div> </text>); }) .ToClientTemplate() ) </script> @(Html.Kendo().TileLayout() .Name("tilelayout") .Columns(1) .Containers(c => { c.Add().Header(h => h.Text("Tools")).BodyTemplateId("tabStripContainer"); }) )@addTagHelper *, Kendo.Mvc <script id="tabStripContainer" type="text/html"> <kendo-tabstrip name="tabstrip" is-in-client-template="true"> <items> <tabstrip-item text="Dashboard Information" selected="true"> <content> <div class="status-cards"> <div class="k-card"> <div class="k-card-body"> <div class="k-card-result on-track-tasks">22</div> <div class="k-card-title">Items in Backlog: 43</div> </div> </div> <div class="k-card"> <div class="k-card-body"> <div class="k-card-result overdue-tasks">7</div> <div class="k-card-title">From Yesterday: 16</div> </div> </div> <div class="k-card"> <div class="k-card-body"> <div class="k-card-result issues">47</div> <div class="k-card-title">Closed By Team: 15</div> </div> </div> </div> </content> </tabstrip-item> <tabstrip-item text="Calendar"> <content> <div class="calendar-widget"> <kendo-calendar name="calendar" component-type="modern" is-in-client-template="true"></kendo-calendar> </div> </content> </tabstrip-item> </items> </kendo-tabstrip> </script> <kendo-tilelayout name="tilelayout" columns="1"> <containers> <container body-template-id="tabStripContainer"></container> </containers> </kendo-tilelayout> -
Include the Grid component as a separate TileLayout container.
    @using Kendo.Mvc.UI

    <script id="gridContainer" type="text/x-kendo-template">
        @(Html.Kendo().Grid<Kendo.Mvc.Examples.Models.EmployeeViewModel>()
            .Name("grid")
            .Columns(columns => {
                columns.Bound(e => e.FirstName);
                columns.Bound(e => e.LastName);
                columns.Bound(e => e.Title);
            })
            .DataSource(dataSource => dataSource
                .Ajax()
                .Read(read => read.Action("CustomCommand_Read", "Grid"))
            )
            .Sortable()
            .Filterable()
            .Scrollable()
            .HtmlAttributes(new { style = "height:250px;" })
            .ToClientTemplate()
        )
    </script>

    @(Html.Kendo().TileLayout()
        .Name("tilelayout")
        .Columns(1)
        .Containers(c => {
            c.Add().Header(h => h.Text("Tools")).BodyTemplateId("tabStripContainer");
            c.Add().Header(h => h.Text("All Employees")).BodyTemplateId("gridContainer");
        })
    )
@addTagHelper *, Kendo.Mvc <script id="gridContainer" type="text/html"> <kendo-grid name="grid" is-in-client-template="true" height="250"> <datasource type="DataSourceTagHelperType.Ajax"> <transport> <read url="@Url.Action("CustomCommand_Read", "Grid")"/> </transport> </datasource> <columns> <column field="FirstName"/> <column field="LastName"/> <column field="Title"/> </columns> <sortable enabled="true"/> <scrollable enabled="true"/> <filterable enabled="true"/> </kendo-grid> </script> <kendo-tilelayout name="tilelayout" columns="1"> <containers> <container body-template-id="tabStripContainer"></container> <container body-template-id="gridContainer"></container> </containers> </kendo-tilelayout>public class EmployeeViewModel { public string FirstName { get; set; } public string LastName { get; set; } public string Title { get; set; } }public ActionResult CustomCommand_Read([DataSourceRequest] DataSourceRequest request) { return Json(GetEmployees().ToDataSourceResult(request)); }
4. Handle a TileLayout Event
The TileLayout exposes convenient events for implementing your desired logic. In this example, you will use the Reorder event to log the title, previous, and new position of the reordered item in the browser's console.
@using Kendo.Mvc.UI

    <script id="card1" type="text/x-kendo-template">
        <div class="k-card">
            <div class="k-card-header">
                <h5 class="k-card-title">Rome</h5>
                <h6 class="k-card-subtitle">Capital of Italy</h6>
            </div>
            <div class="k-card-body">
                <p>Rome is a sprawling, cosmopolitan city with nearly 3,000 years of globally influential art, architecture and culture on display.</p>
                <p>Ancient ruins such as the Forum and the Colosseum evoke the power of the former Roman Empire. </p>
            </div>
            <div class="k-card-footer">
                <a class="k-button k-button-flat-base k-button-flat k-button-md k-rounded-md k-icon-button"><span class="k-icon k-i-facebook"></span></a>
                <a class="k-button k-button-flat-base k-button-flat k-button-md k-rounded-md k-icon-button"><span class="k-icon k-i-pinterest"></span></a>
                <a class="k-button k-button-flat-base k-button-flat k-button-md k-rounded-md k-icon-button"><span class="k-icon k-i-twitter"></span></a>
            </div>
        </div>
    </script>

    <script id="card2" type="text/x-kendo-template">
        <div class="k-card">
            <div class="k-card-header">
                <h5 class="k-card-title">Barcelona</h5>
            </div>
            <div class="k-card-body">
                <p>Barcelona, the cosmopolitan capital of Spain's Catalonia region, is known for its art and architecture.</p>
                <p>The fantastical Sagrada Família church and other modernist landmarks designed by Antoni Gaudí dot the city.</p>
            </div>
            <div class="k-card-footer">
                <a class="k-button k-button-flat-base k-button-flat k-button-md k-rounded-md k-icon-button"><span class="k-icon k-i-facebook"></span></a>
                <a class="k-button k-button-flat-base k-button-flat k-button-md k-rounded-md k-icon-button"><span class="k-icon k-i-pinterest"></span></a>
                <a class="k-button k-button-flat-base k-button-flat k-button-md k-rounded-md k-icon-button"><span class="k-icon k-i-twitter"></span></a>
            </div>
        </div>
    </script>

    <script id="card3" type="text/x-kendo-template">
        <div class="k-card">
            <div class="k-card-header">
                <h5 class="k-card-title">San Francisco</h5>
                <h6 class="k-card-subtitle">City in California</h6>
            </div>
            <div class="k-card-body">
                <p>San Francisco, officially City and County of San Francisco and colloquially known as SF, San Fran or "The City", is the cultural, commercial, and financial center of Northern California.</p>
            </div>
            <div class="k-card-footer">
                <a class="k-button k-button-flat-base k-button-flat k-button-md k-rounded-md k-icon-button"><span class="k-icon k-i-facebook"></span></a>
                <a class="k-button k-button-flat-base k-button-flat k-button-md k-rounded-md k-icon-button"><span class="k-icon k-i-pinterest"></span></a>
                <a class="k-button k-button-flat-base k-button-flat k-button-md k-rounded-md k-icon-button"><span class="k-icon k-i-twitter"></span></a>
            </div>
        </div>
    </script>

    @(Html.Kendo().TileLayout()
        .Name("tilelayout")
        .Columns(3)
        .Containers(c => {
            c.Add().Header(h => h.Text("Rome")).BodyTemplateId("card1").ColSpan(1);
            c.Add().Header(h => h.Text("Barcelona")).BodyTemplateId("card2").ColSpan(1);
            c.Add().Header(h => h.Text("San Francisco")).BodyTemplateId("card3").ColSpan(1);
        })
        .Reorderable()
        .Events(e=>e.Reorder("onTileReorder"))
    )

    <script>
        function onTileReorder(e) {
            let reorderedItem = $(e.container).find(".k-card .k-card-title").text();
            let newPosition = (e.newIndex) + 1;
            let oldPostition = (e.oldIndex) + 1;
            console.log("Card '" + reorderedItem + "' has been moved from position " + oldPostition + " to position " + newPosition);
        }
    </script>
   @addTagHelper *, Kendo.Mvc

    <script id="card1" type="text/x-kendo-template">
        <div class="k-card">
            <div class="k-card-header">
                <h5 class="k-card-title">Rome</h5>
                <h6 class="k-card-subtitle">Capital of Italy</h6>
            </div>
            <div class="k-card-body">
                <p>Rome is a sprawling, cosmopolitan city with nearly 3,000 years of globally influential art, architecture and culture on display.</p>
                <p>Ancient ruins such as the Forum and the Colosseum evoke the power of the former Roman Empire. </p>
            </div>
            <div class="k-card-footer">
                <a class="k-button k-button-flat-base k-button-flat k-button-md k-rounded-md k-icon-button"><span class="k-icon k-i-facebook"></span></a>
                <a class="k-button k-button-flat-base k-button-flat k-button-md k-rounded-md k-icon-button"><span class="k-icon k-i-pinterest"></span></a>
                <a class="k-button k-button-flat-base k-button-flat k-button-md k-rounded-md k-icon-button"><span class="k-icon k-i-twitter"></span></a>
            </div>
        </div>
    </script>

    <script id="card2" type="text/x-kendo-template">
        <div class="k-card">
            <div class="k-card-header">
                <h5 class="k-card-title">Barcelona</h5>
            </div>
            <div class="k-card-body">
                <p>Barcelona, the cosmopolitan capital of Spain's Catalonia region, is known for its art and architecture.</p>
                <p>The fantastical Sagrada Família church and other modernist landmarks designed by Antoni Gaudí dot the city.</p>
            </div>
            <div class="k-card-footer">
                <a class="k-button k-button-flat-base k-button-flat k-button-md k-rounded-md k-icon-button"><span class="k-icon k-i-facebook"></span></a>
                <a class="k-button k-button-flat-base k-button-flat k-button-md k-rounded-md k-icon-button"><span class="k-icon k-i-pinterest"></span></a>
                <a class="k-button k-button-flat-base k-button-flat k-button-md k-rounded-md k-icon-button"><span class="k-icon k-i-twitter"></span></a>
            </div>
        </div>
    </script>

    <script id="card3" type="text/x-kendo-template">
        <div class="k-card">
            <div class="k-card-header">
                <h5 class="k-card-title">San Francisco</h5>
                <h6 class="k-card-subtitle">City in California</h6>
            </div>
            <div class="k-card-body">
                <p>San Francisco, officially City and County of San Francisco and colloquially known as SF, San Fran or "The City", is the cultural, commercial, and financial center of Northern California.</p>
            </div>
            <div class="k-card-footer">
                <a class="k-button k-button-flat-base k-button-flat k-button-md k-rounded-md k-icon-button"><span class="k-icon k-i-facebook"></span></a>
                <a class="k-button k-button-flat-base k-button-flat k-button-md k-rounded-md k-icon-button"><span class="k-icon k-i-pinterest"></span></a>
                <a class="k-button k-button-flat-base k-button-flat k-button-md k-rounded-md k-icon-button"><span class="k-icon k-i-twitter"></span></a>
            </div>
        </div>
    </script>

    <kendo-tilelayout name="tilelayout" columns="3" reorderable="true" on-reorder="onTileReorder">
        <containers>
            <container body-template-id="card1" col-span="1">
                <container-header text="Rome" />
            </container>
            <container body-template-id="card2" col-span="1">
                <container-header text="Barcelona" />
            </container>
            <container body-template-id="card3" col-span="1">
                <container-header text="San Francisco" />
            </container>
    `   </containers>
    </kendo-tilelayout>

    <script>
        function onTileReorder(e) {
            let reorderedItem = $(e.container).find(".k-card .k-card-title").text();
            let newPosition = (e.newIndex) + 1;
            let oldPostition = (e.oldIndex) + 1;
            console.log("Card '" + reorderedItem + "' has been moved from position " + oldPostition + " to position " + newPosition);
        }
    </script>
5. (Optional) Reference Existing TileLayout Instances
You can reference the TileLayout instances that you have created and build on top of their existing configuration:
Use the value of the Name() option of the component to establish a reference.
        <script>
            $(document).ready(function() {
                var tileLayoutReference = $("#tilelayout").data("kendoTileLayout"); // tileLayoutReference is a reference to the existing TileLayout instance of the helper.
            });
        </script>
For more information on referencing specific helper instances, see the Methods and Events article.
Explore this Tutorial in REPL
You can continue experimenting with the code sample above by running it in the Telerik REPL server playground:
Next Steps
- Reordering the TileLayout containers
- Resizing the TileLayout containers
- Configuring the layout of the TileLayout containers