Getting Started with the Pager
This tutorial explains how to set up the Telerik UI for ASP.NET Core Pager and highlights the major steps in the configuration of the component.
You will declare a Pager and a DataSource to supply data from a remote endpoint, send a Read request to the backend and visualize the data items. Then you will be able to test the behavior of the Pager. Finally, you will handle a Pager JavaScript event and reference an existing instance of the component.
After completing this guide, you will achieve the following results:
Prerequisites
To successfully complete the tutorial, you need a project that is already configured to use the Telerik UI for ASP.NET Core components:
- To create a new pre-configured project for the Telerik UI for ASP.NET Core components, you can use a project template.
1. Prepare the CSHTML File
The first step is to add the required directives at the top of the .cshtml document:
-
To use the Telerik UI for ASP.NET Core HtmlHelpers:
@using Kendo.Mvc.UI -
To use the Telerik UI for ASP.NET Core TagHelpers:
@addTagHelper *, Kendo.Mvc
Optionally, you can structure the document by adding the desired HTML elements like headings, divs, paragraphs, and others.
2. Declare a DataSource
The DataSource will consume data from a remote end point. By configuring the PageSize of the DataSource, the number of available pages will be determined by the count of the available data items divided by the page size.
For more information about the DataSource component, visit the Getting Started with the DataSource article.
    @using Kendo.Mvc.UI

    @(Html.Kendo().DataSource<Kendo.Mvc.Examples.Models.ProductViewModel>()
        .Name("dataSource1")
        .Ajax(dataSource=>dataSource
            .Read(read => read.Action("Products_Read", "ListView"))
            .Events(ev=>ev.Change("change"))
            .PageSize(7)
        )
    )
    @addTagHelper *, Kendo.Mvc

    <kendo-datasource name="dataSource1" type="DataSourceTagHelperType.Ajax"
    server-operation="false" page-size="7"
    on-change="change">
        <transport>
            <read url="@Url.Action("Products_Read", "ListView")" />
        </transport>
    </kendo-datasource>
3. Initialize the Pager
Use the Pager HtmlHelper or TagHelper to configure the component.
- Use the
Name()configuration method to assign a name to the instance of the helper—this is mandatory as its value is used for theidand thenameattributes of the Pager element. - Bind the external DataSource configured in the previous step by passing it to the
DataSource()configuration option of the Pager.
- Use the
HtmlAttributesof the component to set the width of the Pager.
    @using Kendo.Mvc.UI

    @(Html.Kendo().DataSource<Kendo.Mvc.Examples.Models.ProductViewModel>()
        .Name("dataSource1")
        .Ajax(dataSource=>dataSource
            .Read(read => read.Action("Products_Read", "ListView"))
            .Events(ev=>ev.Change("change"))
            .PageSize(7)
        )
    )

    <div class="contests-wrapper">
    </div>
    @(Html.Kendo().Pager()
        .Name("pager")
        .DataSource("dataSource1")
        .HtmlAttributes(new { style="width:850px"})
    )
@addTagHelper *, Kendo.Mvc

<kendo-datasource name="dataSource1" type="DataSourceTagHelperType.Ajax"
    server-operation="false" page-size="7"
    on-change="change">
    <transport>
        <read url="@Url.Action("Products_Read", "ListView")" />
    </transport>
</kendo-datasource>

<div class="contests-wrapper">
</div>
<kendo-pager name="pager1" refresh="true" responsive="false" datasource-id="dataSource1" width="850px">
</kendo-pager>
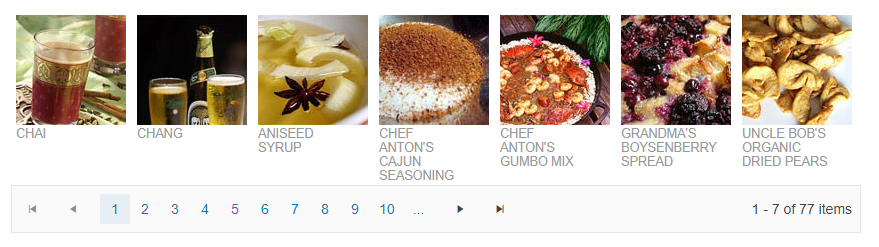
(Optional) Visualize the Data Items
- Use a Kendo template to configure the appearance of the data items.
- Subscribe to the
Changeevent of the DataSource to render any changes to the data.
<script type="text/x-kendo-tmpl" id="template">
    <div class="product">
        <img src="@Url.Content("~/shared/web/foods/")#:ProductID#.jpg" alt="#:ProductName# image" />
        <h3>#:ProductName#</h3>
        <p>#:kendo.toString(UnitPrice, "c")#</p>
    </div>
</script>

<script>
    function change() {
        var template = kendo.template($("#template").html());
        $(".contests-wrapper").html(kendo.render(template, this.view()));
    }
    $(document).ready( function () {
        dataSource1.read();
    });
</script>

<div class="demo-section wide">
    @(Html.Kendo().DataSource<Kendo.Mvc.Examples.Models.ProductViewModel>()
        .Name("dataSource1")
        .Ajax(dataSource=>dataSource
            .Read(read => read.Action("Products_Read", "ListView"))
            .Events(ev=>ev.Change("change"))
            .PageSize(7)
        )
    )
    <div class="contests-wrapper">
    </div>
    @(Html.Kendo().Pager()
        .Name("pager")
        .DataSource("dataSource1")
        .HtmlAttributes(new { style="width:850px"})
    )
</div>
@addTagHelper *, Kendo.Mvc

<script type="text/x-kendo-tmpl" id="template">
    <div class="product">
        <img src="@Url.Content("~/shared/web/foods/")#:ProductID#.jpg" alt="#:ProductName# image" />
        <h3>#:ProductName#</h3>
        <p>#:kendo.toString(UnitPrice, "c")#</p>
    </div>
</script>

<script>
    function change() {
        var template = kendo.template($("#template").html());
        $(".contests-wrapper").html(kendo.render(template, this.view()));
    }

    $(document).ready( function () {
        dataSource1.read();
    });
</script>

<div class="demo-section wide">
    <kendo-datasource name="dataSource1" type="DataSourceTagHelperType.Ajax"
    server-operation="false" page-size="7"
    on-change="change">
        <transport>
            <read url="@Url.Action("Products_Read", "ListView")" />
        </transport>
    </kendo-datasource>

    <div class="contests-wrapper">
    </div>
    <kendo-pager name="pager1" refresh="true" responsive="false" datasource-id="dataSource1" width="850px">
    </kendo-pager>
</div>
4. Handle the Change Event of the Pager
The Pager exposes a client-side event that you can handle and use to customize the component's functions. Attach a handler in the declaration of the Pager and declare the onPagerChange JavaScript function.
<script type="text/x-kendo-tmpl" id="template">
    <div class="product">
        <img src="@Url.Content("~/shared/web/foods/")#:ProductID#.jpg" alt="#:ProductName# image" />
        <h3>#:ProductName#</h3>
        <p>#:kendo.toString(UnitPrice, "c")#</p>
    </div>
</script>

<script>
    function change() {
        var template = kendo.template($("#template").html());
        $(".contests-wrapper").html(kendo.render(template, this.view()));
    }
    function onPagerChange(e){
        console.log("Pager is navigated to page "+e.sender.page());
    }

    $(document).ready( function () {
        dataSource1.read();
    });
</script>

<div class="demo-section wide">
    @(Html.Kendo().DataSource<Kendo.Mvc.Examples.Models.ProductViewModel>()
        .Name("dataSource1")
        .Ajax(dataSource=>dataSource
            .Read(read => read.Action("Products_Read", "ListView"))
            .Events(ev=>ev.Change("change"))
            .PageSize(7)
        )
    )
    <div class="contests-wrapper">
    </div>
    @(Html.Kendo().Pager()
        .Name("pager")
        .DataSource("dataSource1")
        .HtmlAttributes(new { style="width:850px"})
        .Events(e=>e.Change("onPagerChange"))
    )
</div>
@addTagHelper *, Kendo.Mvc

<script type="text/x-kendo-tmpl" id="template">
    <div class="product">
        <img src="@Url.Content("~/shared/web/foods/")#:ProductID#.jpg" alt="#:ProductName# image" />
        <h3>#:ProductName#</h3>
        <p>#:kendo.toString(UnitPrice, "c")#</p>
    </div>
</script>

<script>
    function change() {
        var template = kendo.template($("#template").html());
        $(".contests-wrapper").html(kendo.render(template, this.view()));
    }
    function onPagerChange(e){
        console.log("Pager is navigated to page "+e.sender.page());
    }

    $(document).ready( function () {
        dataSource1.read();
    });
</script>

<div class="demo-section wide">
    <kendo-datasource name="dataSource1" type="DataSourceTagHelperType.Ajax"
    server-operation="false" page-size="7"
    on-change="change">
        <transport>
            <read url="@Url.Action("Products_Read", "ListView")" />
        </transport>
    </kendo-datasource>

    <div class="contests-wrapper">
    </div>
    <kendo-pager name="pager1" refresh="true" responsive="false" datasource-id="dataSource1"
        width="850px"
        on-change="onPagerChange">
    </kendo-pager>
</div>
(Optional) Reference Existing Pager Instances
Referencing existing instances allows you to build on top of their configuration. To reference an existing Pager instance, use the jQuery.data() method:
-
Use the
idattribute of the component instance to establish a reference.<script> var pagerReference = $("#pager").data("kendoPager"); // pagerReference is a reference to the existing instance of the helper. </script> -
Use the Pager client-side API to control the behavior of the widget. In this example, you will hide one of the Pager columns by using
hideColumnmethod.<script> var pagerReference = $("#pager").data("kendoPager"); // pagerReference is a reference to the existing instance of the helper. pagerReference.page(2); // Select page 2. </script>
For more information on referencing specific helper instances, see the Methods and Events article.
Explore this Tutorial in REPL
You can continue experimenting with the code sample above by running it in the Telerik REPL server playground: