Adding the License Key to CI Services
This article describes how to set up and activate your Kendo UI for jQuery license key across a few popular CI services by using environment variables or secrets.
The following general requirements apply to all CI/CD environments:
- Regardless of the CI/CD tool you use, the step that installs the project dependencies must be executed before the step that activates the license.
- The license activation step requires the
@progress/kendo-licensingpackage to be downloaded and set up in your local environment or CI/CD pipeline. - To activate the license, you need a securely stored license key, either in your environment variables or in the CI/CD tool's secret management. Hardcoding license keys into the build script is strictly discouraged.
- The CI pipeline configurations are not executable. They merely outline the specific sequence of steps.
Creating an Environment Variable
Each platform has a different process for setting environment variables. Some popular examples are listed below.
Starting with the 2025 Q1 release, the name of the environment variable changes from KENDO_UI_LICENSE to TELERIK_LICENSE and the downloaded file changes from
kendo-ui-license.txttotelerik-license.txt. This change is required as all Telerik UI and Kendo UI products now use the same licensing mechanism with a common license key. See the Handling License Key File Name and Environment Variable Name Changes in the 2025 Q1 Release KB article for more details.
GitHub Actions
- Create a new Repository Secret or an Organization Secret. Set the name of the secret to
TELERIK_LICENSEand paste the contents of the license key file as a value. - After running
npm installoryarn, add a build step to activate the license:
steps:
    # ... Install modules before activating the license.
    - name: Install NPM modules
      run: |
        npm install
    - name: Activate Kendo UI License
      run: npx kendo-ui-license activate
      # Set a working directory if the application is not in the repository root folder:
      # working-directory: 'ClientApp'
      env:
        TELERIK_LICENSE: $
    # ... Run an application build after the activation of the license.
    - name: Build Application
      run: npm run build --configuration production
GitLab CI/CD Pipelines
- Go to
Settings > CI/CD > Variablesin your GitLab project. - Add a new variable named
TELERIK_LICENSEand paste the content of the downloaded license key file as a value. - After running
npm installoryarn, add a build step to activate the license.
yaml# .gitlab-ci.yml file
variables:
  NODE_ENV: production
setup_dependencies:
  stage: setup
  script:
    - echo "Installing dependencies..."
    - npm install
  # ...
activate_license:
  stage: activate
  script:
    - echo "Activating Kendo UI license..."
    - npx kendo-ui-license activate
  environment:
    name: production
  variables:
    TELERIK_LICENSE: $TELERIK_LICENSE
  # ...
Azure Pipelines (YAML)
- Create a new User-defined Variable named
TELERIK_LICENSE. Paste the contents of the downloaded license key file as a value. - After running
npm installoryarn, add a build step to activate the license.
The following example provides the syntax for Windows build agents.
pool:
  vmImage: 'windows-latest'
steps:
# ... Install modules before activating the license.
- script: call npm install
  displayName: 'Install NPM modules'
- script: call npx kendo-ui-license activate
  displayName: 'Activate Kendo UI License'
  # Set a working directory if the application is not in the repository root folder:
  # workingDirectory: 'ClientApp'
  env:
    TELERIK_LICENSE: $(TELERIK_LICENSE)
# ... Run an application build after the activation of the license.
- script: call npm run build --configuration production
  displayName: 'Build Application'
The following example provides the syntax for Linux build agents.
pool:
vmImage: 'ubuntu-latest'
steps:
# ... Install modules before activating the license.
- script: npm install
displayName: 'Install NPM modules'
- script: npx kendo-ui-license activate
displayName: 'Activate Kendo UI License'
# Set a working directory if the application is not in the repository root folder:
# workingDirectory: 'ClientApp'
env:
TELERIK_LICENSE: $(TELERIK_LICENSE)
# ... Run an application build after the activation of the license.
- script: npm run build --configuration production
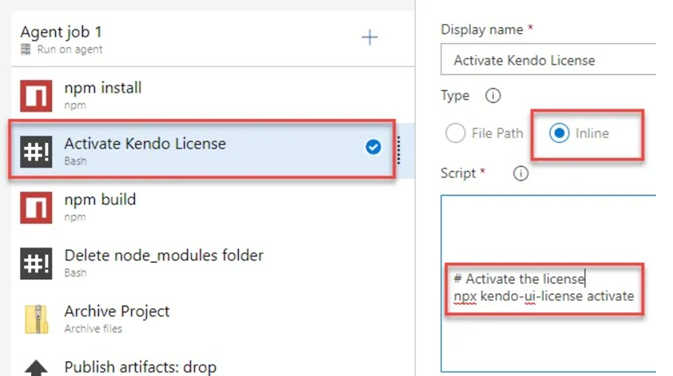
displayName: 'Build Application'Azure Pipelines (Classic)
- Create a new user-defined variable named
TELERIK_LICENSE. Paste the contents of the downloaded license key file as a value. - Before the NPM build task, add a new Bash task to the Agent job.
- Change the step to inline and use the following command:
bash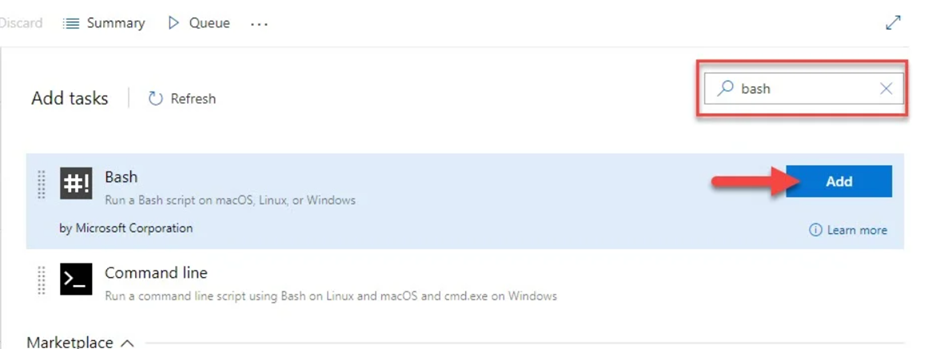
# Activate the license
npx kendo-ui-license activate