ImageEditor External API Custom Tool
Environment
| Product Version | 2019.3.1119 |
| Product | ImageEditor for Xamarin |
Description
This article shows you how to make an HTTP request to an online API in a RadImageEditor using the CommandToolbarItem.
Solution
The ImageEditor allows you to invoke custom logic via CommandToolbarItem in either a bound Command or a Clicked event. Visit the ImageEditor Custom Toolbar article for details and more options.
Setup
As an example, this article will use an online API to remove the background from a photo using machine learning via the Remove Background API. You can use any API in its place.
However, if you would like to follow along precisely with this tutorial, you will need to get a free API key from the service.
- Login or Create an Account (click here)
- Request API Key (click here)
Progress Software is not affliated with removebg or Kaleido AI. The removebg API example is only to demonstrate how to use any online service with the ImageEditor control.
Configuring the ImageEditor and Toolbar
The first step is to define a RadImageEditor in the first row of a Grid. Then add a RadImageEditorToolbar, with AutoGenerateItems="False" (because we'll be defining our own commands), in the second row. Note: The initial cat4.jpeg image source is hard coded to keep the example simple.
<Grid BackgroundColor="LightGray">
    <Grid.RowDefinitions>
        <RowDefinition />
        <RowDefinition Height="Auto" />
    </Grid.RowDefinitions>

    <ie:RadImageEditor x:Name="Editor" Source="cat4.jpeg" BackgroundColor="Transparent"/>

    <ie:RadImageEditorToolbar ImageEditor="{x:Reference Editor}" AutoGenerateItems="False" Grid.Row="1">
        ...
    </ie:RadImageEditorToolbar>
</Grid>
Next, we'll add a CommandToolbarItem to be able to save the image.
<Grid BackgroundColor="LightGray">
    <Grid.RowDefinitions>
        <RowDefinition />
        <RowDefinition Height="Auto" />
    </Grid.RowDefinitions>

    <ie:RadImageEditor x:Name="Editor" Source="cat4.jpeg" BackgroundColor="Transparent"/>

    <ie:RadImageEditorToolbar ImageEditor="{x:Reference Editor}" AutoGenerateItems="False" Grid.Row="1">
        <ie:CommandToolbarItem Text="Save" Tapped="Save_Clicked" />
    </ie:RadImageEditorToolbar>
</Grid>
<Grid BackgroundColor="LightGray">
    <Grid.RowDefinitions>
        <RowDefinition />
        <RowDefinition Height="Auto" />
    </Grid.RowDefinitions>

    <ie:RadImageEditor x:Name="Editor" Source="cat4.jpeg" BackgroundColor="Transparent"/>

    <ie:RadImageEditorToolbar ImageEditor="{x:Reference Editor}" AutoGenerateItems="False" Grid.Row="1">
        <ie:CommandToolbarItem Text="Remove BG" Tapped="RemoveBackground_Clicked" />
        <ie:CommandToolbarItem Text="Save" Tapped="Save_Clicked" />
    </ie:RadImageEditorToolbar>
</Grid>
Calling the API
Now, in the code-behind, let's define the event handlers for the CommandToolbarItem's Clicked events.
private async void Save_Clicked(object sender, EventArgs e)
{
    await SaveToPicturesFolderAsync();
}

private async void RemoveBackground_Clicked(object sender, EventArgs e)
{
    await RemoveBackgroundAsync();
}
The SaveToPicturesFolder task is straightforward thanks to .NET Standard 2.0. It uses System.IO.File to save a file to the user's pictures folder for that device.
private async Task SaveToPicturesFolderAsync()
{
    var folderPath = Environment.GetFolderPath(Environment.SpecialFolder.MyPictures);

    using (var fileStream = File.OpenWrite(Path.Combine(folderPath, "ImageEditor_Final.jpeg")))
    {
        await this.Editor.SaveAsync(fileStream, ImageFormat.Jpeg, 0.9);
    }
}
Finally, the RemoveBackgroundAsync task is where the API call is made. Take notice of the code comments in the following snippet to follow the workflow.
private async Task RemoveBackgroundAsync()
{
    // 1. Create the file path for a temporary image file
    var folderPath = Environment.GetFolderPath(Environment.SpecialFolder.LocalApplicationData);
    var tempFilePath = Path.Combine(folderPath, "temp_image.jpeg");

    // 2. Use the ImageEditor's SaveAsync to save the current image to the temp file
    using (var tempFileStream = File.OpenWrite(tempFilePath))
    {
        await this.Editor.SaveAsync(tempFileStream, ImageFormat.Jpeg, 0.9);
    }

    // 3. Create a MultipartFormDataContent and add the headers required by the API you're using
    using (var formData = new MultipartFormDataContent())
    {
        // 4. In this case, we pass the API key and the image file
        formData.Headers.Add("X-Api-Key", "YOUR_REMOVEBG_API_KEY_GOES_HERE");
        formData.Add(new ByteArrayContent(File.ReadAllBytes(tempFilePath)), "image_file", "file.jpg");
        formData.Add(new StringContent("auto"), "size");

        // 5. Make the request to the API
        using(var client = new HttpClient())
        using (var response = await client.PostAsync("https://api.remove.bg/v1.0/removebg", formData))
        {
            if (response.IsSuccessStatusCode)
            {
                var noBgFilePath = Path.Combine(folderPath, "no-bg_image.jpg");

                // 6. Save the API response as a new image file
                using (var fileStream = File.OpenWrite(noBgFilePath))
                {
                    await response.Content.CopyToAsync(fileStream);
                }

                // 6. Set the ImageEditor source to the new file path
                Editor.Source = new FileImageSource { File = noBgFilePath };
            }
        }
    }
}
<ContentPage xmlns:ie="clr-namespace:Telerik.XamarinForms.ImageEditor;assembly=Telerik.XamarinForms.ImageEditor"
             xmlns:primitives="clr-namespace:Telerik.XamarinForms.Primitives;assembly=Telerik.XamarinForms.Primitives"
             ...>

    <Grid BackgroundColor="LightGray">
        <Grid.RowDefinitions>
            <RowDefinition />
            <RowDefinition Height="Auto" />
        </Grid.RowDefinitions>

       <!--  ImageEditor and Toolbar set up
        <ie:RadImageEditor .../>
        <ie:RadImageEditorToolbar Grid.Row="1" .../>
        -->

        <!-- Add a hidden RadBusyIndicator on top of both rows (RowSpan=2) with a translucent background-->
        <primitives:RadBusyIndicator x:Name="BusyIndicator"
                                     IsVisible="False"
                                     AnimationContentHeightRequest="100"
                                     AnimationContentWidthRequest="100"
                                     AnimationType="Animation6"
                                     BackgroundColor="#99FFFFFF"
                                     Grid.Row="0"
                                     Grid.RowSpan="2">
            <primitives:RadBusyIndicator.BusyContent>
                <StackLayout>
                    <!-- A label that you can update as operations change (i.e. show progress) -->
                    <Label x:Name="BusyLabel" />
                    <!-- Add a cancel button -->
                    <Button Text="cancel" Clicked="Button_OnClicked"/>
                </StackLayout>
            </primitives:RadBusyIndicator.BusyContent>
            <primitives:RadBusyIndicator.BusyContentTemplate>
                <ControlTemplate>
                    <Grid>
                        <Grid.RowDefinitions>
                            <RowDefinition Height="Auto" />
                            <RowDefinition Height="Auto" />
                            <RowDefinition Height="*" />
                        </Grid.RowDefinitions>
                        <ContentPresenter Content="{TemplateBinding Path=AnimationContent}" />
                        <ContentPresenter Content="{TemplateBinding Path=BusyContent}"
                                          HorizontalOptions="Center"
                                          Grid.Row="1" />
                    </Grid>
                </ControlTemplate>
            </primitives:RadBusyIndicator.BusyContentTemplate>
        </primitives:RadBusyIndicator>
    </Grid>
</ContentPage>
Toggle Busyindicator before and after the call. Update "busy message" via the BusyLabel and offer a cancel button.
// CancellationTokenSource field on the class level
private CancellationTokenSource cts;

private async void RemoveBackground_Clicked(object sender, EventArgs e)
{
    // Show the busy indicator
    BusyIndicator.IsVisible = BusyIndicator.IsBusy = true;
    BusyLabel.Text = "Starting request...";

    await RemoveBackgroundAsync();

    // Hide the busy indicator
    BusyLabel.Text = "Done!";
    BusyIndicator.IsVisible = BusyIndicator.IsBusy = false;
}

private async Task RemoveBackgroundAsync()
{
    ...

    BusyLabel.Text = "Uploading and processing image...";

    // New up the CancellationTokenSource and pass the CancellationToken to to the HttpClient's PostAsync call
    cts = new CancellationTokenSource();

    using (var response = await client.PostAsync("https://api.remove.bg/v1.0/removebg", formData, cts.Token))

    ...
}


private void Button_OnClicked(object sender, EventArgs e)
{
    BusyLabel.Text = "Cancelling...";

    // If the user clicked the Cancel button in the busy indicator, cancel the HTTP request via token
    cts.Cancel();
}
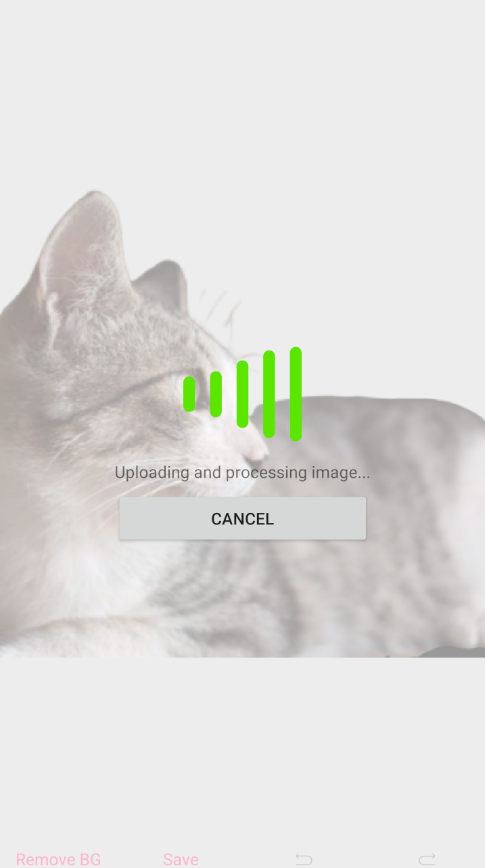
Here is the result at while the remote operation is busy:
See Also
For more information, visit the following locations: