New to Telerik UI for WPF? Download free 30-day trial

Binding To Object

To bind the RadListBox to a collection of business objects, you should use its ItemsSource property and define the DataTemplate that is needed to display the data from the collection. If you want the changes to the collection to be automatically reflected to the RadListBoxItems, the collection should implement the INotifyCollectionChanged interface, as well as your business object to implement the INotifyPropertyChanged interface.

The following tutorial will guide you how to bind a RadListBox to a collection of business objects. Two cases will be shown:

Before reading this tutorial you should get familiar with the Data Binding support of the RadListBox control.

In order to bind a RadListBox to a collection of business objects, you should perform the following instructions:

  • Add a new RadListBox declaration in your XAML:

Declaring RadListBox

<telerik:RadListBox x:Name="radListBox" Width="300" /> 
  • Create a new business object named Customer. Its structure is shown on the next code-snippet:

Business object implementation

public class Customer 
{ 
    public string Name { get; set; } 
    public string City { get; set; }         
    public string Phone { get; set; } 
    public Customer(string name, string city, string phone) 
    { 
        this.Name = name; 
        this.City = city; 
        this.Phone = phone; 
    } 
} 

The RadListBox control will be bound to an ObservableCollection of Customer objects.

  • Create a new class named CustomerViewModel. In fact, this will be the data source for the listbox. This class has only one purpose - to initialize a collection with sample data.

ViewModel

public class CustomerViewModel 
{ 
    public ObservableCollection<Customer> Customers { get; set; } 
    public CustomerViewModel() 
    { 
        this.Customers = new ObservableCollection<Customer>() 
        { 
            new Customer("Maria Anders", "Berlin", "030-0074321"), 
            new Customer("Lino Rodriguez", "Lisbon", "(1) 354-2534"), 
            new Customer("Yoshi Tannamuri", "Vancouver","(604) 555-3392"), 
            new Customer("Renate Messner","Frankfurt a.M.","069-0245984"), 
            new Customer("Paolo Accorti","Torino","011-4988260"), 
            new Customer("Philip Cramer","Brandenburg","0555-09876") 
        }; 
    } 
} 
  • Declare the CustomerViewModel as a resource in your XAML:

Declaring the ViewModel as resource

  <UserControl.Resources> 
    <example:CustomerViewModel x:Key="CustomerViewModel" /> 
  </UserControl.Resources> 
  • Update your RadListBox declaration and its ItemsSource property:

Setting the ItemsSource

<telerik:RadListBox x:Name="radListBox1" Width="300"  
        ItemsSource="{Binding Customers, Source={StaticResource CustomerViewModel}}" /> 

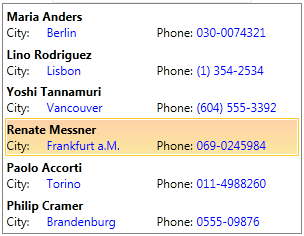
Using Custom ItemTemplate

  • The final step is to create a custom DataTemplate and set it to the RadListBox's ItemTemplate property.

Declaring the ItemTemplate

<DataTemplate x:Key="ListBoxCustomTemplate"> 
  <Grid Margin="0" Width="300"> 
    <Grid.ColumnDefinitions> 
      <ColumnDefinition /> 
      <ColumnDefinition /> 
    </Grid.ColumnDefinitions> 
    <Grid.RowDefinitions> 
      <RowDefinition /> 
      <RowDefinition /> 
    </Grid.RowDefinitions> 
    <TextBlock FontWeight="Bold" Grid.ColumnSpan="2" Text="{Binding Name}" /> 
    <TextBlock Grid.Row="1" Text="City:" /> 
    <TextBlock Grid.Row="1" Foreground="Blue" Margin="40,0,0,0" 
                Text="{Binding City}" /> 
    <TextBlock Grid.Row="1" Grid.Column="1" Text="Phone:" /> 
    <TextBlock Grid.Row="1" Foreground="Blue" Grid.Column="1" Margin="40,0,0,0" 
                Text="{Binding Phone}" /> 
  </Grid> 
</DataTemplate> 
  • Update your RadListBox declaration and set its ItemTemplate property like in the example below:

Setting the ItemTemplate

<telerik:RadListBox Width="300"  
        ItemsSource="{Binding Customers, Source={StaticResource CustomerViewModel}}" 
        ItemTemplate="{StaticResource ListBoxCustomTemplate}"/> 

Run your demo, the end result is shown on the snapshot below:

radlistbox populatingwithdata bindingtoobject 010

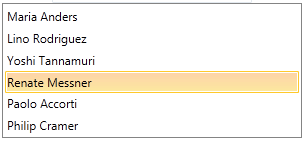
Using DisplayMemberPath

Instead of creating a custom ItemTemplate, an alternative approach is to use the DisplayMemberPath property. Its purpose is to get or set a path to a value on the source object to serve as the visual representation of the object.

For example, instead of setting the ItemTemplate, set the RadListBox's DisplayMemberPath property to point the Name property of the Customer object.

Setting the DisplayMemberPath

<telerik:RadListBox Width="300"  
        ItemsSource="{Binding Customers, Source={StaticResource CustomerViewModel}}" 
        DisplayMemberPath="Name"/> 

The end result is shown on the next snapshot:

radlistbox populatingwithdata bindingtoobject 020

If neither the DisplayMemberPath nor the ItemTemplate are set, then the content of the item would be set to the value returned by the ToString() method of the business object.

See Also

In this article