Export Events
You have more control over the exportation by utilizing the export events which are fired when you export data from RadGridView:
Export Events Life Cycle
The purpose of the events is to provide you with a mechanism to style or modify the exported data.
When you call the Export method of RadGridView, the ElementExporting and ElementExported events are fired.
If you are using the more recently introduced ExportToXlsx and ExportToPdf methods, you should take advantage of the ElementExportingToDocument and ElementExportedToDocument events.
The ElementExporting and ElementExportingToDocument events can be cancelled for a particular row or cell. If they are not cancelled - the ElementExported or ElementExportedToDocument event is fired for the associated RadGridView.
You can subscribe to the events either declaratively or from the code-behind, as shown in the next three examples.
Example 1: Subscribe to events declaratively
<telerik:RadGridView x:Name="RadGridView1"
             ElementExporting="RadGridView1_ElementExporting"
             ElementExported="RadGridView1_ElementExported" />
Example 2: Subscribe to events from the code-behind
RadGridView1.ElementExporting += RadGridView1_ElementExporting;
RadGridView1.ElementExported += RadGridView1_ElementExported;
AddHandler RadGridView1.ElementExporting, AddressOf RadGridView1_ElementExporting
AddHandler RadGridView1.ElementExported, AddressOf RadGridView1_ElementExported
ElementExporting
Telerik introduced the ElementExporting event in Q1 2010 SP2 as a direct replacement of the obsolete Exporting event. The ElementExporting event takes argument of type GridViewElementExportingEventArgs, which expose the following properties:
- Cancel: Gets or sets a boolean value that indicates whether the event should be canceled or not.
- Context: Gets the current context.
- Element: Gets the current element that is about to be exported.
- Format: Gets the current export format.
- Value: Gets or sets the value to be exported.
- ShouldEncodeValue: Gets or sets a value indicating whether special characters in the cell value will be escaped.
- VisualParameters: Gets the visual export parameters. (Introduced in Q3 2013.)
The event argument's property Element identifies the currently exported element. The possible element types are defined in the ExportElement enumeration:
- Cell
- GroupHeaderCell
- GroupHeaderRow
- GroupHeaderRow
- HeaderRow
- Row
- Table
You can use the Element property in combination with the Cancel property to omit the export of a certain element.
ElementExported
The ElementExported event takes argument of type GridViewElementExportedEventArgs, which expose the following properties:
- Context: Gets the current context.
- Element: Gets the current element.
- Format: Gets the current export format.
- Writer: Gets the StreamWriter.
You can use the ElementExported event if you want to write additional data to the stream. A common scenario is to add Row Details to the exported data, as shown in Example 3.
Example 3: Add row details to the exported data
private void RadGridView1_ElementExported(object sender, GridViewElementExportedEventArgs e)
{
    if (e.Element == ExportElement.Row)
    {
        Employee obj = e.Context as Employee;
        if (obj != null)
        {
            e.Writer.Write(String.Format(@"<tr><td style=""background-color:#CCC;"" colspan=""{0}"">",
                ((IEnumerable<Telerik.Windows.Controls.GridViewColumn>)RadGridView1.Columns).Count()));
            e.Writer.Write(String.Format(@"<b>Birth date:</b> {0} <br />", obj.BirthDate));
            e.Writer.Write(String.Format(@"<b>Hire date:</b> {0} <br />", obj.HireDate));
            e.Writer.Write(String.Format(@"<b>Address:</b> {0} <br />", obj.Address));
            e.Writer.Write(String.Format(@"<b>City:</b> {0} <br />", obj.City));
            e.Writer.Write(String.Format(@"<b>Notes:</b> {0} <br />", obj.Notes));
            e.Writer.Write("</td></tr>");
        }
    }
}
Private Sub RadGridView1_ElementExported(ByVal sender As Object, ByVal e As GridViewElementExportedEventArgs)
    If e.Element = ExportElement.Row Then
        Dim obj As Employee = TryCast(e.Context, Employee)
        If obj IsNot Nothing Then
            e.Writer.Write(String.Format("<tr><td style=""background-color:#CCC;"" colspan=""{0}"">", DirectCast(RadGridView1.Columns, IEnumerable(Of Telerik.Windows.Controls.GridViewColumn)).Count()))
            e.Writer.Write(String.Format("<b>Birth date:</b> {0} <br />", obj.BirthDate))
            e.Writer.Write(String.Format("<b>Hire date:</b> {0} <br />", obj.HireDate))
            e.Writer.Write(String.Format("<b>Address:</b> {0} <br />", obj.Address))
            e.Writer.Write(String.Format("<b>City:</b> {0} <br />", obj.City))
            e.Writer.Write(String.Format("<b>Notes:</b> {0} <br />", obj.Notes))
            e.Writer.Write("</td></tr>")
        End If
    End If
End Sub
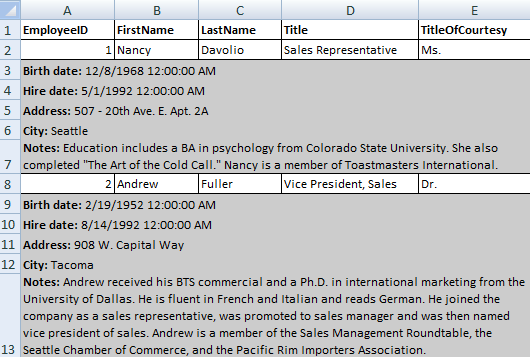
You can see the result in Figure 1.
Figure 1: Exporting Row Details
ElementExportingToDocument
The ElementExportingToDocument event is fired when exporting with ExportToXlsx or ExportToPdf methods. The event handler expects a GridViewElementExportingToDocumentEventArgs argument that has the following properties:
- Element: The export element.
- Cancel: The event is cancelable.
- DataContext: The DataContext of the corresponding visual element. For example, the DataContext of a row is its corresponding data item.
- Value: The value to be exported.
- VisualParameters: They are of type GridViewDocumentVisualExportParameters and have a Style property that is of type CellSelectionStyle. It provides the ability to set the FontSize, Fill, etc., for the exported document.
ElementExportedToDocument
The ElementExportedToDocument event is fired when exporting with the ExportToXlsx or ExportToPdf methods. The event handler expects a GridViewElementExportedToDocumentEventArgs argument that has the following properties:
- Element: The export Element.
- DataContext: The DataContext of the corresponding visual element.
InitializingExcelMLStyles (ExcelML only)
This event will be only raised when exporting with ExportFormat.ExcelML.
You can define a style when the InitializingExcelMLStyles event is raised, as shown in Example 4.
Example 4: Define a style
ExcelMLStyle style = new ExcelMLStyle("0");
style.Alignment.Horizontal = ExcelMLHorizontalAlignment.Automatic;
e.Styles.Add(style);
Dim style As New ExcelMLStyle("0")
style.Alignment.Horizontal = ExcelMLHorizontalAlignment.Automatic
e.Styles.Add(style)
'
Here is a list of the properties that could be set for ExcelMLStyle:
Alignment:
- Horizontal: You can choose a specific alignment through the ExcelMLHorizontalAlignment enumeration.
- Vertical: You can choose a specific alignment through the ExcelMLVerticalAlignment enumeration.
- Indent
- Rotate
- ShrinkToFit
- VerticalText
- WrapText
Font:
- Bold
- Color
- FontName
- Italic
- Outline (only for Mac)
- Size
- StrikeThrough
- Underline: You can choose a specific underline through ExcelMLUnderline.
Interior:
- Color: You must also set a pattern in order to be applied in Interior.Color.
- Pattern: You can choose a specific pattern through ExcelMLPattern.
- PatternColor: You must also set a pattern in order to be applied in Interior.PatternColor.
NumberFormat:
- Format
Example 5 shows how to use ExcelMLStyle.
Example 5: Modify the style before exporting
private void clubsGrid_InitializingExcelMLStyles_1(object sender, ExcelMLStylesEventArgs e)
{
    ExcelMLStyle style = new ExcelMLStyle("0");

    // Alignment
    style.Alignment.Horizontal = ExcelMLHorizontalAlignment.Automatic;
    style.Alignment.Vertical = ExcelMLVerticalAlignment.Top;
    style.Alignment.Indent = 5;
    style.Alignment.Rotate = 0;
    style.Alignment.ShrinkToFit = true;
    style.Alignment.VerticalText = true;
    style.Alignment.WrapText = true;

    // Font
    style.Font.Bold = true;
    style.Font.Color = "Beige";
    style.Font.FontName = "Calibri";
    style.Font.Italic = true;
    style.Font.Outline = true;
    style.Font.Shadow = true;
    style.Font.Size = 10;
    style.Font.StrikeThrough = true;
    style.Font.Underline = ExcelMLUnderline.Double;

    // Interior
    style.Interior.Color = "Green";
    style.Interior.Pattern = ExcelMLPattern.Solid;
    style.Interior.PatternColor = "#FF0000";

    // NumberFormat
    style.NumberFormat.Format = "00.00";

    e.Styles.Add(style);
}
Private Sub clubsGrid_InitializingExcelMLStyles_1(ByVal sender As Object, ByVal e As ExcelMLStylesEventArgs)
    Dim style As New ExcelMLStyle("0")

    ' Alignment
    style.Alignment.Horizontal = ExcelMLHorizontalAlignment.Automatic
    style.Alignment.Vertical = ExcelMLVerticalAlignment.Top
    style.Alignment.Indent = 5
    style.Alignment.Rotate = 0
    style.Alignment.ShrinkToFit = True
    style.Alignment.VerticalText = True
    style.Alignment.WrapText = True

    ' Font
    style.Font.Bold = True
    style.Font.Color = "Beige"
    style.Font.FontName = "Calibri"
    style.Font.Italic = True
    style.Font.Outline = True
    style.Font.Shadow = True
    style.Font.Size = 10
    style.Font.StrikeThrough = True
    style.Font.Underline = ExcelMLUnderline.Double

    ' Interior
    style.Interior.Color = "Green"
    style.Interior.Pattern = ExcelMLPattern.Solid
    style.Interior.PatternColor = "#FF0000"

    ' NumberFormat
    style.NumberFormat.Format = "00.00"

    e.Styles.Add(style)
End Sub