How to use RadDateTimePicker in a Grid
This tutorial will guide you through creating a custom RadDateTimePicker column in a RadGridView control.
To do this you need to alter the default CellEditTemplate in your RadGridView control. You have to indicate that the RadDateTimePicker control is to be used whenever the cell enters in edit mode.
For the purpose of this example the first thing you have to do is to define the RadGridView and populate it with sample data. Below are the custom business object definitions, as well as the RadGridView declaration.
public class Club
{
    public Club(string name, DateTime established, int stadiumCapacity)
    {
        this.Name = name;
        this.Established = established;
        this.StadiumCapacity = stadiumCapacity;
    }
    public string Name
    {
        get;
        set;
    }
    public DateTime? Established
    {
        get;
        set;
    }
    public int StadiumCapacity
    {
        get;
        set;
    }
    public static IEnumerable<Club> GetClubs()
    {
        ObservableCollection<Club> clubs = new ObservableCollection<Club>();
        clubs.Add(new Club("Liverpool", new DateTime(1892, 1, 1), 45362));
        clubs.Add(new Club("Manchester Utd.", new DateTime(1878, 1, 1), 76212));
        clubs.Add(new Club("Chelsea", new DateTime(1905, 1, 1), 42055));
        clubs.Add(new Club("Arsenal", new DateTime(1886, 1, 1), 60355));
        return clubs;
    }
}
Public Class Club
    Public Sub New(name As String, established As DateTime, stadiumCapacity As Integer)
        Me.Name = name
        Me.Established = established
        Me.StadiumCapacity = stadiumCapacity
    End Sub
    Public Property Name() As String
        Get
            Return m_Name
        End Get
        Set(value As String)
            m_Name = value
        End Set
    End Property
    Private m_Name As String
    Public Property Established() As System.Nullable(Of DateTime)
        Get
            Return m_Established
        End Get
        Set(value As System.Nullable(Of DateTime))
            m_Established = value
        End Set
    End Property
    Private m_Established As System.Nullable(Of DateTime)
    Public Property StadiumCapacity() As Integer
        Get
            Return m_StadiumCapacity
        End Get
        Set(value As Integer)
            m_StadiumCapacity = value
        End Set
    End Property
    Private m_StadiumCapacity As Integer
    Public Shared Function GetClubs() As IEnumerable(Of Club)
        Dim clubs As New ObservableCollection(Of Club)()
        clubs.Add(New Club("Liverpool", New DateTime(1892, 1, 1), 45362))
        clubs.Add(New Club("Manchester Utd.", New DateTime(1878, 1, 1), 76212))
        clubs.Add(New Club("Chelsea", New DateTime(1905, 1, 1), 42055))
        clubs.Add(New Club("Arsenal", New DateTime(1886, 1, 1), 60355))
        Return clubs
    End Function
End Class
<telerik:RadGridView Name="radGridView"
                     AutoGenerateColumns="False">
    <telerik:RadGridView.Columns>
        <telerik:GridViewDataColumn Header="Name"
                                    DataMemberBinding="{Binding Name}" />
        <telerik:GridViewDataColumn Header="Established"
                                    DataMemberBinding="{Binding Established}" />
        <telerik:GridViewDataColumn Header="Stadium"
                                    DataMemberBinding="{Binding StadiumCapacity}"
                                    DataFormatString="{}{0:N0}" />
    </telerik:RadGridView.Columns>
</telerik:RadGridView>
this.radGridView.ItemsSource = Club.GetClubs();
Me.radGridView.ItemsSource = Club.GetClubs()
The next and final step in the example is to define the actual CellTemplate used for the DateTime column. Here is the complete XAML:
<telerik:RadGridView Name="radGridView1"
                     AutoGenerateColumns="False">
    <telerik:RadGridView.Columns>
        <telerik:GridViewDataColumn Header="Name"
                                    DataMemberBinding="{Binding Name}" />
        <telerik:GridViewDataColumn Header="Established"
                                    DataMemberBinding="{Binding Established}">
            <telerik:GridViewDataColumn.CellEditTemplate>
                <DataTemplate>
                    <telerik:RadDateTimePicker SelectedValue="{Binding Established, Mode=TwoWay}"/>
                </DataTemplate>
            </telerik:GridViewDataColumn.CellEditTemplate>
        </telerik:GridViewDataColumn>
        <telerik:GridViewDataColumn Header="Stadium"
                                    DataMemberBinding="{Binding StadiumCapacity}"
                                    DataFormatString="{}{0:N0}" />
    </telerik:RadGridView.Columns>
</telerik:RadGridView>
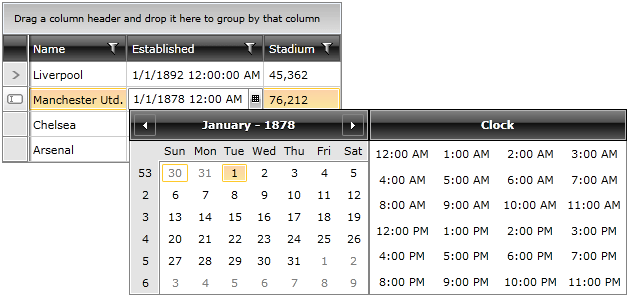
Here is the result: