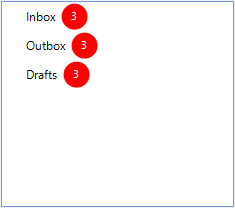
Notification badge for nodes in RadTreeView
Environment
| Product Version | Product | Author |
|---|---|---|
| 2021.1.223 | RadTreeView for WinForms | Nadya Karaivanova |
Description
Usually badges are used to indicate that a new message, email, push notification, or any other info message is waiting. Each app with new unread information has a white number with a red background in the upper right hand corner of the app icon. This is a badge. This article will demonstrate how to create such a notification badge/button for the nodes in RadTreeView control.

Solution
This can be done by creating a custom TreeNodeElement, which will replace the default one in the CreateNodeElement event handler. We should override the CreateChildElements method in order to add a red circled LightVisualElement that would illustrate the notification badge. You can customize the LightVisualElement in a way that is suitable for you, I used red background and white text for the numbers.
If you want to update the displayed number in the red circle, the Synchronize method is the right place where you can sync the LightVisualElement's text.
public class NotificationNodeElement : TreeNodeElement
{
    int result;
    LightVisualElement lve;
    int sizeConst = 26;

    protected override void CreateChildElements()
    {
        base.CreateChildElements();

        lve = new LightVisualElement();
        lve.BackColor = Color.Red;
        lve.DrawFill = true;
        lve.StretchHorizontally = false;
        lve.StretchVertically = false;
        lve.GradientStyle = Telerik.WinControls.GradientStyles.Solid;
        lve.Shape = new RoundRectShape(sizeConst / 2);
        lve.SmoothingMode = System.Drawing.Drawing2D.SmoothingMode.AntiAlias;
        lve.ForeColor = Color.White;
        lve.MinSize = new Size(sizeConst, sizeConst);
        this.Children.Add(lve);
        lve.Visibility = ElementVisibility.Hidden;
    }
    public override void Synchronize()
    {
        base.Synchronize();

        RadTreeNode node = this.Data;

        if (node.Tag != null)
        {
            result = (int)node.Tag;

            if (result == 0)
            {
                lve.Visibility = ElementVisibility.Hidden;
            }
            else
            {
                lve.Visibility = ElementVisibility.Visible;
            }

            lve.Text = result.ToString();
        }

    }
    protected override Type ThemeEffectiveType
    {
        get { return typeof(TreeNodeElement); }
    }
}
Public Class NotificationNodeElement
    Inherits TreeNodeElement

    Private result As Integer
    Private lve As LightVisualElement
    Private sizeConst As Integer = 26

    Protected Overrides Sub CreateChildElements()
        MyBase.CreateChildElements()
        lve = New LightVisualElement()
        lve.BackColor = Color.Red
        lve.DrawFill = True
        lve.StretchHorizontally = False
        lve.StretchVertically = False
        lve.GradientStyle = Telerik.WinControls.GradientStyles.Solid
        lve.Shape = New RoundRectShape(sizeConst / 2)
        lve.SmoothingMode = System.Drawing.Drawing2D.SmoothingMode.AntiAlias
        lve.ForeColor = Color.White
        lve.MinSize = New Size(sizeConst, sizeConst)
        Me.Children.Add(lve)
        lve.Visibility = ElementVisibility.Hidden
    End Sub

    Public Overrides Sub Synchronize()
        MyBase.Synchronize()
        Dim node As RadTreeNode = Me.Data

        If node.Tag IsNot Nothing Then
            result = CInt(node.Tag)

            If result = 0 Then
                lve.Visibility = ElementVisibility.Hidden
            Else
                lve.Visibility = ElementVisibility.Visible
            End If

            lve.Text = result.ToString()
        End If
    End Sub

    Protected Overrides ReadOnly Property ThemeEffectiveType As Type
        Get
            Return GetType(TreeNodeElement)
        End Get
    End Property
End Class
And also we need to subscribe to the CreateNodeElement event in order to use the newly created custom notification node:
public NotificationTreeNode()
{
    InitializeComponent();

    this.radTreeView1.CreateNodeElement += new CreateTreeNodeElementEventHandler(radTreeView1_CreateNodeElement);
    this.radTreeView1.LineStyle = TreeLineStyle.Solid;
    this.radTreeView1.Nodes.Add(new RadTreeNode("Inbox"));
    this.radTreeView1.Nodes.Add(new RadTreeNode("Outbox"));
    this.radTreeView1.Nodes.Add(new RadTreeNode("Drafts"));
    this.radTreeView1.ItemHeight = 30;

}

private void radTreeView1_CreateNodeElement(object sender, CreateTreeNodeElementEventArgs e)
{
    e.NodeElement = new NotificationNodeElement();
}
int result = 1;
private void radButton1_Click(object sender, EventArgs e)
{
    this.radTreeView1.Nodes[0].Tag = result;
    this.radTreeView1.Nodes[1].Tag = result;
    this.radTreeView1.Nodes[2].Tag = result;
    this.radTreeView1.TreeViewElement.Update(RadTreeViewElement.UpdateActions.StateChanged);
    result++;
}

private void radButton2_Click(object sender, EventArgs e)
{
    this.radTreeView1.Nodes[0].Tag = result;
    this.radTreeView1.Nodes[1].Tag = result;
    this.radTreeView1.Nodes[2].Tag = result;
    this.radTreeView1.TreeViewElement.Update(RadTreeViewElement.UpdateActions.StateChanged);
    result--;
}
Class SurroundingClass
    Public Sub New()
        InitializeComponent()
        AddHandler Me.radTreeView1.CreateNodeElement, AddressOf New CreateTreeNodeElementEventHandler(AddressOf radTreeView1_CreateNodeElement)
        Me.radTreeView1.LineStyle = TreeLineStyle.Solid
        Me.radTreeView1.Nodes.Add(New RadTreeNode("Inbox"))
        Me.radTreeView1.Nodes.Add(New RadTreeNode("Outbox"))
        Me.radTreeView1.Nodes.Add(New RadTreeNode("Drafts"))
        Me.radTreeView1.ItemHeight = 30
    End Sub

    Private Sub radTreeView1_CreateNodeElement(ByVal sender As Object, ByVal e As CreateTreeNodeElementEventArgs)
        e.NodeElement = New NotificationNodeElement()
    End Sub

    Private result As Integer = 1

    Private Sub radButton1_Click(ByVal sender As Object, ByVal e As EventArgs)
        Me.radTreeView1.Nodes(0).Tag = result
        Me.radTreeView1.Nodes(1).Tag = result
        Me.radTreeView1.Nodes(2).Tag = result
        Me.radTreeView1.TreeViewElement.Update(RadTreeViewElement.UpdateActions.StateChanged)
        result += 1
    End Sub

    Private Sub radButton2_Click(ByVal sender As Object, ByVal e As EventArgs)
        Me.radTreeView1.Nodes(0).Tag = result
        Me.radTreeView1.Nodes(1).Tag = result
        Me.radTreeView1.Nodes(2).Tag = result
        Me.radTreeView1.TreeViewElement.Update(RadTreeViewElement.UpdateActions.StateChanged)
        result -= 1
    End Sub
End Class
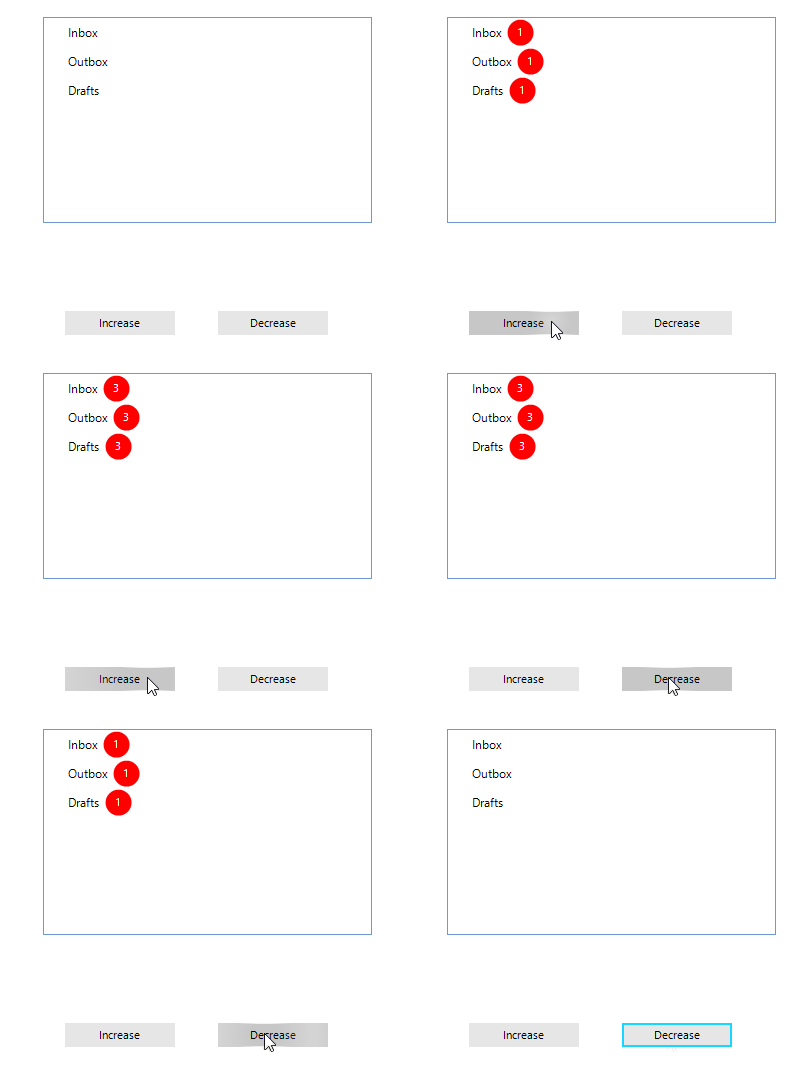
Below you can see the result of this example.
