Grouping by GridViewImageColumn
| Date Posted | Product | Author |
|---|---|---|
| May 09, 2014 | RadGridView | Desislava Yordanova |
How To
By default, RadGridView does not support grouping by GridViewImageColumn functionality. This article demonstrates how to implement such a behavior.
Solution
1. First, let’s populate the RadGridView with data. For this purpose, we will start with creating a sample class MyObject, which have Photo property of type Image.
List<Image> images = new List<Image>()
{
    Properties.Resources.open,
    Properties.Resources.paste,
    Properties.Resources.pdf
};

public Form1()
{
    InitializeComponent();

    Random rand = new Random();
    List<MyObject> list = new List<MyObject>() { };
    for (int i = 0; i < 10; i++)
    {
        list.Add(new MyObject(rand.Next(0, 4), "Name " + i, images[rand.Next(0, images.Count)]));
    }

    radGridView1.DataSource = list;
    radGridView1.AutoSizeRows = true;
    radGridView1.AutoSizeColumnsMode = GridViewAutoSizeColumnsMode.Fill;
 }
Private images As New List(Of Image)() From { _
 My.Resources.open, _
 My.Resources.paste, _
 My.Resources.pdf _
}

Public Sub New()
    InitializeComponent()

    Dim rand As New Random()
    Dim list As New List(Of MyObject)()

    For i As Integer = 0 To 9
        list.Add(New MyObject(rand.[Next](0, 4), "Name " & i, images(rand.[Next](0, images.Count))))
    Next

    RadGridView1.DataSource = list
    RadGridView1.AutoSizeRows = True
    RadGridView1.AutoSizeColumnsMode = GridViewAutoSizeColumnsMode.Fill
End Sub
The custom business object:
public class MyObject
{
    public int ID { get; set; }

    public string Title { get; set; }

    public Image Photo { get; set; }

    public MyObject(int iD, string title, Image photo)
    {
        this.ID = iD;
        this.Title = title;
        this.Photo = photo;
    }
}
Public Class MyObject
    Public Property ID() As Integer
        Get
            Return m_ID
        End Get
        Set(value As Integer)
            m_ID = value
        End Set
    End Property
    Private m_ID As Integer

    Public Property Title() As String
        Get
            Return m_Title
        End Get
        Set(value As String)
            m_Title = value
        End Set
    End Property
    Private m_Title As String

    Public Property Photo() As Image
        Get
            Return m_Photo
        End Get
        Set(value As Image)
            m_Photo = value
        End Set
    End Property
    Private m_Photo As Image

    Public Sub New(iD As Integer, title As String, photo AsImage)
        Me.ID = iD
        Me.Title = title
        Me.Photo = photo
    End Sub
End Class
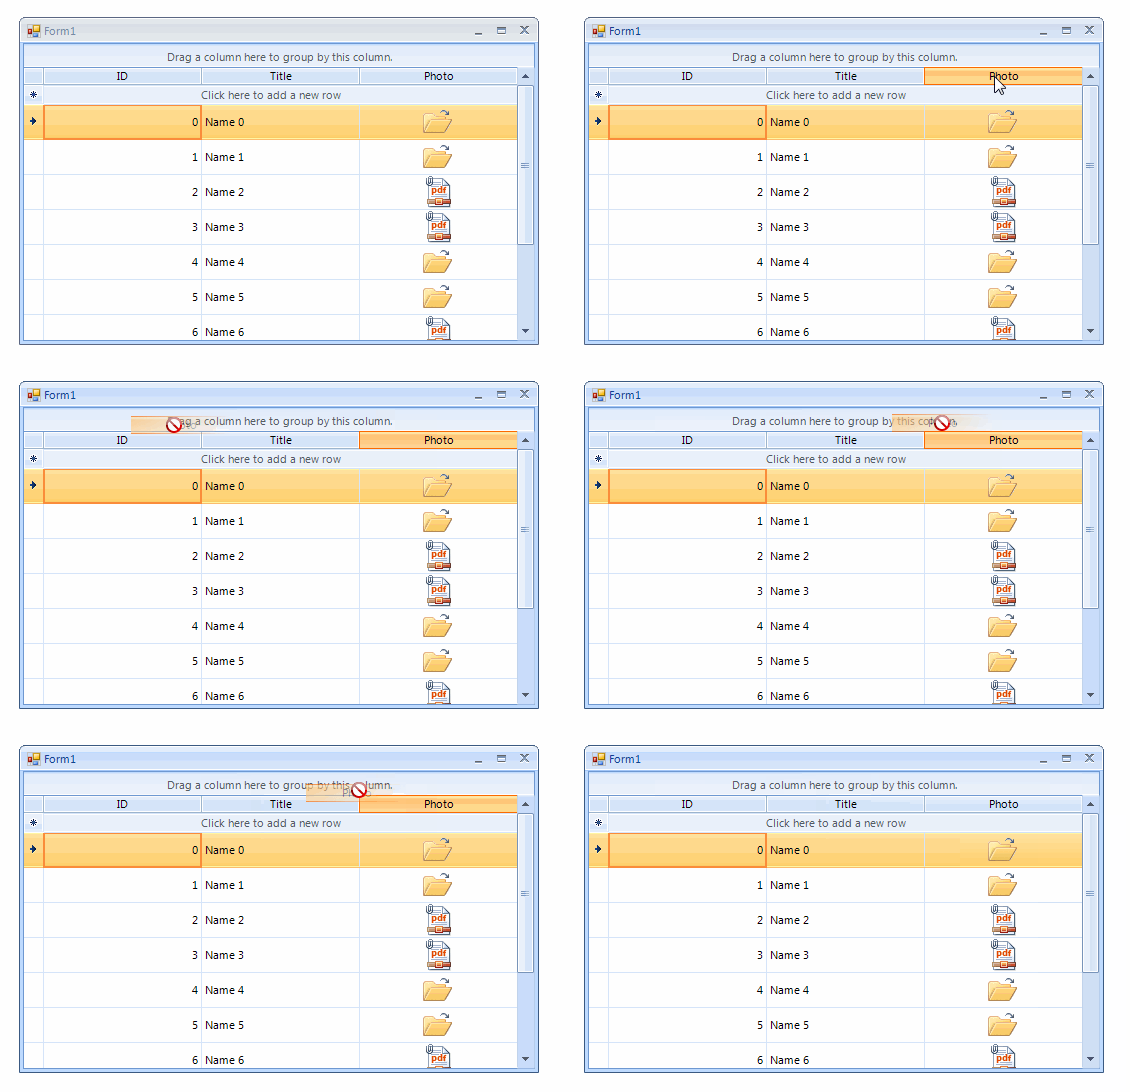
You will notice that you are not allowed to drag the GridViewImageColumn’s header and drop it over the “Drag a column here to group by this column” area.

2. In order to enable drag and drop functionality for the GridViewImageColumn’s header over the GroupPanelElement, it is necessary to use the RadDragDropService. Subscribe for its PreviewDragStart event to start the RadDragDropService if you are dragging a GridHeaderCellElement. Use the PreviewDragOver event to allow dropping over the GroupPanelElement:
public Form1()
{
    InitializeComponent();
    //populate the grid with data

    RadDragDropService svc =this.radGridView1.GridViewElement.GetService<RadDragDropService>();
    svc.PreviewDragStart += svc_PreviewDragStart;
    svc.PreviewDragOver += svc_PreviewDragOver;

    radGridView1.GroupByChanged += radGridView1_GroupByChanged;
    radGridView1.EnableCustomGrouping = true;
    radGridView1.CustomGrouping += radGridView1_CustomGrouping;
    radGridView1.GroupSummaryEvaluate += radGridView1_GroupSummaryEvaluate;
}

private void svc_PreviewDragStart(object sender, PreviewDragStartEventArgs e)
{
    SnapshotDragItem dragged = e.DragInstance asSnapshotDragItem;
    if (dragged != null && dragged.Item isGridHeaderCellElement)
    {
        e.CanStart = true;
    }
}

private void svc_PreviewDragOver(object sender, RadDragOverEventArgs e)
{
    SnapshotDragItem dragged = e.DragInstance asSnapshotDragItem;
    if (dragged != null && dragged.Item isGridHeaderCellElement)
    {
        e.CanDrop = e.HitTarget is GroupPanelElement;
    }
}
Public Sub New()
    InitializeComponent()
    'populate the grid with data

    Dim svc As RadDragDropService =Me.RadGridView1.GridViewElement.GetService(Of RadDragDropService)()
    AddHandler svc.PreviewDragStart, AddressOfsvc_PreviewDragStart
    AddHandler svc.PreviewDragOver, AddressOfsvc_PreviewDragOver

    AddHandler RadGridView1.GroupByChanged, AddressOfradGridView1_GroupByChanged
    RadGridView1.EnableCustomGrouping = True
    AddHandler RadGridView1.CustomGrouping, AddressOfradGridView1_CustomGrouping
    AddHandler RadGridView1.GroupSummaryEvaluate, AddressOfradGridView1_GroupSummaryEvaluate
End Sub

Private Sub svc_PreviewDragStart(sender As Object, e AsPreviewDragStartEventArgs)
    Dim dragged As SnapshotDragItem = TryCast(e.DragInstance, SnapshotDragItem)
    If dragged IsNot Nothing AndAlso TypeOf dragged.Item IsGridHeaderCellElement Then
        e.CanStart = True
    End If
End Sub

Private Sub svc_PreviewDragOver(sender As Object, e AsRadDragOverEventArgs)
    Dim dragged As SnapshotDragItem = TryCast(e.DragInstance, SnapshotDragItem)
    If dragged IsNot Nothing AndAlso TypeOf dragged.Item IsGridHeaderCellElement Then
        e.CanDrop = TypeOf e.HitTarget Is GroupPanelElement
    End If
End Sub
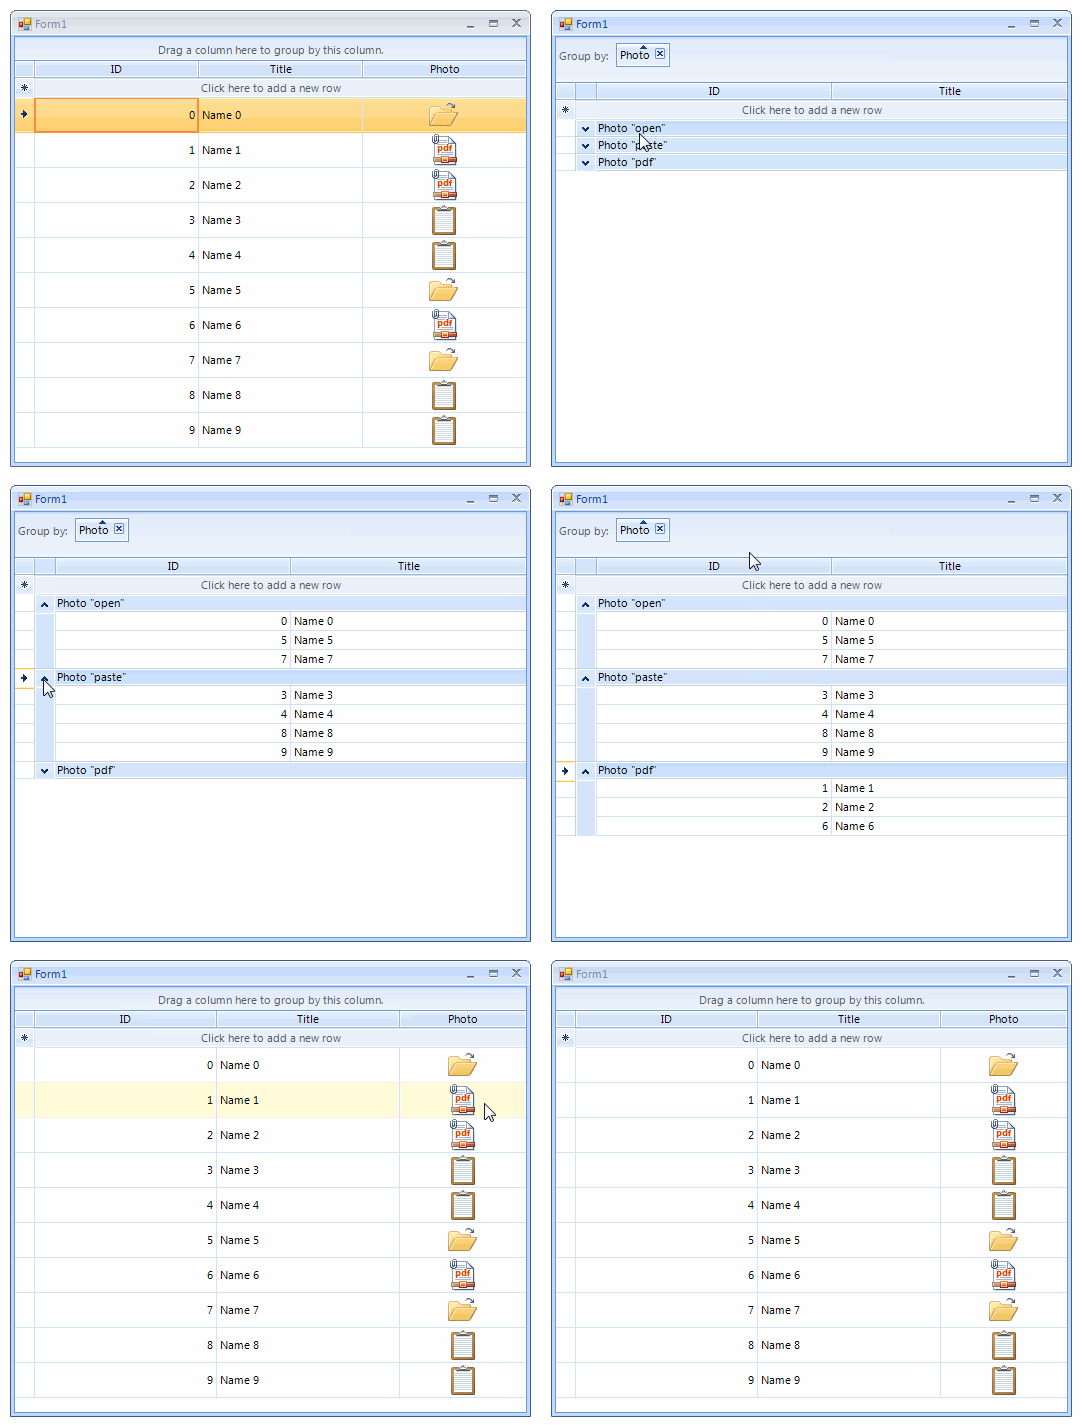
3. Use the GroupByChanged event to display the GroupFieldElement.RemoveButton
private void radGridView1_GroupByChanged(object sender, GridViewCollectionChangedEventArgs e)
{
    if(this.radGridView1.GridViewElement.GroupPanelElement.PanelContainer.Children != null &&
        this.radGridView1.GridViewElement.GroupPanelElement.PanelContainer.Children.Count > 0)
    {
        TemplateGroupsElement templateGroupsElement = radGridView1.GridViewElement.GroupPanelElement.PanelContainer.Children[0] as TemplateGroupsElement;
        if (templateGroupsElement != null)
        {
            foreach (GroupElement groupElement intemplateGroupsElement.GroupElements)
            {
                foreach (GroupFieldElement groupFieldsElement in groupElement.GroupingFieldElements)
                {
                    if(groupFieldsElement.RemoveButton.Visibility != ElementVisibility.Visible)
                    {
                        groupFieldsElement.RemoveButton.Visibility = ElementVisibility.Visible;
                    }
                }
            }
        }
    }
}
Private Sub radGridView1_GroupByChanged(sender As Object, e AsGridViewCollectionChangedEventArgs)
    IfMe.RadGridView1.GridViewElement.GroupPanelElement.PanelContainer.Children IsNot Nothing AndAlso _
        Me.RadGridView1.GridViewElement.GroupPanelElement.PanelContainer.Children.Count > 0 Then
        Dim templateGroupsElement As TemplateGroupsElement = TryCast(RadGridView1.GridViewElement.GroupPanelElement.PanelContainer.Children(0), TemplateGroupsElement)
        If templateGroupsElement IsNot Nothing Then
            For Each groupElement As GroupElement IntemplateGroupsElement.GroupElements
                For Each groupFieldsElement AsGroupFieldElement In groupElement.GroupingFieldElements
                    IfgroupFieldsElement.RemoveButton.Visibility <> ElementVisibility.Visible Then
                        groupFieldsElement.RemoveButton.Visibility = ElementVisibility.Visible
                    End If
                Next
            Next
        End If
    End If
End Sub
4. Now, we need to implement the logic for grouping the rows. We will use the custom grouping functionality of the RadGridView. Set the EnableCustomGrouping property to true and subscribe to the CustomGrouping event, where we will group rows by image name:
private void radGridView1_CustomGrouping(object sender, GridViewCustomGroupingEventArgs e)
{
    if (this.UseDefaultGrouping(e.Level))
    {
        e.Handled = false;
        return;
    }
    Image photo = e.Row.Cells["Photo"].Value as Image;
    int index = images.IndexOf(photo);

    switch (index)
    {
        case 0:
            e.GroupKey = "open";

            break;
        case 1:
            e.GroupKey = "paste";
            break;
        case 2:
            e.GroupKey = "pdf";
            break;
        default:
            e.GroupKey = "Other image";
            break;
    }
}

private bool UseDefaultGrouping(int level)
{
    GroupDescriptor groupDescriptor =this.radGridView1.GroupDescriptors[level];
    for (int i = 0; i < groupDescriptor.GroupNames.Count; i++)
    {
        if(groupDescriptor.GroupNames[i].PropertyName.Equals("Photo", StringComparison.InvariantCultureIgnoreCase))
        {
            return false;
        }
    }
    return true;
}
Private Sub radGridView1_CustomGrouping(sender As Object, e AsGridViewCustomGroupingEventArgs)
    If Me.UseDefaultGrouping(e.Level) Then
        e.Handled = False
        Return
    End If
    Dim photo As Image = TryCast(e.Row.Cells("Photo").Value, Image)
    Dim index As Integer = images.IndexOf(photo)

    Select Case index
        Case 0
            e.GroupKey = "open"

            Exit Select
        Case 1
            e.GroupKey = "paste"
            Exit Select
        Case 2
            e.GroupKey = "pdf"
            Exit Select
        Case Else
            e.GroupKey = "Other image"
            Exit Select
    End Select
End Sub

Private Function UseDefaultGrouping(level As Integer) As Boolean
    Dim groupDescriptor AsTelerik.WinControls.Data.GroupDescriptor =Me.RadGridView1.GroupDescriptors(level)
    For i As Integer = 0 To groupDescriptor.GroupNames.Count - 1
        IfgroupDescriptor.GroupNames(i).PropertyName.Equals("Photo", StringComparison.InvariantCultureIgnoreCase) Then
            Return False
        End If
    Next
    Return True
End Function
5. The last thing we need to do is to subscribe to the GroupSummaryEvaluate event and construct the desired string for the group’s title:
private void radGridView1_GroupSummaryEvaluate(object sender, GroupSummaryEvaluationEventArgs e)
{
    if (this.UseDefaultGrouping(e.Group.Level))
    {
        return;
    }

    if (e.Value == null)
    {
        e.FormatString = "Photo \"" + e.Group.Key.ToString() + "\"";
    }
}
Private Sub radGridView1_GroupSummaryEvaluate(sender As Object, e As GroupSummaryEvaluationEventArgs)
    If Me.UseDefaultGrouping(e.Group.Level) Then
        Return
    End If

    If e.Value Is Nothing Then
        e.FormatString = "Photo """ + e.Group.Key.ToString() + """"
    End If
End Sub

A complete solution in C# and VB.NET can be found here.