How to open multiple flyout screens
Environment
| Product Version | Product | Author |
|---|---|---|
| 2023.1.117 | RadFlyout for WinForms | Dinko Krastev |
Description
Flyout control is a powerful tool that combines the overlay form with any container control, thus allowing you to customize the screens per your needs. This article demonstrates how to show several flyout screens.
Solution
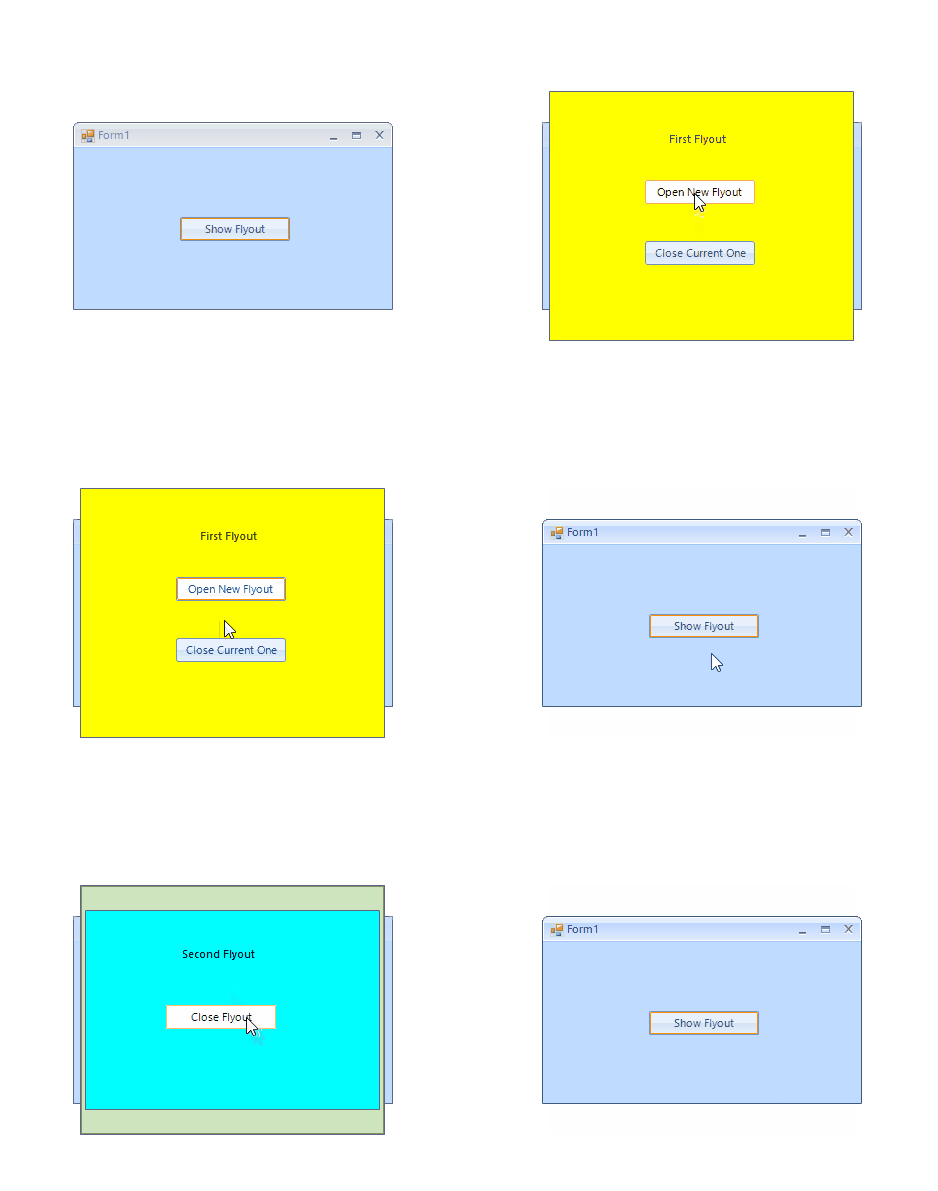
In this particular scenario, we will demonstrate how to open flyout and close it using a button inside its user control. To achieve this scenario, you can create a static property of type FlyoutScreen so that you can access it from other places and close the desired instance. In the following example, the first flyout screen will have two buttons, one to show the second flyout and one to close the first one. The second flyout will have only a close button to close the flyout. Let see this scenario in more deeply.
- The main form will have a button to open a flyout. the flyout content will by of type UserControl1.
public partial class Form1 : RadForm
{
    public Form1()
    {
        InitializeComponent();
    }
    public static FlyoutScreen FlyoutScreen { get; set; }
    private void radButton1_Click(object sender, EventArgs e)
    {
        FlyoutScreen = new FlyoutScreen();
        FlyoutScreen.Show(this, typeof(UserControl1));
    }
}
Public Partial Class Form1
    Inherits RadForm

    Public Sub New()
        InitializeComponent()
    End Sub

    Public Shared Property FlyoutScreen As FlyoutScreen

    Private Sub radButton1_Click(ByVal sender As Object, ByVal e As EventArgs)
        FlyoutScreen = New FlyoutScreen()
        FlyoutScreen.Show(Me, GetType(UserControl1))
    End Sub
End Class
- The UserControl1 will have two buttons. One to open another flyout and one to close the current one. The content of the second flyout will be of type UserControl2.
public partial class UserControl1 : UserControl
{
    public UserControl1()
    {
        InitializeComponent();
    }

    public static FlyoutScreen FlyoutScreen { get; set; }
    private void radButton1_Click(object sender, EventArgs e)
    {
        FlyoutScreen = new FlyoutScreen();
        FlyoutScreen.Show(this,typeof(UserControl2));
    }

    private void radButton2_Click(object sender, EventArgs e)
    {
        Form1.FlyoutScreen.Close();
    }
}
Public Partial Class UserControl1
    Inherits UserControl

    Public Sub New()
        InitializeComponent()
    End Sub

    Public Shared Property FlyoutScreen As FlyoutScreen

    Private Sub radButton1_Click(ByVal sender As Object, ByVal e As EventArgs)
        FlyoutScreen = New FlyoutScreen()
        FlyoutScreen.Show(Me, GetType(UserControl2))
    End Sub

    Private Sub radButton2_Click(ByVal sender As Object, ByVal e As EventArgs)
        Form1.FlyoutScreen.Close()
    End Sub
End Class
- The UserControl2 will have only close button. You can extend this approach to show as much as you want flyout screens on top of each other.
public partial class UserControl2 : UserControl
{
    public UserControl2()
    {
        InitializeComponent();
    }

    private void radButton1_Click_1(object sender, EventArgs e)
    {
        UserControl1.FlyoutScreen.Close();
    }
}
Public Partial Class UserControl2
    Inherits UserControl

    Public Sub New()
        InitializeComponent()
    End Sub

    Private Sub radButton1_Click_1(ByVal sender As Object, ByVal e As EventArgs)
        UserControl1.FlyoutScreen.Close()
    End Sub
End Class
Here is the example will look:
