Stamp Annotation
A Stamp annotation displays text or graphics intended to look as if they were stamped on the page with a rubber stamp. When opened, it displays a pop-up window containing the text of the associated note.
The StampAnnotation class is a derivative of the MarkupAnnotation (descendent of ContentAnnotation) and it exposes the following properties:
| Property | Description |
|---|---|
| Name | Gets or sets the name of the stamp. The name can be chosen from the predefined names in the StampAnnotationPredefinedNames class or it can be a custom string. In the case of a custom string an appearance should be provided via the ContentAnnotation.Content property. |
| Opacity | Gets or sets the opacity of the annotation. |
| Contents | Gets or sets the text that shall be displayed for the annotation. |
| Color | Gets or sets the color of the annotation. |
| Content | Gets the source defining the visual content of the annotation. This content is with bigger priority compared to the annotation appearance characteristics and text properties and it is visualized by default when opening the exported document in some PDF viewer. |
Creating a StampAnnotation
RadFixedDocument fixedDocument = new RadFixedDocument();
RadFixedPage page = fixedDocument.Pages.AddPage();

StampAnnotation annotation1 = page.Annotations.AddStamp(new Rect(50, 50, 300, 50));
annotation1.Name = StampAnnotationPredefinedNames.SBApproved;

StampAnnotation annotation2 = page.Annotations.AddStamp(new Rect(50, 100, 300, 50));
annotation2.Name = StampAnnotationPredefinedNames.SBPreliminaryResults;

StampAnnotation annotation3 = page.Annotations.AddStamp(new Rect(50, 150, 300, 50));
annotation3.Name = StampAnnotationPredefinedNames.SBRejected;

StampAnnotation annotation4 = page.Annotations.AddStamp(new Rect(50, 200, 300, 50));
annotation4.Name = StampAnnotationPredefinedNames.SBVoid;

Creating a StampAnnotation with FixedContentEditor
The FixedContentEditor offers the public DrawStampAnnotation method which creates a new StampAnnotation and draws it with a specified annotation size and name.
RadFixedDocument fixedDocument = new RadFixedDocument();
FixedContentEditor editor = new FixedContentEditor(fixedDocument.Pages.AddPage());

editor.Position.Translate(100, 100);
editor.DrawStampAnnotation(new Size(250, 250), StampAnnotationPredefinedNames.SBFinal);
editor.Position.Translate(400, 100);
editor.DrawStampAnnotation(new Size(250, 250), StampAnnotationPredefinedNames.SBConfidential);

Creating a StampAnnotation with Appearance
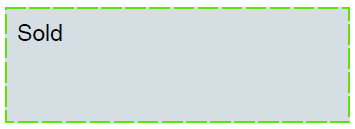
The AnnotationContentSource class, accessed by the Content property of the annotation object, represents the FormSource instances used for displaying the widget content. The following example shows how to create a custom Stamp annotation and change its visual appearance:
When creating a custom stamp name (not from the predefined names), it is important to start the name with "#". Otherwise, if the stamp is moved in Adobe, its appearance will be rewritten.
When creating appearance for an annotation, it is important to create it with the same size as the rectangle of the annotation otherwise unexpected behavior may occur when the annotation is moved in Adobe.
private RadFixedDocument CreateTextAnnotation()
{
    RadFixedDocument fixedDocument = new RadFixedDocument();
    RadFixedPage page = fixedDocument.Pages.AddPage();

    StampAnnotation annotation = page.Annotations.AddStamp(new Rect(100, 100, 300, 100));
    annotation.Name = "#Sold";

    FormSource simpleForm = new FormSource();
    CreateContentFormWithText(simpleForm, "Sold");

    annotation.Content.NormalContentSource = simpleForm;
    return fixedDocument;
}

private static void CreateContentFormWithText(FormSource normalForm, string text)
{
    normalForm.Size = new Size(300, 100);

    FixedContentEditor formEditor = new FixedContentEditor(normalForm);

    using (formEditor.SaveProperties())
    {
        formEditor.GraphicProperties.IsFilled = true;
        formEditor.GraphicProperties.IsStroked = true;
        formEditor.GraphicProperties.StrokeThickness = 2;
        formEditor.GraphicProperties.StrokeColor = new RgbColor(92, 229, 0);
        formEditor.GraphicProperties.FillColor = new RgbColor(213, 222, 226);
        formEditor.GraphicProperties.StrokeDashArray = new double[] { 17, 4 };
        formEditor.DrawRectangle(new Rect(formEditor.Position.Matrix.OffsetX,
            formEditor.Position.Matrix.OffsetY, 300, 100));
    }

    formEditor.TextProperties.FontSize = 20;
    formEditor.TextProperties.Font = FontsRepository.Courier;
    formEditor.Position.Translate(10, 10);
    formEditor.DrawText(text);
}

In .NET Standard/.NET (Target OS: None) environments, fonts beyond the 14 standard ones require a FontsProvider implementation to be resolved correctly.