Getting Started Overview
RadWindow is a part of the Telerik® UI for ASP.NET AJAX suite. It is a container that can display content from the same page (when used as controls container) or it can display a content page, different from the parent one. In the second case, the control uses an IFRAME and behaves like one.
This getting started article will walk you through creating a web page that shows how to:
- Start a RadWindow when the web page first loads.
- Use a RadWindowManager to manage multiple windows.
- Launch a RadWindow when the user clicks on a control.
- Use skins to alter the appearance of a window.
- Create modal and non-modal windows.
- Specify the behavior and position of a window.
For more information on how to work with and control RadWindow, please check the Client-Side/Server-Side Programming sections in this documentation.
Creating a Window on Startup
To create a RadWindow, drag a RadWindow control from the Visual Studio Toolbox onto an existing form.
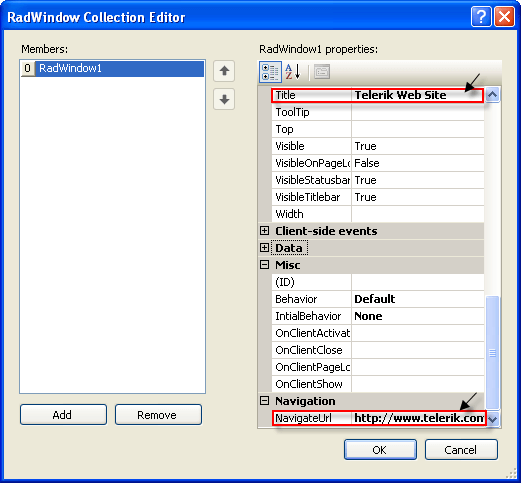
In the Behavior section of the Properties menu, set the Title property to "Telerik Web Site".
-
Set the VisibleOnPageLoad property to True.
This property is used to make the example simpler. The Opening from the server help article explains how to open a RadWindow with server code in more detail, as well as the implications of the VisibleOnPageLoad property and when it should not be used.
-
In the Navigation section, set the NavigateUrl property to https://www.telerik.com

Press F5 to run the application.
You should see the window pop up immediately. Experiment with the window by moving it on the form, using the "pin" button, maximizing and restoring it, and finally closing the window.

Using RadWindowManager with Multiple Windows
Although you can use RadWindow controls directly, if you are working with multiple RadWindow controls it is a good idea to use a RadWindowManager control. It allows you to create RadWindow instances dynamically - with JavaScript alone, without as much as a postback. Also, it can be used at a central place to set the common properties for all dialogs it opens, thus minimizing the configuration steps you need to perform.
You'll now modify the previous example to delete the RadWindow you just created and use a RadWindowsManager control to host two RadWindow controls.
Delete the RadWindow control from your form. You will now use a RadWindowManager to create the RadWindow controls instead.
Drag a RadWindowManager from the Toolbox onto your form.
Expand the Misc section of the Properties window, find the Windows property and click on the ellipsis button to display the RadWindow Collection Editor.
-
In the RadWindow Collection Editor, click the Add button to create a new RadWindow control.Use the Properties pane to set its properties to match those of the window you created before:
- Set the Title property to "Telerik Web Site".
- Set the NavigateUrl property to https://www.telerik.com
- Do not set the VisibleOnPageLoad property this time.
-
Click the Add button again to create another RadWindow control. Use the Properties pane to set the following properties:
- Set the ID property to "rwDialog".
- Set the Modal property to True.
Click Ok to exit the RadWindow Collection Editor for now.
Creating a Form for the Dialog
Before continuing with the multiple window example, you need to create a dialog form for the second RadWindow.
In the Solution Explorer, right-click on the project and choose Add New Item to display the Add New Item dialog box .
Add a new Web Form, giving it the name "MyDialog.aspx".
In the body of the Web Form, enter the literal text "My dialog content here...".
-
Move to the Source view and change the title for this form to "My Dialog". The markup should look similar to this:
ASP.NET
<head runat="server">
  <title>My Dialog</title>
</head>
<body>
  <form id="form1" runat="server">
  <div>
    My dialog content here...</div>
  </form>
</body>
Launching Windows from Another Control
-
Return to your default form and add a Button control from the Standard section of the toolbox. Set its properties as follows:
- Set the ID property to "btnTelerik".
- Set the Text property to "Show Telerik site".
Copy the Button control to create a second Button. Set its ID property to "btnDialog" and its Text property to "Show My Dialog".
-
Select the RadWindowManager, and use the Windows property to bring up the RadWindow Collection editor again.
- Select the first RadWindow in the collection and set its OpenerElementId property to "btnTelerik".
The OpenerElementId property requires the ClientID of the HTML element that will open the RadWindow when clicked.
- Select the second RadWindow in the collection (rwDialog), and set its OpenerElementID property to "btnDialog". Set its NavigateUrl property to "MyDialog.aspx".
There are other ways to open a dialog and they are explained in the Opening Windows help article.
- Click Ok to exit the dialog.
- Select the first RadWindow in the collection and set its OpenerElementId property to "btnTelerik".
Right-click the RadWindowManager control and select "Show Smart Tag". Use the Smart Tag to set the Skin to "Vista".
Press F5 to run the application. Click both buttons to bring up both windows. They both get the "Vista" look from the RadWindowManager skin. Note the differences in behavior. The "Telerik Web Site" window gets its title from the RadWindow control, while "My Dialog" gets its title from the HTML markup of MyDialog.aspx. The "Telerik Web Site" window is not modal, while "My Dialog" is modal.
Exit the application.

Altering the appearance and behavior of individual windows
Select the RadWindowManager, and use the Windows property to bring up the RadWindow Collection editor again.
-
Select the first RadWindow control in the list (the "Show Telerik site" window).
- Set its Skin property to "Default 2006".
- Set its Top property to 30 and its Left property to 0.
- Set its OffsetElementId property to "btnTelerik".
- Set its VisibleStatusBar property to False.
-
Select the second RadWindow control in the list (the "Show My Dialog" window).
- Set its Behaviors property to "Close, Move".
- Set both its Height and Width properties to 200.
Click Ok to exit the Collection editor.
-
Run the application.
- Click the "Show Telerik site" label. The window appears 30 pixels below the label you clicked. (If you had not set an OffsetElementId, its position would be relative to the upper left corner of the web page instead of to the label.) Note that the window title bar has changed its appearance to reflect the new skin and that there is no status bar.
- Click the "Show My Dialog" label. Note that this window still reflects the skin you set in the RadWindowManager. The title bar has lost all controls except the close button. Note that you can move the window, but not resize it from the 200 by 200 size you set in the designer.
