Getting Started with the Telerik WebForms TreeMap
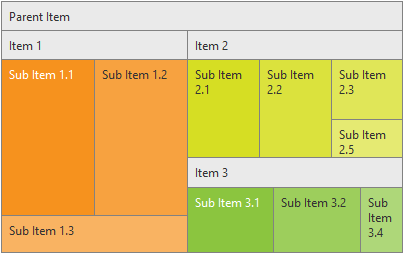
The following article demonstrates how you can add a RadTreeMap control with three steps. The end result will be similar to Figure 1:
Figure 1: RadTreeMap data visualization with three easy steps.

The control visualizes its data in Squarified AlgorithmType as this is the default algorithm type.
To add a RadTreeMap control into the page, you can simply drag it from the Visual Studio Toolbox into an ASP.NET page with correctly set ScriptManager control. Or you can paste the markup from Example 1 into the form element.
Add a ScriptManager control on the Web Form.
Add a RadTreeMap control on Web Form, with a preferable Width and Height:
Add RadTreeMapItems into the declaration of RadTreeMap and set preferable Text and Value. Note that the Value of the items is used for calculation of their ratio, regarding the visualization.
Example 1: Simple declaration of a RadTreeMap control.
<telerik:radtreemap runat="server" id="RadTreeMap1" height="250" width="400">
    <Items>
        <telerik:TreeMapItem Text="Parent Item">
            <Items>
                <telerik:TreeMapItem Text="Item 1" Value="6">
                    <Items>
                        <telerik:TreeMapItem Text="Sub Item 1.1" Value="2"></telerik:TreeMapItem>
                        <telerik:TreeMapItem Text="Sub Item 1.2" Value="2"></telerik:TreeMapItem>
                        <telerik:TreeMapItem Text="Sub Item 1.3" Value="1"></telerik:TreeMapItem>
                    </Items>
                </telerik:TreeMapItem>
                <telerik:TreeMapItem Text="Item 2" Value="4">
                    <Items>
                        <telerik:TreeMapItem Text="Sub Item 2.1" Value="5"></telerik:TreeMapItem>
                        <telerik:TreeMapItem Text="Sub Item 2.2" Value="5"></telerik:TreeMapItem>
                        <telerik:TreeMapItem Text="Sub Item 2.3" Value="3"></telerik:TreeMapItem>
                        <telerik:TreeMapItem Text="Sub Item 2.5" Value="2"></telerik:TreeMapItem>
                    </Items>
                </telerik:TreeMapItem>
                <telerik:TreeMapItem Text="Item 3" Value="3">
                    <Items>
                        <telerik:TreeMapItem Text="Sub Item 3.1" Value="2"></telerik:TreeMapItem>
                        <telerik:TreeMapItem Text="Sub Item 3.2" Value="2"></telerik:TreeMapItem>
                        <telerik:TreeMapItem Text="Sub Item 3.4" Value="1"></telerik:TreeMapItem>
                    </Items>
                </telerik:TreeMapItem>
            </Items>
        </telerik:TreeMapItem>
    </Items>
</telerik:radtreemap>
All RadTreeMapItems should have one Parent item.