Smart Tag
The RadNavigation Smart Tag allows easy access to frequently needed tasks. You can display the Smart Tag by right clicking on a RadNavigation control in the design window, and choosing Show Smart Tag.
Unbound Smart Tag
When RadNavigation is unbound, the Smart Tag looks like the following:
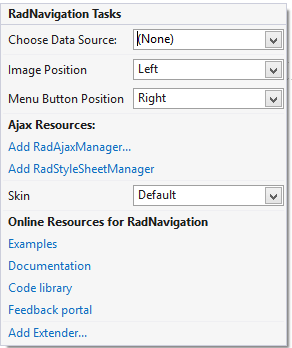
Using the unbound RadNavigation Smart Tag you can perform the following:
RadNavigation Tasks
Choose Data Source lets you bind the menu declaratively by selecting a data source from a drop-down list of all available data source components. If you select
the standard Windows Data Source Configuration Wizard appears, where you can create and configure a data source component. Image Position allows you to specify the position of the images set to the Node's ImageUrl property: Left or Right.
Menu Button Position lets set the Navigation's Menu Button Position: Left or Right.
Ajax Resources
Add RadAjaxManager... adds a RadAjaxManager component to your Web page, and displays the RadAjaxManager Property Builder where you can configure it.
Add RadStyleSheetManager adds a RadStyleSheetManager to your Web page.
Skin
The Skin drop-down lets you preview the built-in skins and select one for your navigation.
Learning Center
Links navigate you directly to RadNavigation examples, help, or code library. You can also search the Telerik web site for a given string.
Bound Smart Tag
When RadNavigation is bound to a data source, the Smart Tag looks like the following:
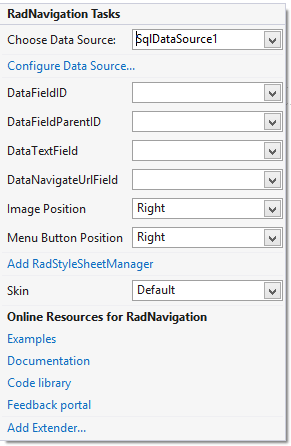
Using the bound RadNavigation Smart Tag you can perform the following:
RadNavigation Tasks
Choose Data Source lets you change the declarative navigation binding by selecting a data source from a drop-down list of all available data source components. If you select "
" the standard Windows Data Source Configuration Wizard appears, where you can create and configure a data source component. If you select "(None)", you remove the existing binding. Configure Data Source... opens the standard Windows Data Source Configuration Wizard, where you can configure the currently bound data source component.
Refresh Schema refreshes the schema for the currently bound data source component.
Once the Data Source is chosen, you can select each one of the following: DataFieldID,DataFieldParentID,DataTextField and DataNavigationUrlField. For the first two, you need to select the fields in the Data Source that will be used when creating the hierarchy of the RadNavigation. The rest will serve data respectively for the Text and NavigateUrl properties of RadNavigation Nodes.