TreeList Toolbar
The treelist provides a toolbar where you can add a variety of actions that are not tied to a concrete row.
To use a toolbar, define the TreeListToolBarTemplate tag of the treelist. In it, you can use arbitrary HTML and components to get the desired layout, and also TreeListCommandButton instances in (you can read more about the features available in those buttons in the Command Column article).
The toolbar is not associated with an item from the data source. The
ItemandParentItemfields on the click event handler argument of aTreeListCommandButtonwill always benull, and theEdit,Update,Cancelcommands do not work with it.
In this article, you will learn how to use:
Built-in Commands
The treelist offers built-in commands that you can invoke through its toolbar. To use them, set the Command property of the button to the command name. The built-in command names are:
-
Add- starts inserting a new item in the treelist.
For an example of using the toolbar to insert a new item, see the TreeList Editing Overview article.
Custom Commands
You can use the toolbar to add buttons that invoke actions specific to your application.
How to define a custom command in the treelist toolbar
@result

<TelerikTreeList Data="@Data" Pageable="true" ItemsField="@(nameof(Employee.DirectReports))" Width="850px">

    <TreeListToolBarTemplate>
        <TreeListCommandButton Command="MyToolbarCommand" OnClick="@MyCommandFromToolbar" Icon="@SvgIcon.InfoCircle">Fire My Command</TreeListCommandButton>
    </TreeListToolBarTemplate>

    <TreeListColumns>
        <TreeListColumn Field="Name" Expandable="true" Width="320px" />
        <TreeListColumn Field="Id" Editable="false" Width="120px" />
        <TreeListColumn Field="EmailAddress" Width="220px" />
        <TreeListColumn Field="HireDate" Width="220px" />
    </TreeListColumns>
</TelerikTreeList>

@code {
    public List<Employee> Data { get; set; }

    // sample custom command handling
    string result;
    async Task MyCommandFromToolbar(TreeListCommandEventArgs args)
    {
        //note - the args.Item object is null because the command item is not associated with an item

        result = "my custom toolbar command fired at " + DateTime.Now.ToString();
    }

    // sample model

    public class Employee
    {
        public int Id { get; set; }
        public string Name { get; set; }
        public string EmailAddress { get; set; }
        public DateTime HireDate { get; set; }

        public List<Employee> DirectReports { get; set; }
        public bool HasChildren { get; set; }
    }

    // data generation
    public int LastId { get; set; } = 1;
    protected override async Task OnInitializedAsync()
    {
        Data = await GetTreeListData();
    }

    async Task<List<Employee>> GetTreeListData()
    {
        List<Employee> data = new List<Employee>();

        for (int i = 1; i < 15; i++)
        {
            Employee root = new Employee
            {
                Id = LastId,
                Name = $"root: {i}",
                EmailAddress = $"{i}@example.com",
                HireDate = DateTime.Now.AddYears(-i),
                DirectReports = new List<Employee>(),
                HasChildren = true
            };
            data.Add(root);
            LastId++;

            for (int j = 1; j < 4; j++)
            {
                int currId = LastId;
                Employee firstLevelChild = new Employee
                {
                    Id = currId,
                    Name = $"first level child {j} of {i}",
                    EmailAddress = $"{currId}@example.com",
                    HireDate = DateTime.Now.AddDays(-currId),
                    DirectReports = new List<Employee>(),
                    HasChildren = true
                };
                root.DirectReports.Add(firstLevelChild);
                LastId++;

                for (int k = 1; k < 3; k++)
                {
                    int nestedId = LastId;
                    firstLevelChild.DirectReports.Add(new Employee
                    {
                        Id = LastId,
                        Name = $"second level child {k} of {j} and {i}",
                        EmailAddress = $"{nestedId}@example.com",
                        HireDate = DateTime.Now.AddMinutes(-nestedId)
                    }); ;
                    LastId++;
                }
            }
        }

        return await Task.FromResult(data);
    }
}
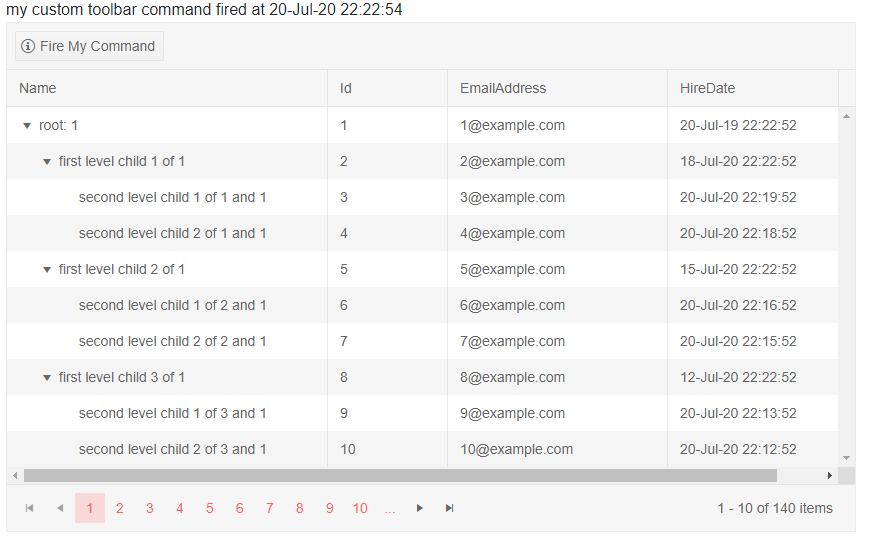
The result from the code snippet above, after the custom command button in the toolbar was clicked
Custom Layout
You can add your own HTML and components to create a more complex layout in the treelist header to match your business needs. You can still use the treelist command buttons, as well as other components and logic.
Custom TreeList Toolbar Layout
@* for brevity the insert operation is not implemented in this sample *@

@result

<TelerikTreeList Data="@Data" Pageable="true" ItemsField="@(nameof(Employee.DirectReports))" Width="850px">

    <TreeListToolBarTemplate>
        <div style="display: block; flex-grow: 1;">
            @* the first level children in the toolbar get display: inline-flex and flex-shrink: 0 inherited from the grid,
                we change it here to show we can, or you can work with the layout the grid defines if it suits your needs *@

            <div style="background:yellow">
                <TreeListCommandButton Command="Add" Icon="@SvgIcon.Plus">Add Employee</TreeListCommandButton>
            </div>
            <div style="background: green;">
                <TelerikDropDownList Data="@( new List<string>() { "first", "second", "third" } )" TValue="string" TItem="string" ValueChanged="@( (string itm) => result = itm )"></TelerikDropDownList>
            </div>

            <div style="border: 1px solid red;">
                @* one example of aligning content to the right with flex *@
                <button style="display: flex; margin-left: auto;"
                        @onclick="@( () => result = $"Custom button click on {DateTime.Now}"  )">
                    Click me
                </button>
            </div>
        </div>
    </TreeListToolBarTemplate>

    <TreeListColumns>
        <TreeListColumn Field="Name" Expandable="true" Width="320px" />
        <TreeListColumn Field="Id" Editable="false" Width="120px" />
        <TreeListColumn Field="EmailAddress" Width="220px" />
        <TreeListColumn Field="HireDate" Width="220px" />
    </TreeListColumns>
</TelerikTreeList>

@code {
    public List<Employee> Data { get; set; }

    // sample custom command handling
    string result;
    async Task MyCommandFromToolbar(TreeListCommandEventArgs args)
    {
        //note - the args.Item object is null because the command item is not associated with an item

        result = "my custom toolbar command fired at " + DateTime.Now.ToString();
    }

    // sample model

    public class Employee
    {
        public int Id { get; set; }
        public string Name { get; set; }
        public string EmailAddress { get; set; }
        public DateTime HireDate { get; set; }

        public List<Employee> DirectReports { get; set; }
        public bool HasChildren { get; set; }
    }

    // data generation
    public int LastId { get; set; } = 1;
    protected override async Task OnInitializedAsync()
    {
        Data = await GetTreeListData();
    }

    async Task<List<Employee>> GetTreeListData()
    {
        List<Employee> data = new List<Employee>();

        for (int i = 1; i < 15; i++)
        {
            Employee root = new Employee
            {
                Id = LastId,
                Name = $"root: {i}",
                EmailAddress = $"{i}@example.com",
                HireDate = DateTime.Now.AddYears(-i),
                DirectReports = new List<Employee>(),
                HasChildren = true
            };
            data.Add(root);
            LastId++;

            for (int j = 1; j < 4; j++)
            {
                int currId = LastId;
                Employee firstLevelChild = new Employee
                {
                    Id = currId,
                    Name = $"first level child {j} of {i}",
                    EmailAddress = $"{currId}@example.com",
                    HireDate = DateTime.Now.AddDays(-currId),
                    DirectReports = new List<Employee>(),
                    HasChildren = true
                };
                root.DirectReports.Add(firstLevelChild);
                LastId++;

                for (int k = 1; k < 3; k++)
                {
                    int nestedId = LastId;
                    firstLevelChild.DirectReports.Add(new Employee
                    {
                        Id = LastId,
                        Name = $"second level child {k} of {j} and {i}",
                        EmailAddress = $"{nestedId}@example.com",
                        HireDate = DateTime.Now.AddMinutes(-nestedId)
                    }); ;
                    LastId++;
                }
            }
        }

        return await Task.FromResult(data);
    }
}
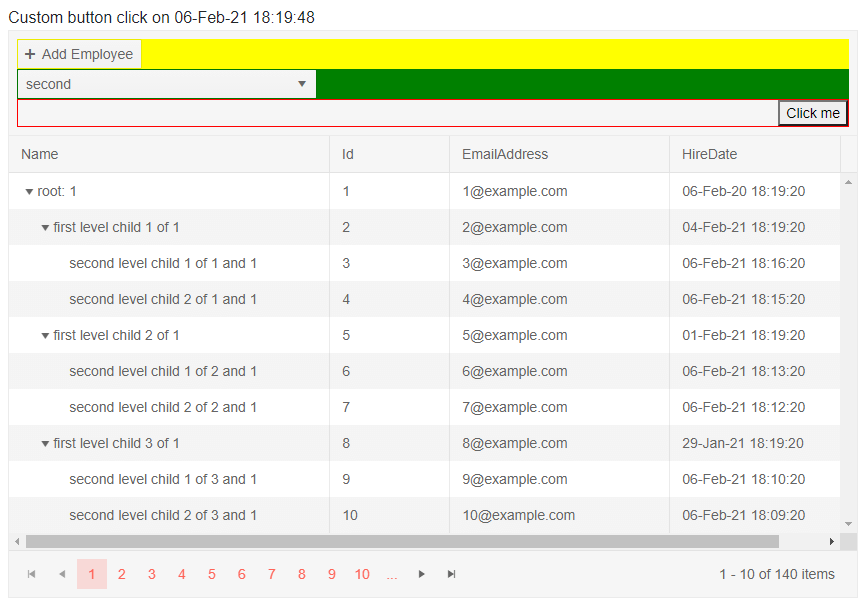
The result from the code snippet above, after changing the dropdown and clicking the custom button.