Editing
The ListView lets you edit the data through a dedicated edit template. You can put the items in edit/insert mode, as well as delete items through dedicated command buttons from the listview.
To invoke the commands, use the ListViewCommandButton component in the templates of the component. It can take the following built-in Command values:
-
Add- initializes a new item insertion by adding theEditTemplateat the top of the listview. -
Edit- puts the item in whoseTemplateit is in edit mode so it renders itsEditTemplate. -
Save- saves the changes on the currently edited/inserted item. -
Delete- deletes the current item. -
Cancel- cancels the current operation (e.g., puts the edited item into read mode without saving changes, or removes thew newly inserted item).
The command buttons expose the standard button features such as icons, text, primary state and an OnClick event handler that you can use to implement custom commands, although you can use any button or DOM event handler for that.
The CUD operations are implemented through dedicated events that let you alter the data source (both in the view-model, in in your actual database):
-
OnUpdate- fires when an existing item is saved. -
OnEdit- fires when the user clicks the Edit command, cancellable. -
OnCreate- fires when a new item is saved. -
OnDelete- fires when an item is deleted. -
OnCancel- fires when the Cancel button is clicked.
Consider setting DebounceDelay="0" to the component inside the editor template. This is how the default editors in all Telerik Blazor components work. Otherwise, fast users may try to save changes before the data item in edit mode receives the new value.
How to edit data in the ListView
@* The actual data source operations depend on the app and must be implemented in the events the listview provides.
Implementing beautiful rendering is up to the application, this example shows the basics of the available events and commands.
*@
<TelerikListView Data="@ListViewData" Pageable="true"
OnCreate="@CreateHandler" OnDelete="@DeleteHandler" OnUpdate="@UpdateHandler"
OnEdit="@EditHandler" OnCancel="@CancelHandler">
<EditTemplate>
<div style="border: 1px solid green; margin: 10px; padding: 10px; display: inline-block;">
<TelerikTextBox @bind-Value="@context.Name" DebounceDelay="0" /><br />
<TelerikDropDownList Data="@Teams" @bind-Value="@context.Team" />
<ListViewCommandButton Command="Save" Icon="@SvgIcon.Save">Save</ListViewCommandButton>
<ListViewCommandButton Command="Cancel" Icon="@SvgIcon.Cancel">Cancel</ListViewCommandButton>
</div>
</EditTemplate>
<Template>
<div style="border: 1px solid black; margin: 10px; padding: 10px; display: inline-block;">
Employee: @context.Id <br />
Name: @context.Name in team: @context.Team
<ListViewCommandButton Command="Edit" Icon="@SvgIcon.Pencil">Edit</ListViewCommandButton>
<ListViewCommandButton Command="Delete" Icon="@SvgIcon.Trash">Delete</ListViewCommandButton>
</div>
</Template>
<HeaderTemplate>
<ListViewCommandButton Command="Add" Icon="@SvgIcon.Plus">Add Employee</ListViewCommandButton>
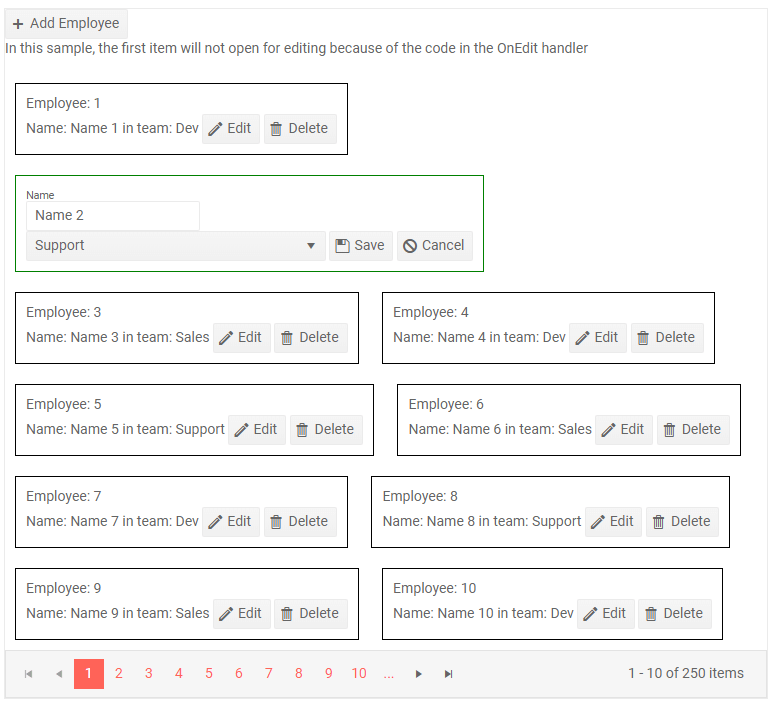
<p>In this sample, the first item will not open for editing because of the code in the OnEdit handler</p>
</HeaderTemplate>
</TelerikListView>
@code{
List<Employee> ListViewData { get; set; }
List<string> Teams { get; set; }
async Task UpdateHandler(ListViewCommandEventArgs args)
{
Employee item = (Employee)args.Item;
// perform actual data source operation here through your service
await MyService.Update(item);
// update the local view-model data with the service data
await GetListViewData();
}
async Task DeleteHandler(ListViewCommandEventArgs args)
{
Employee item = (Employee)args.Item;
// perform actual data source operation here through your service
await MyService.Delete(item);
// update the local view-model data with the service data
await GetListViewData();
}
async Task CreateHandler(ListViewCommandEventArgs args)
{
Employee item = (Employee)args.Item;
// perform actual data source operation here through your service
await MyService.Create(item);
// update the local view-model data with the service data
await GetListViewData();
}
async Task EditHandler(ListViewCommandEventArgs e)
{
Employee currItem = e.Item as Employee;
// prevent opening an item for editing on condition
if (currItem.Id < 2)
{
e.IsCancelled = true;
}
}
async Task CancelHandler(ListViewCommandEventArgs e)
{
Employee changedItem = e.Item as Employee;
// this is the item as the user edited it, but chose to cancel editing/inserting
Console.WriteLine($"user changed item {changedItem.Id} to have Name: {changedItem.Name} and Team: {changedItem.Team}");
}
// data and models follow
async Task GetListViewData()
{
ListViewData = await MyService.Read();
Teams = await MyService.GetTeams();
}
protected override async Task OnInitializedAsync()
{
await GetListViewData();
}
public class Employee
{
public int Id { get; set; }
public string Name { get; set; }
public string Team { get; set; }
}
// the following static class mimics an actual data service that handles the actual data source
// replace it with your actual service through the DI, this only mimics how the API can look like and works for this standalone page
public static class MyService
{
private static List<Employee> _data { get; set; } = new List<Employee>();
private static List<string> _teams = new List<string> { "Sales", "Dev", "Support" };
public static async Task Create(Employee itemToInsert)
{
itemToInsert.Id = _data.Count + 1;
_data.Insert(0, itemToInsert);
}
public static async Task<List<Employee>> Read()
{
if (_data.Count < 1)
{
for (int i = 1; i < 50; i++)
{
_data.Add(new Employee()
{
Id = i,
Name = $"Name {i}",
Team = _teams[i % _teams.Count]
});
}
}
return await Task.FromResult(_data);
}
public static async Task<List<string>> GetTeams()
{
return await Task.FromResult(_teams);
}
public static async Task Update(Employee itemToUpdate)
{
var index = _data.FindIndex(i => i.Id == itemToUpdate.Id);
if (index != -1)
{
_data[index] = itemToUpdate;
}
}
public static async Task Delete(Employee itemToDelete)
{
_data.Remove(itemToDelete);
}
}
}
The result from the code snippet above after clicking Edit for the second item
You can add validation in the edit/insert templates as well, and handle it by cancelling the
OnUpdateandOnCreateevents depending on the result of the validation (be that localDataAnnotationvalidation, or remote validation through your data service). You can find several examples in the ListView Validation sample project.