Getting Started with the Wizard
This tutorial explains how to set up a basic Telerik UI for ASP.NET MVC Wizard and highlights the major steps in the configuration of the component.
You will initialize a Wizard component with several steps and integrate a Form in one of the steps. Next, you will handle the Wizard events and submit the form data to the server.
Prerequisites
To successfully complete the tutorial, you need a project that is already configured to use the Telerik UI for ASP.NET MVC components:
To create a new pre-configured project for the Telerik UI for ASP.NET MVC components, you can use a project template.
To manually configure an existing project by using NuGet, see the Adding Telerik UI through NuGet.
1. Prepare the CSHTML File
The first step is to add the required directives at the top of the .cshtml document:
-
To use the Telerik UI for ASP.NET MVC HtmlHelpers:
@using Kendo.Mvc.UI
Optionally, you can structure the View content by adding the desired HTML elements like headings, divs, paragraphs, and others.
    @using Kendo.Mvc.UI

    <h4>Registration progress with Wizard</h4>
    <div>

    </div>
2. Initialize the Wizard
Use the Wizard HtmlHelper to add the component to a page:
- The
Name()configuration method is mandatory as its value is used for theidand the name attributes of the Wizard element. - The
Tag()property determines theHTMLelement from which the Wizard will be initialized. Set either aformordivelement. When a Wizard step contains a Form component and the Wizard is initialized as a<form>element, the Done button in the last step will act as asubmitbutton. - The
Steps()configuration specifies the desired steps and their content. - The
Buttons()property of a Wizard's step determines the Next, Previous, and Done buttons.
@using Kendo.Mvc.UI
@(Html.Kendo().Wizard()
.Name("wizard")
.Tag("form")
.Steps(step =>
{
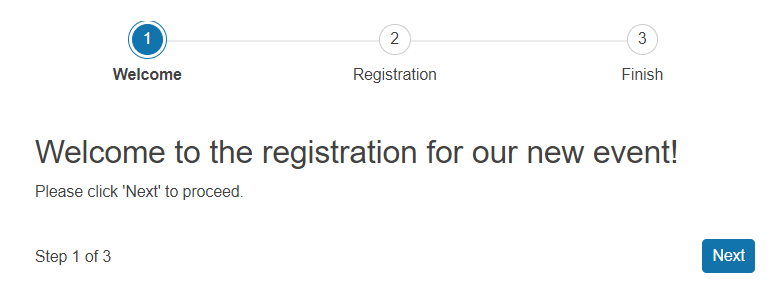
step.Add()
.Title("Welcome")
.Content("<h3>Welcome to the registration for our new event!</h3>Please select 'Next' to proceed.")
.Buttons(b =>
{
b.Next();
});
step.Add<UserViewModel>()
.Title("Registration")
.Form(...) //the Form integration is implemented in the next step
.Buttons(b =>
{
b.Previous();
b.Next();
});
step.Add()
.Title("Finish")
.Content("<div style=\"text-align:center\"><h3>Thank you! Click 'Done' to submit your registration.</h3</div>")
.Buttons(b =>
{
b.Previous();
b.Done();
});
})
)
3. Configure the Form Integration
The next step is to integrate a Form component inside the Wizard. The Form() configuration method defines the options as they are available in the Telerik UI for ASP.NET MVC Form itself. Each Form defined within the Wizard configuration will have all the functionality available in the stand-alone Form component.
When setting up the step that will display the form, specify the Model name in the Add method of the step.
@using Kendo.Mvc.UI

    @(Html.Kendo().Wizard()
        .Name("wizard")
        .Tag("form")
        .Steps(step =>
        {
            ...
            step.Add<UserViewModel>()
                .Title("Registration")
                .Form(f => f
                    .Validatable(v =>
                    {
                        v.ValidateOnBlur(true);
                        v.ValidationSummary(vs => vs.Enable(false));
                    })
                    .Items(items =>
                    {
                        items.Add().Field(field => field.FirstName).Label(label => label.Text("First name:"));
                        items.Add().Field(field => field.LastName).Label(label => label.Text("Last name:"));
                        items.Add().Field(field => field.Phone).Label(label => label.Text("Phone:"));
                        items.Add().Field(field => field.DateOfBirth).Label(label => label.Text("DateOfBirth:").Optional(true))
                        .Editor(editor => editor.DatePicker());
                    })
                )
                .Buttons(b =>
                {
                    b.Previous();
                    b.Next();
                });
            ...
        })
    )
public class UserViewModel
{
    public string FirstName { get; set; }

    public string LastName { get; set; }

    public string Phone { get; set; }

    public DateTime DateOfBirth { get; set; }
}
4. Handle the Wizard Events
The Wizard exposes various events that you can handle and further customize the functionality of the component. In this tutorial, you will use the Done() event to submit the form data to the server.
@using Kendo.Mvc.UI

    @(Html.Kendo().Wizard()
        .Name("wizard")
        .Events(events => events.Done("onDone"))
        .Tag("form")
        .Steps(step =>
        {
             step.Add()
                .Title("Welcome")
                .Content("<h3>Welcome to the registration for our new event!</h3>Please select 'Next' to proceed.")
                .Buttons(b =>
                {
                    b.Next();
                });

            step.Add<UserViewModel>()
                .Title("Registration")
                .Form(f => f
                    .Validatable(v =>
                    {
                        v.ValidateOnBlur(true);
                        v.ValidationSummary(vs => vs.Enable(false));
                    })
                    .Items(items =>
                    {
                        items.Add().Field(field => field.FirstName).Label(label => label.Text("First name:"));
                        items.Add().Field(field => field.LastName).Label(label => label.Text("Last name:"));
                        items.Add().Field(field => field.Phone).Label(label => label.Text("Phone:"));
                        items.Add().Field(field => field.DateOfBirth).Label(label => label.Text("DateOfBirth:").Optional(true))
                        .Editor(editor => editor.DatePicker());
                    })
                )
                .Buttons(b =>
                {
                    b.Previous();
                    b.Next();
                });

            step.Add()
                .Title("Finish")
                .Content("<div style=\"text-align:center\"><h3>Thank you! Click 'Done' to submit your registration.</h3</div>")
                .Buttons(b =>
                {
                    b.Previous();
                    b.Done();
                });
        })
    )

    <script>
        function onDone(e) {
            //Prevent the default event action
            e.originalEvent.preventDefault();

            //Select the Wizard element
            let form = $("#wizard");
            //Initialize an AJAX request to the server
            $.ajax({
                type: 'POST',
                url: "@Url.Action("SubmitRegistration", "Home")",
                data: form.serialize(),
                success: function (data) {
                    alert("Thank you for registering!");
                },
                error: function (data) {
                    alert("Please try again. Something went wrong.");
                }
            });
        }
    </script>
    public ActionResult SubmitRegistration(UserViewModel user)
    {
        //Receive and save the data
        ...
        return Json(new { Success = "Form Posted Successfully" });
    }
5. (Optional) Reference Existing Wizard Instances
You can reference the Wizard instances that you have created and build on top of their existing configuration:
-
Use the value of the
Name()option of the component to establish a reference.<script> $(document).ready(function() { var wizardReference = $("#wizard").data("kendoWizard"); // wizardReference is a reference to the existing Wizard instance of the helper. }); </script> -
Use the Wizard client-side API to control the behavior of the control. In this example, you will use the
selectmethod to select the second step (index 1).<script> $(document).ready(function() { var wizardReference = $("#wizard").data("kendoWizard"); wizardReference.select(1); }); </script>