Getting Started with the ContextMenu
This tutorial explains how to set up a basic Telerik UI for ASP.NET MVC Context Menu and highlights the major steps in the configuration of the component.
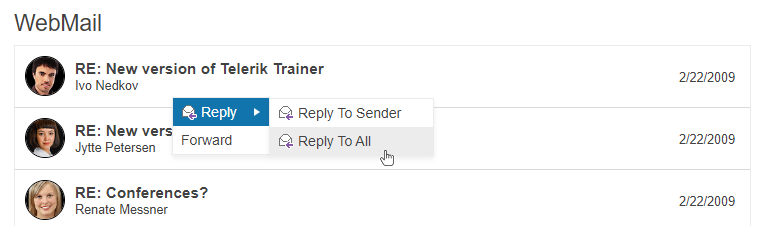
You will initialize a ContextMenu control with two items and a submenu.
Prerequisites
To successfully complete the tutorial, you need a project that is already configured to use the Telerik UI for ASP.NET MVC components:
To create a new pre-configured project for the Telerik UI for ASP.NET MVC components, you can use a project template.
To manually configure an existing project by using NuGet, see the Adding Telerik UI through NuGet.
1. Prepare the CSHTML File
The first step is to add the required directives at the top of the .cshtml document:
-
To use the Telerik UI for ASP.NET MVC HtmlHelpers:
@using Kendo.Mvc.UI
Optionally, you can structure the document by adding the desired HTML elements like headings, divs, paragraphs, and apply some basic styles.
In this step, you will also configure a ListView component that will serve as a target for the ContextMenu. Right-clicking a ListView item will open the ContextMenu. For more information about configuring the ListView control, refer to the Getting Started with the ListView article.
    @using Kendo.Mvc.UI

    <script type="text/x-kendo-template" id="template">
        <div class="product">
            <img src="@Url.Content("~/shared/images/employees/")#: FromID #.png" alt="#: From #" />

            <h3>#:Title#</h3>
            <p class="date">#:Date#</p>
            <p>#:From#</p>
        </div>
    </script>

    <div class="demo-section wide">
        <h4>WebMail</h4>
        @(Html.Kendo().ListView<Kendo.Mvc.Examples.Models.WebMail>()
        .Name("listview-context-menu")
        .TagName("div")
        .ClientTemplateId("template")
        .DataSource(dataSource => dataSource
            .Ajax()
            .Read(read => read.Action("WebMailData", "Menu"))
            .PageSize(5)
        ))

        <!-- configure Context Menu here -->
    </div>


    <style>
        #listview-context-menu {
            padding: 0;
            margin-bottom: -1px;
            min-height: 300px;
        }

        .product {
            position: relative;
            height: 62px;
            margin: 0;
            padding: 0;
            border-bottom: 1px solid rgba(128,128,128,.3);
        }

        .product img {
            width: 40px;
            height: 40px;
            border-radius: 40px;
            margin: 10px;
            border: 1px solid #000;
            float: left;
        }

        .product h3 {
            margin: 0;
            padding: 15px 5px 1px 0;
            overflow: hidden;
            line-height: 1em;
            font-size: 1.1em;
            font-weight: bold;
        }

        .product p {
            font-size: .9em;
        }

        .product .date {
            float: right;
            margin: -8px 15px 0 0;
        }

        .k-listview:after {
            content: ".";
            display: block;
            height: 0;
            clear: both;
            visibility: hidden;
        }
    </style>
    @using Kendo.Mvc.UI

    <script type="text/x-kendo-template" id="template">
        <div class="product">
            <img src="@Url.Content("~/shared/images/employees/")#: FromID #.png" alt="#: From #" />

            <h3>#:Title#</h3>
            <p class="date">#:Date#</p>
            <p>#:From#</p>
        </div>
    </script>

    <div class="demo-section wide">
        <h4>WebMail</h4>
        <kendo-listview name="listview-context-menu"
                        tag-name="div"
                        template-id="template">
            <datasource type="DataSourceTagHelperType.Ajax" page-size="5">
                <transport>
                    <read url="@Url.Action("WebMailData", "Menu")" />
                </transport>
            </datasource>
        </kendo-listview>

        <!-- configure Context Menu here -->
    </div>


    <style>
        #listview-context-menu {
            padding: 0;
            margin-bottom: -1px;
            min-height: 300px;
        }

        .product {
            position: relative;
            height: 62px;
            margin: 0;
            padding: 0;
            border-bottom: 1px solid rgba(128,128,128,.3);
        }

        .product img {
            width: 40px;
            height: 40px;
            border-radius: 40px;
            margin: 10px;
            border: 1px solid #000;
            float: left;
        }

        .product h3 {
            margin: 0;
            padding: 15px 5px 1px 0;
            overflow: hidden;
            line-height: 1em;
            font-size: 1.1em;
            font-weight: bold;
        }

        .product p {
            font-size: .9em;
        }

        .product .date {
            float: right;
            margin: -8px 15px 0 0;
        }

        .k-listview:after {
            content: ".";
            display: block;
            height: 0;
            clear: both;
            visibility: hidden;
        }
    </style>
2. Initialize the ContextMenu
Use the ContextMenu HtmlHelper to add the component to a page:
Assign a name to the component by using the
Name()configuration method—this is mandatory as the assigned value is used for theidand thenameattributes of the ContextMenu element.Use the
TargetandFilterconfiguration properties to determine over which elements on the page a right mouse opens the ContextMenu.The
Itemsconfiguration method lets you add the desired Context Menu items. In this tutorial, you will define two root items and two submenu items for the first root item.Add images for the context menu items through the
ImageUrlproperty.
    @using Kendo.Mvc.UI

    <script type="text/x-kendo-template" id="template">
        <div class="product">
            <img src="@Url.Content("~/shared/images/employees/")#: FromID #.png" alt="#: From #" />

            <h3>#:Title#</h3>
            <p class="date">#:Date#</p>
            <p>#:From#</p>
        </div>
    </script>

    <div class="demo-section wide">
        <h4>WebMail</h4>
        @(Html.Kendo().ListView<Kendo.Mvc.Examples.Models.WebMail>()
        .Name("listview-context-menu")
        .TagName("div")
        .ClientTemplateId("template")
        .DataSource(dataSource => dataSource
            .Ajax()
            .Read(read => read.Action("WebMailData", "Menu"))
            .PageSize(5)
        ))

        @(Html.Kendo().ContextMenu()
            .Name("menu")
            .Target("#listview-context-menu")
            .Filter(".product")
            .Items(items =>
            {
                items.Add()
                    .Text("Reply")
                    .ImageUrl(Url.Content("~/shared/web/toolbar/reply.png"))
                    .Items(children =>
                    {
                        children.Add().Text("Reply To Sender").ImageUrl(Url.Content("~/shared/web/toolbar/reply.png"));
                        children.Add().Text("Reply To All").ImageUrl(Url.Content("~/shared/web/toolbar/reply.png"));
                    });

                items.Add()
                    .Text("Forward");
            })
        )
    </div>

    <style>
        #listview-context-menu {
            padding: 0;
            margin-bottom: -1px;
            min-height: 300px;
        }

        .product {
            position: relative;
            height: 62px;
            margin: 0;
            padding: 0;
            border-bottom: 1px solid rgba(128,128,128,.3);
        }

        .product img {
            width: 40px;
            height: 40px;
            border-radius: 40px;
            margin: 10px;
            border: 1px solid #000;
            float: left;
        }

        .product h3 {
            margin: 0;
            padding: 15px 5px 1px 0;
            overflow: hidden;
            line-height: 1em;
            font-size: 1.1em;
            font-weight: bold;
        }

        .product p {
            font-size: .9em;
        }

        .product .date {
            float: right;
            margin: -8px 15px 0 0;
        }

        .k-listview:after {
            content: ".";
            display: block;
            height: 0;
            clear: both;
            visibility: hidden;
        }
    </style>
3. (Optional) Reference Existing ContextMenu Instances
You can reference the ContextMenu instances that you have created and build on top of their existing configuration:
-
Use the
idattribute of the component instance to establish a reference.<script> var contextMenuReference = $("#menu").data("kendoContextMenu"); //contextMenuReference is a reference to the existing instance of the helper. </script> -
Use the ContextMenu client-side API to control the behavior of the widget. In this example, you will use the
enablemethod to disable one of the Context Menu items.<script> $(document).ready(function () { var contextMenuReference = $("#menu").data("kendoContextMenu"); //contextMenuReference is a reference to the existing instance of the helper. contextMenuReference.enable("#Roadmap", false); // Disable the desired item in the referenced Context Menu instance. }) </script>
Next Steps
- Binding the ContextMenu to Data
- Subscribing to the ContextMenu Events
- Customizing the Appearance of the ContextMenu