Getting Started with the ActionSheet
This tutorial explains how to set up a basic Telerik UI for ASP.NET MVC ActionSheet and highlights the major steps in the configuration of the component.
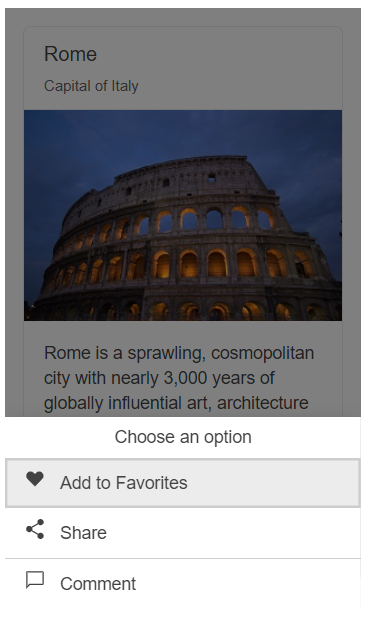
You will initialize an ActionSheet component with three items and show it over a Card when a Button is clicked.
Prerequisites
To successfully complete the tutorial, you need a project that is already configured to use the Telerik UI for ASP.NET MVC components:
To create a new pre-configured project for the Telerik UI for ASP.NET MVC components, you can use a project template.
To manually configure an existing project by using NuGet, see the Adding Telerik UI through NuGet.
1. Prepare the CSHTML File
The first step is to add the required directives at the top of the .cshtml document:
-
To use the Telerik UI for ASP.NET MVC HtmlHelpers:
@using Kendo.Mvc.UI
Optionally, you can structure the View content by adding the desired HTML elements like headings, divs, paragraphs, and others.
    @using Kendo.Mvc.UI

    <div id="city" class="demo-view">
    </div>
2. Initialize the ActionSheet
Use the ActionSheet HtmlHelper to add the component to a page:
- The
Name()configuration method is mandatory as its value is used for theidand thenameattributes of the ActionSheet element. - The
Title()option specifies the title that will be displayed in the header. - The
Items()method configures the component items.
    @using Kendo.Mvc.UI

    <div id="city" class="demo-view">
        @(Html.Kendo().ActionSheet()
            .Name("actionsheet")
            .Title("Choose an option")
            .Items(items =>
            {
                items.Add().Text("Add to favorites").IconClass("k-i-heart").Click("onItemClick");
                items.Add().Text("Share").IconClass("k-i-share").Click("onItemClick");
                items.Add().Text("Comment").IconClass("k-i-comment").Click("onItemClick");
            })
        )
    </div>
3. Configure the Card and the Button
The next step is to define the Card and the Button components—the ActionSheet will be displayed on top of the Card when the Button is clicked.
    @using Kendo.Mvc.UI

    <div id="city" class="demo-view">
        <div class="cards-container">
            <div class="k-card">
                <div class="k-card-header">
                    <h5 class="k-card-title">Rome</h5>
                    <h6 class="k-card-subtitle">Capital of Italy</h6>
                </div>
                <img class="k-card-media" alt="Telerik UI for ASP.NET Core ActionSheet Rome" src="~/shared/web/cards/rome.jpg" />
                <div class="k-card-body">
                    <p>Rome is a sprawling, cosmopolitan city with nearly 3,000 years of globally influential art, architecture and culture on display.</p>
                    <p>Ancient ruins such as the Forum and the Colosseum evoke the power of the former Roman Empire. </p>
                </div>
            </div>
        </div>
        @(Html.Kendo().Button()
            .Name("moreOptionsBtn")
            .ThemeColor(ThemeColor.Primary)
            .Content("More options")
            .Events(ev => ev.Click("moreOptionsClick"))
        )
        @(Html.Kendo().ActionSheet()
            .Name("actionsheet")
            .Title("Choose an option")
            .Items(items =>
            {
                items.Add().Text("Add to favorites").IconClass("k-i-heart").Click("onItemClick");
                items.Add().Text("Share").IconClass("k-i-share").Click("onItemClick");
                items.Add().Text("Comment").IconClass("k-i-comment").Click("onItemClick");
            })
        )
    </div>
Handle the Click event of the Button and call the open() client-side method to open the ActionSheet.
    <script>
        function moreOptionsClick() {
            var actionsheet = $("#actionsheet").data("kendoActionSheet");
            actionsheet.open()
        }
    </script>
Handle the Click event of each ActionSheet item and call the close() client-side method to close the ActionSheet when an item is selected.
    <script>
        function onItemClick() {
            var actionsheet = $("#actionsheet").data("kendoActionSheet");
            actionsheet.close();
        }
    </script>
4. Handle the ActionSheet Events
The ActionSheet exposes events that you can handle and further customize the functionality of the component. In this tutorial, you will use the Activate event to disable the Share ActionSheet item based on a specified condition (for example, depending on the user permissions).
    @using Kendo.Mvc.UI

    @(Html.Kendo().ActionSheet()
        .Name("actionsheet")
        .Title("Choose an option")
        .Items(items =>
        {
            items.Add().Text("Add to favorites").IconClass("k-i-heart").Click("onItemClick");
            items.Add().Text("Share").IconClass("k-i-share").Click("onItemClick");
            items.Add().Text("Comment").IconClass("k-i-comment").Click("onItemClick");
        })
        .Events(e => e.Activate("onActivate"))
    )
    <script>
        var isAdmin = false;
        function onActivate() {
            if(!isAdmin) {
                $(".k-actionsheet-content .k-actionsheet-item").eq(1).addClass("k-disabled"); // Disable the second item.
            }
        }
    </script>
5. (Optional) Reference Existing ActionSheet Instances
You can reference the ActionSheet instances that you have created and build on top of their existing configuration:
-
Use the
idattribute of the component instance to get its reference.<script> $(document).ready(function() { var actionSheetReference = $("#actionsheet").data("kendoActionSheet"); // actionSheetReference is a reference to the existing ActionSheet instance of the helper. }); </script> -
Use the ActionSheet client-side API to control the behavior of the component. In this example, you will enable the adaptive mode of the ActionSheet through the
Adaptive()option and use thefullscreen()method to set the ActionSheet in full-screen mode dynamically (for example, when a button is clicked).@(Html.Kendo().Button() .Name("btn") .Content("Open in full-screen mode") .Events(ev => ev.Click("onBtnClick")) ) @(Html.Kendo().ActionSheet() .Name("actionsheet") .Title("Choose an option") .Adaptive(true) .Items(items => { items.Add().Text("Add to favorites").IconClass("k-i-heart").Click("onItemClick"); items.Add().Text("Share").IconClass("k-i-share").Click("onItemClick"); items.Add().Text("Comment").IconClass("k-i-comment").Click("onItemClick"); }) )<script> function onBtnClick() { var actionSheetReference = $("#actionsheet").data("kendoActionSheet"); actionSheetReference.fullscreen(true); actionSheetReference.open(); } </script>
For more information on referencing specific helper instances, see the Methods and Events article.
Next Steps
- Setting the ActionSheet Items
- Using the Keyboard Navigation of the ActionSheet for ASP.NET MVC (Demo)