Getting Started with the Sortable
This tutorial explains how to set up the Telerik UI for ASP.NET MVC Sortable and goes through the steps required to configure the component.
You will create a collection of Model instances and generate a Card for each collection item. Next, you will initialize a Sortable for the dynamically populated Cards. Then, you will handle the JavaScript events of the Sortable and access the client-side references of the component.

Prerequisites
To successfully complete the tutorial, you need a project that is already configured to use the Telerik UI for ASP.NET MVC components:
To create a new pre-configured project for the Telerik UI for ASP.NET MVC components, you can use a project template.
To manually configure an existing project by using NuGet, see the Adding Telerik UI through NuGet.
1. Prepare the CSHTML File
The first step is to add the required directives at the top of the .cshtml document:
-
To use the Telerik UI for ASP.NET MVC HtmlHelpers:
@using Kendo.Mvc.UI
Optionally, you can structure the View content by adding the desired HTML elements like headings, divs, paragraphs, and others.
    @using Kendo.Mvc.UI

    <h5>Users</h5>
    <div class="main-container">
        <div id="user-list">
        </div>
    </div>
2. Declare the Model Collection
-
Declare the
UserViewModelModel.public class UserViewModel { public string ID { get; set; } public string FirstName { get; set; } public string LastName { get; set; } public string BackgroundColor { get; set; } } -
Create a List collection that holds instances of the
UserViewModel.public ActionResult Index() { var users = new List<UserViewModel> { new UserViewModel(){ ID = "1", FirstName = "Steven", LastName = "White", BackgroundColor = "#1EBEDC" }, new UserViewModel(){ ID = "2", FirstName = "Nancy", LastName = "King", BackgroundColor = "#1EDCA1" }, new UserViewModel(){ ID = "3", FirstName = "Nancy", LastName = "Davolio", BackgroundColor = "#2ADC1E" }, new UserViewModel(){ ID = "4", FirstName = "Michael", LastName = "Leverling", BackgroundColor = "#E4EA08" }, new UserViewModel(){ ID = "5", FirstName = "Andrew", LastName = "Callahan", BackgroundColor = "#EA8608" }, new UserViewModel(){ ID = "6", FirstName = "Michael", LastName = "Suyama", BackgroundColor = "#EF8CE4" } }; return View(users); }@model List<UserViewModel> <h5>Users</h5> <div class="main-container"> <div id="user-list"> </div> </div>
3. Generate the Cards
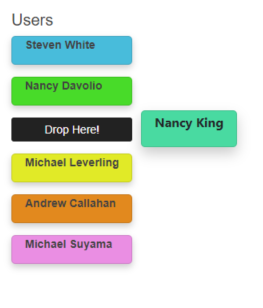
In this step, you will iterate through the List collection and create a Card for each record. The Card's background color will be set based on the Model property BackgroundColor Model property.
    @model List<UserViewModel>

    <h5>Users</h5>
    <div class="main-container">
        <div id="user-list">
            @{
                foreach(UserViewModel user in Model)
                {
                    <div class="card" style="background-color: @user.BackgroundColor">
                        <div class="container">
                            <p><b>@user.FirstName @user.LastName</b></p>
                        </div>
                    </div>
                }
            }
        </div>
    </div>
4. Initialize the Sortable
Use the Sortable HtmlHelper to add the component to a page:
- The
For()configuration method is mandatory as its value matches the selector of the DOM element to which the Sortable will be instantiated. - The
Cursor()option sets the cursor that will be shown while user drags the sortable item. - The
PlaceholderHandler()method accepts the name of the JavaScript function that returns the desired Sortable item placeholder.
    @using Kendo.Mvc.UI

    @(Html.Kendo().Sortable()
        .For("#user-list")
        .Cursor("url('https://demos.telerik.com/kendo-ui//content/web/sortable/grabbing.cur'), default")
        .PlaceholderHandler("placeholder")
    )

    <script>
        function placeholder(element) {
            return $("<li class='list-item' id='placeholder'>Drop Here!</li>");
        }
    </script>

    <style>
        .list-item {
            list-style-type: none;
            margin-bottom: 15px;
            line-height: 30px;
            text-align: center;
            background-color: #222222;
            color: #ffffff;
            border-radius: 3px;
            cursor: url('https://demos.telerik.com/kendo-ui//content/web/sortable/grabbing.cur'), default;
        }
    </style>
5. Handle the Sortable Events
The Sortable exposes events that you can handle and implement a custom logic. In this tutorial, you will use the Change event that triggers when the item's position is changed and get the indexes of the previous and the new position.
    @using Kendo.Mvc.UI

    @(Html.Kendo().Sortable()
        .For("#user-list")
        .Cursor("url('https://demos.telerik.com/kendo-ui//content/web/sortable/grabbing.cur'), default")
        .PlaceholderHandler("placeholder")
        .Events(events => events.Change("onChange"))
    )
    <script>
        function onChange(e) {
            var newIndex = e.newIndex;
            var previousIndex = e.oldIndex;
            console.log("newIndex: " + newIndex + " previousIndex: " + previousIndex);
            // Custom logic when the Sortable items are reordered.
        }
    </script>
6. (Optional) Reference Existing Sortable Instances
You can reference the Sortable instances that you have created and build on top of their existing configuration:
-
Use the
idattribute of the component instance to get its reference.<script> $(document).ready(function() { var sortableReference = $("#user-list").data("kendoSortable"); // sortableReference is a reference to the existing Sortable instance of the helper. }); </script> -
Use the Sortable client-side API to control the behavior of the component. In this example, you will use the
items()method to get all Sortable items when a button is clicked.@(Html.Kendo().Button() .Name("getItemsBtn") .Content("Get Sortable items") .Events(ev => ev.Click("onBtnClick")) )<script> function onBtnClick() { var sortableReference = $("#user-list").data("kendoSortable"); var sortableItems = sortableReference.items(); $.each(sortableItems, function(){ // Loop through the Sortable item elements. console.log($(this)); }); } </script>
For more information on referencing specific helper instances, see the Methods and Events article.
Next Steps
- Customizing the Hint of the Sortable
- Handling the Sortable Events
- Common Scenarios with the Sortable