Build the Team Efficiency Dashboard Project
Step 2: Input Controls
In this chapter you'll learn how to add Kendo UI widgets to your application. UI for MVC has powerful HTML Helpers that configure and render Kendo UI widgets.
Kendo UI Helper Overview
Server-Side Wrappers
Telerik UI for ASP.NET MVC is a set of server-side wrappers. A server-wrapper does the following:
- Allows the developer to configure a Kendo UI widget via C# or VB.NET code—set its value, data source, etc.
- Renders the HTML and JavaScript needed to initialize the Kendo UI widget. The widget options propagate to the client side via the widget initialization script.

Configuration
The Kendo UI HtmlHelper exposes all Kendo UI server wrappers.

Widget Options
The widget options are exposed via a fluent interface.

Below is an example of how a NumericTextBox input is created.
@(Html.Kendo().NumericTextBox()
    .Name("age") // set the name of the NumericTextBox
    .Value(10) //set the value
    .Spinners(false) // disable the spinners
)
Adding a Kendo UI DatePicker
Overview
Let's open the Index.cshtml page under the folder ~\Views\Home\. The Index.cshtml page is where most of the application's UI lives. This page currently contains basic HTML inputs to collect date input from the user. To provide a better user experience, replace the standard HTML inputs with Kendo UI date picker controls. The Kendo UI date picker controls offer users a flyout calendar to choose a desired date.
The Kendo UI DatePicker control is touch and mouse friendly. No additional code is necessary to support tablets and phones.
Exercise: Replace StatsFrom and StatsTo TextBoxes with Kendo UI Date Pickers
-
Open
~\Views\Home\Index.cshtmland find theStatsFromtext box helper.<!-- Stats From Date Picker --> @Html.TextBox("StatsFrom", new DateTime(1996, 1, 1)) -
Replace the text box helper with a Kendo UI date picker. Set the
Nameproperty toStatsFromand theValuewith a newDateTimeof1996,1,1.<!-- Stats From Date Picker --> @(Html.Kendo().DatePicker() .Name("StatsFrom") .Value(new DateTime(1996, 1, 1)) ) -
Find the
StatsTotext box helper.<!-- Stats To Date Picker --> @Html.TextBox("StatsTo", new DateTime(1996, 1, 1)) -
Replace the text box helper with a Kendo UI DatePicker. Set the
Nameproperty toStatsToand theValuewith a newDateTimeof1998,8,1.<!-- Stats To Date Picker --> @(Html.Kendo().DatePicker() .Name("StatsTo") .Value(new DateTime(1998, 8, 1)) )
The Kendo UI HTML helper's fluent interface lets you configure a widget's behavior and appearance. The code you just added uses the following properties:
-
Name—The property sets the rendered HTML element's id property. -
Value—Sets a default selected date value for the date picker.
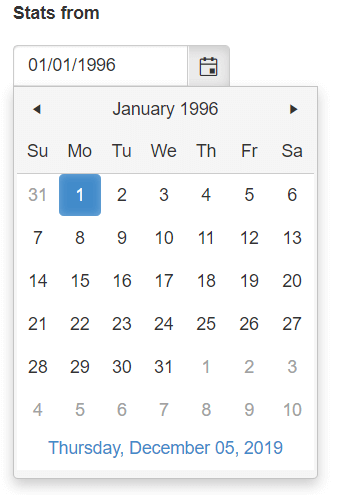
After you run your app with this change, you will see a calendar icon in the Stats from field. Click or tap the icon to reveal the date picker.

With the inputs upgraded, let's move on to the extremely robust Kendo UI Grid.