Getting Started with the OrgChart
This tutorial explains how to set up a basic Telerik UI for ASP.NET MVC OrgChart and highlights the major steps in the configuration of the component.
You will initialize a OrgChart control and bind it to data. Then, you will handle some of the OrgChart events.
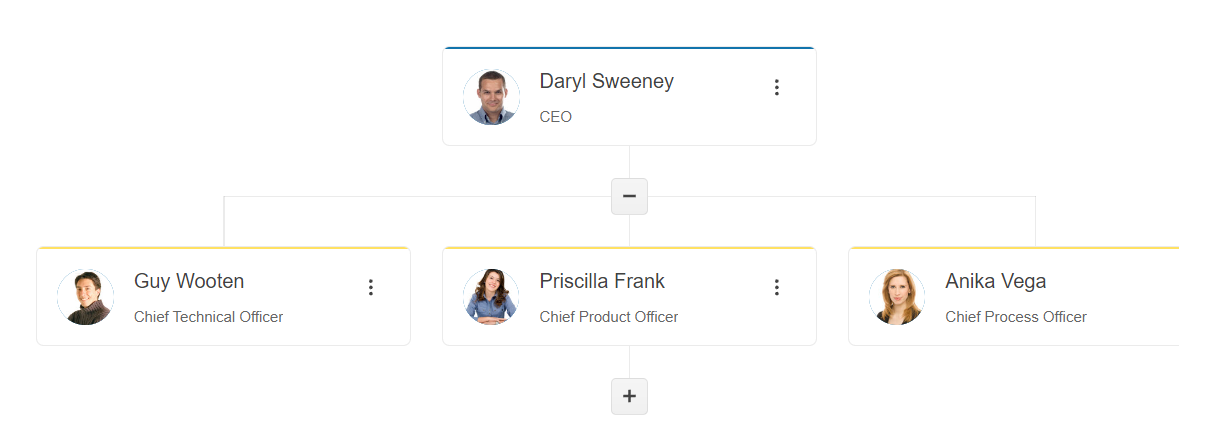
After completing this guide, you will achieve the following result:
Prerequisites
To successfully complete the tutorial, you need a project that is already configured to use the Telerik UI for ASP.NET MVC components:
To create a new pre-configured project for the Telerik UI for ASP.NET MVC components, you can use a project template.
To manually configure an existing project by using NuGet, see the Adding Telerik UI through NuGet.
1. Prepare the CSHTML File
The first step is to add the required directives at the top of the .cshtml document:
-
To use the Telerik UI for ASP.NET MVC HtmlHelpers:
@using Kendo.Mvc.UI
Optionally, you can structure the document by adding the desired HTML elements like headings, divs, paragraphs, and others.
2. Declare the View Model
Declare the EmployeeViewModel view model. The model must have a property field that represents the hierarchical relationship of the entries. In this tutorial, this is the ParentID field.
public class EmployeeViewModel
{
    public int ID { get; set; }

    public string Name { get; set; }

    public string Title { get; set; }

    public string Avatar { get; set; }

    public string Group { get; set; }

    public bool? Expanded { get; set; }

    public int? ParentID { get; set; }

    public bool hasChildren { get; set; }
}
3. Initialize the OrgChart
Use the OrgChart HtmlHelper to add the component to a page and set some of its options.
- Use the
Name()configuration method to assign a name to the instance of the helper—this is mandatory as its value is used for theidand thenameattributes of the OrgChart element. - Add the
DataSource()configuration option and set theReadend point. - Configure the DataSource
Modelto correctly bind the fields to their respective OrgChart properties.
@using Kendo.Mvc.UI


@(Html.Kendo().OrgChart()
    .Name("orgchart")
    .DataTextField("Name")
    .DataSource(dataSource => dataSource
        .Read(read => read
            .Action("RemoteDataBindingData", "OrgChart")
        )
        .Model(m => {
            m.Id(f => f.ID);
            m.ParentId(f => f.ParentID);
            m.Name(f => f.Name);
            m.Title(f => f.Title);
            m.Avatar(f => f.Avatar);
            m.Expanded(f=>f.Expanded);
        })
    )
)
4. Declare the Read Action
In the Home controller, declare the RemoteDataBindingData action that you set to the DataSource Read configuration in the previous step.
public List<EmployeeViewModel> GetData()
{
    List<EmployeeViewModel> employees = new List<EmployeeViewModel>(){
        new EmployeeViewModel {
          ID = 1,
          Name = "Daryl Sweeney",
          Title = "CEO",
          ParentID = null,
          hasChildren = false
        },
        new EmployeeViewModel {
          ID = 2,
          Name = "Guy Wooten",
          Title = "Chief Technical Officer",
          ParentID = 1,
          hasChildren = false
        },
        new EmployeeViewModel {
          ID = 3,
          Name = "Priscilla Frank",
          Title = "Chief Product Officer",
          ParentID = 1,
          hasChildren = false
        },
        new EmployeeViewModel {
          ID = 4,
          Name = "Ursula Holmes",
          Title = "EVP, Product Strategy",
          ParentID = 3,
          hasChildren = false
        },
        new EmployeeViewModel {
          ID = 5,
          Name = "Anika Vega",
          Title = "Chief Process Office",
          ParentID = 1,
          hasChildren = false
        }
    }

    return employees;
}

public JsonResult RemoteDataBindingData([DataSourceRequest] DataSourceRequest request)
{
    var source = GetData().Select((x, i) => new EmployeeViewModel()
    {
        ID = x.EmployeeId,
        Name = x.Name,
        ParentID = x.ParentID,
        Title = x.Position,
        Avatar = "../shared/web/treelist/people/" + (i + 1) + ".jpg",
    }).ToList<EmployeeViewModel>();

    source[0].Expanded = true;

    return Json(new
    {
        Data = source
    });
}
5. Handle the OrgChart Events
The OrgChart exposes various events that you can handle and further customize the functionality of the component. In this tutorial, you will use the DataBound event of the OrgChart.
    @using Kendo.Mvc.UI


    @(Html.Kendo().OrgChart()
        .Name("orgchart")
        .DataTextField("Name")
        .DataSource(dataSource => dataSource
            .Read(read => read
                .Action("RemoteDataBindingData", "OrgChart")
            )
            .Model(m => {
                m.Id(f => f.ID);
                m.ParentId(f => f.ParentID);
                m.Name(f => f.Name);
                m.Title(f => f.Title);
                m.Avatar(f => f.Avatar);
                m.Expanded(f=>f.Expanded);
            })
        )
        .Events(e=>e.DataBound("onDataBound"))
    )
    <script>
        function onDataBound(e) {
            console.log("OrgChart data bound");
        }
    </script>
For more examples, refer to the demo on using the events of the OrgChart.
6. (Optional) Reference Existing OrgChart Instances
To use the client-side API of the OrgChart and build on top of its initial configuration, you need a reference to the OrgChart instance. Once you get a valid reference, you can call the respective API methods:
-
Use the
.Name()(idattribute) of the component instance to get a reference.<script> var orgchartReference = $("#orgchart").data("kendoOrgChart"); // orgchartReference is a reference to the existing instance of the helper. </script> -
Use the OrgChart client-side API to control the behavior of the widget. In this example, you will use the
itemsmethod to access the element of the first node use theexpandmethod to expand it programmatically.<script> $(document).ready(function () { var orgChart = $("#orgchart").getKendoOrgChart(); // Reference to the existing instance of the helper. var node = orgChart.items()[1]; // Access the element of the first node. orgChart.expand(node); // Expand the node. }) </script>
Next Steps
- Binding the OrgChart to Data
- Configuring the OrgChart Editing Feature
- Using the OrgChart Templates
- Grouping the OrgChart Nodes