Getting Started with the Spreadsheet
This tutorial explains how to set up the Telerik UI for ASP.NET MVC Spreadsheet.
You will declare a product view model and bind it to an instance of the Spreadsheet component. Then, you will set up a sheet by configuring its columns, rows and by providing a DataSource for it. Next, you will configure the DataSource, the read transport operation for the Spreadsheet, and the server endpoint to handle the request at the backend. Finally, you will learn how to subscribe to client-side events and reference the client-side instance of the component.
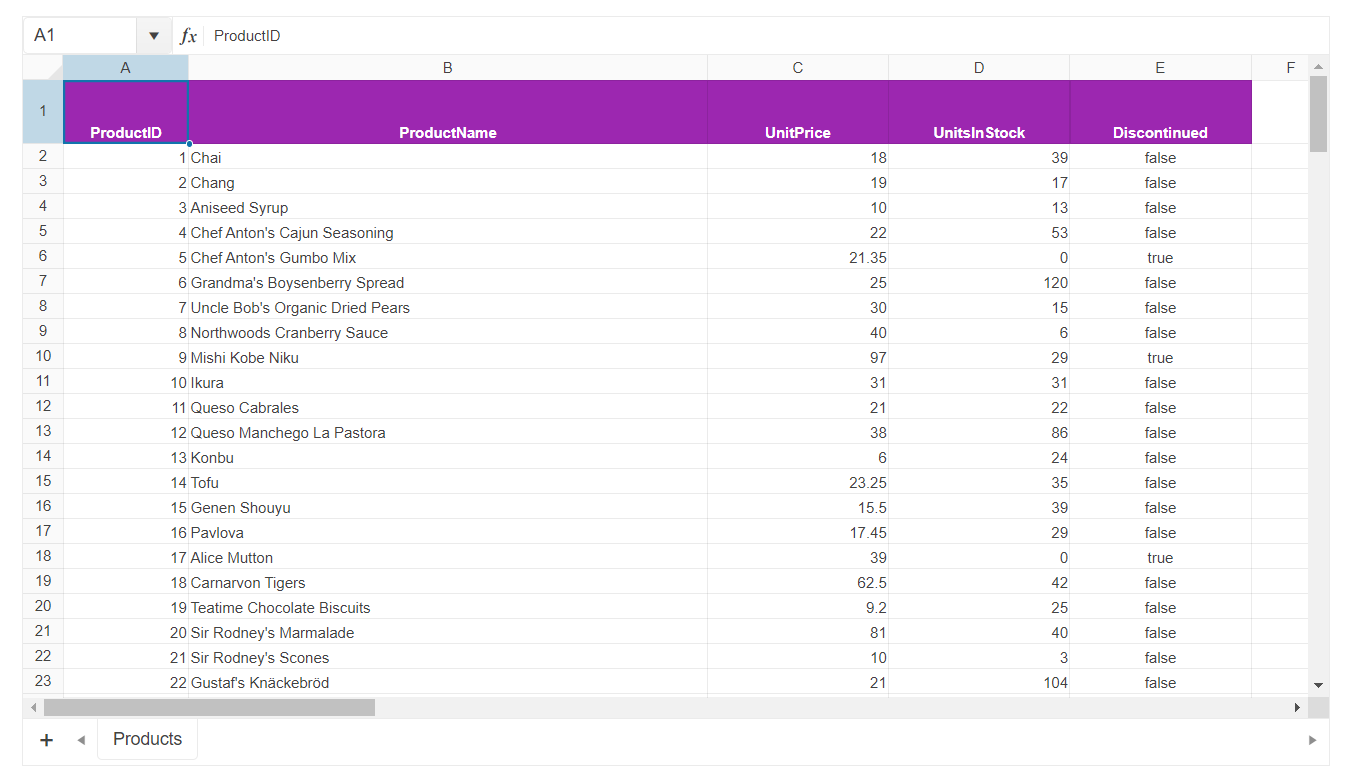
After completing this guide, you will achieve the following results:
Prerequisites
To successfully complete the tutorial, you need a project that is already configured to use the Telerik UI for ASP.NET MVC components:
To create a new pre-configured project for the Telerik UI for ASP.NET MVC components, you can use a project template.
To manually configure an existing project by using NuGet, see the Adding Telerik UI through NuGet.
1. Prepare the CSHTML File
The first step is to add the required directives at the top of the .cshtml document:
-
To use the Telerik UI for ASP.NET MVC HtmlHelpers:
@using Kendo.Mvc.UI
Starting with v2023.3.1115 the JSZip library is no longer distributed with the rest of the Kendo UI for jQuery scripts. You must use one of the official distribution channels such as
unpkginstead.
- Add the JSZip library that is used internally by the Spreadsheet:
@using Kendo.Mvc.UI
<script src="https://unpkg.com/jszip/dist/jszip.min.js"></script>
Optionally, you can structure the document by adding the desired HTML elements like headings, divs, paragraphs, and others.
2. Declare the View Model
Declare the SpreadsheetProductViewModel.
using System.ComponentModel.DataAnnotations;
using System.ComponentModel;
using System;

namespace Kendo.Mvc.Examples.Models
{
    public class SpreadsheetProductViewModel
    {
        [ScaffoldColumn(false)]
        public int ProductID
        {
            get;
            set;
        }

        [Required]
        [Display(Name = "Product name")]
        public string ProductName
        {
            get;
            set;
        }

        [Display(Name = "Unit price")]
        [DataType(DataType.Currency)]
        [Range(0, int.MaxValue)]
        public decimal UnitPrice
        {
            get;
            set;
        }

        [Display(Name = "Units in stock")]
        [DataType("Integer")]
        [Range(0, int.MaxValue)]
        public int UnitsInStock
        {
            get;
            set;
        }

        public bool Discontinued
        {
            get;
            set;
        }
    }
}
3. Initialize the Spreadsheet
Use the Spreadsheet HtmlHelper to add the component to a page and set some of its options.
- Use the
Name()configuration method to assign a name to the instance of the helper—this is mandatory as its value is used for theidand thenameattributes of the outermost Spreadsheet element. - Configure the
Sheetsby giving each one aNameand setting up itsColumnsandRows. When configuring theRows, set up the formatting of the header row's cells with the optionsBold,Background,TextAlign, andColor. - Add a
DataSource()for each sheet you'd like to bind to remote data and pass a JavaScript handler that would submit the read request to the endpoint.
@using Kendo.Mvc.UI
<script src="https://unpkg.com/jszip/dist/jszip.min.js"></script>

    @(Html.Kendo().Spreadsheet()
        .Name("spreadsheet")
        .HtmlAttributes(new { style = "width:100%" })
        .Toolbar(false)
        .Sheetsbar(false)
        .Sheets(sheets =>
        {
            sheets.Add()
                .Name("Products")
                .DataSource<Kendo.Mvc.Examples.Models.SpreadsheetProductViewModel>(ds => ds
                    .Custom()
                    .Batch(true)
                    .PageSize(25)
                    .Transport(t => t
                        .Read("onRead")
                    )
                )
                .Columns(columns =>
                {
                    columns.Add().Width(100);
                    columns.Add().Width(415);
                    columns.Add().Width(145);
                    columns.Add().Width(145);
                    columns.Add().Width(145);
                })
                .Rows(rows =>
                {
                    rows.Add().Height(40).Cells(cells =>
                    {
                        cells.Add()
                            .Bold(true)
                            .Background("#9c27b0")
                            .TextAlign(SpreadsheetTextAlign.Center)
                            .Color("white");

                        cells.Add()
                            .Bold(true)
                            .Background("#9c27b0")
                            .TextAlign(SpreadsheetTextAlign.Center)
                            .Color("white");

                        cells.Add()
                            .Bold(true)
                            .Background("#9c27b0")
                            .TextAlign(SpreadsheetTextAlign.Center)
                            .Color("white");

                        cells.Add()
                            .Bold(true)
                            .Background("#9c27b0")
                            .TextAlign(SpreadsheetTextAlign.Center)
                            .Color("white");

                        cells.Add()
                            .Bold(true)
                            .Background("#9c27b0")
                            .TextAlign(SpreadsheetTextAlign.Center)
                            .Color("white");
                    });
                });
        })
    )

<script>
    function onRead(options) {
        $.ajax({
            url: '@Url.Action("Data_Source_Products_Read", "Spreadsheet")',
            dataType: "json",
            success: function (result) {
                options.success(result.Data);
            },
            error: function (result) {
                options.error(result);
            }
        });
    }
</script>
4. Declare the Read Action
In the Spreadsheet controller, declare the Read action method. Use the name of the action that you set in the DataSource configuration from the previous step.
public ActionResult Index()
{
    return View();
}

private List<SpreadsheetProductViewModel> products = new List<SpreadsheetProductViewModel>{
     new SpreadsheetProductViewModel { ProductID = 1,  ProductName = "Chai",  UnitPrice = 18,  UnitsInStock = 39,  Discontinued = false },
     new SpreadsheetProductViewModel { ProductID = 2,  ProductName = "Chang",  UnitPrice = 19,  UnitsInStock = 17,  Discontinued = false },
     new SpreadsheetProductViewModel { ProductID = 3,  ProductName = "Aniseed Syrup",  UnitPrice = 10,  UnitsInStock = 13,  Discontinued = false },
     new SpreadsheetProductViewModel { ProductID = 4,  ProductName = "Chef Anton's Cajun Seasoning",  UnitPrice = 22,  UnitsInStock = 53,  Discontinued = false },
     new SpreadsheetProductViewModel { ProductID = 5,  ProductName = "Chef Anton's Gumbo Mix",  UnitPrice = 21.35,  UnitsInStock = 0,  Discontinued = true },
     new SpreadsheetProductViewModel { ProductID = 6,  ProductName = "Grandma's Boysenberry Spread",  UnitPrice = 25,  UnitsInStock = 120,  Discontinued = false },
     new SpreadsheetProductViewModel { ProductID = 7,  ProductName = "Uncle Bob's Organic Dried Pears",  UnitPrice = 30,  UnitsInStock = 15,  Discontinued = false },
     new SpreadsheetProductViewModel { ProductID = 8,  ProductName = "Northwoods Cranberry Sauce",  UnitPrice = 40,  UnitsInStock = 6,  Discontinued = false },
     new SpreadsheetProductViewModel { ProductID = 9,  ProductName = "Mishi Kobe Niku",  UnitPrice = 97,  UnitsInStock = 29,  Discontinued = true },
     new SpreadsheetProductViewModel { ProductID = 10,  ProductName = "Ikura",  UnitPrice = 31,  UnitsInStock = 31,  Discontinued = false },
     new SpreadsheetProductViewModel { ProductID = 11,  ProductName = "Queso Cabrales",  UnitPrice = 21,  UnitsInStock = 22,  Discontinued = false },
     new SpreadsheetProductViewModel { ProductID = 12,  ProductName = "Queso Manchego La Pastora",  UnitPrice = 38,  UnitsInStock = 86,  Discontinued = false },
     new SpreadsheetProductViewModel { ProductID = 13,  ProductName = "Konbu",  UnitPrice = 6,  UnitsInStock = 24,  Discontinued = false },
     new SpreadsheetProductViewModel { ProductID = 14,  ProductName = "Tofu",  UnitPrice = 23.25,  UnitsInStock = 35,  Discontinued = false },
     new SpreadsheetProductViewModel { ProductID = 15,  ProductName = "Genen Shouyu",  UnitPrice = 15.5,  UnitsInStock = 39,  Discontinued = false },
     new SpreadsheetProductViewModel { ProductID = 16,  ProductName = "Pavlova",  UnitPrice = 17.45,  UnitsInStock = 29,  Discontinued = false },
     new SpreadsheetProductViewModel { ProductID = 17,  ProductName = "Alice Mutton",  UnitPrice = 39,  UnitsInStock = 0,  Discontinued = true },
     new SpreadsheetProductViewModel { ProductID = 18,  ProductName = "Carnarvon Tigers",  UnitPrice = 62.5,  UnitsInStock = 42,  Discontinued = false },
     new SpreadsheetProductViewModel { ProductID = 19,  ProductName = "Teatime Chocolate Biscuits",  UnitPrice = 9.2,  UnitsInStock = 25,  Discontinued = false },
     new SpreadsheetProductViewModel { ProductID = 20,  ProductName = "Sir Rodney's Marmalade",  UnitPrice = 81,  UnitsInStock = 40,  Discontinued = false },
     new SpreadsheetProductViewModel { ProductID = 21,  ProductName = "Sir Rodney's Scones",  UnitPrice = 10,  UnitsInStock = 3,  Discontinued = false },
     new SpreadsheetProductViewModel { ProductID = 22,  ProductName = "Gustaf's Knäckebröd",  UnitPrice = 21,  UnitsInStock = 104,  Discontinued = false },
     new SpreadsheetProductViewModel { ProductID = 23,  ProductName = "Tunnbröd",  UnitPrice = 9,  UnitsInStock = 61,  Discontinued = false },
     new SpreadsheetProductViewModel { ProductID = 24,  ProductName = "Guaraná Fantástica",  UnitPrice = 4.5,  UnitsInStock = 20,  Discontinued = true },
     new SpreadsheetProductViewModel { ProductID = 25,  ProductName = "NuNuCa Nuß-Nougat-Creme",  UnitPrice = 14,  UnitsInStock = 76,  Discontinued = false }
}

public virtual JsonResult Data_Source_Products_Read([DataSourceRequest] DataSourceRequest request)
{
    return Json(products.ToDataSourceResult(request));
}
5. Handle Spreadsheet Events
The Spreadsheet exposes numerous client-side events that you can handle to customize behavior of the component. In this tutorial, you will subscribe to the DataBinding and DataBound events.
@using Kendo.Mvc.UI
<script src="https://unpkg.com/jszip/dist/jszip.min.js"></script>

    @(Html.Kendo().Spreadsheet()
        .Name("spreadsheet")
        .HtmlAttributes(new { style = "width:100%" })
        .Toolbar(false)
        .Sheetsbar(false)
        .Events(e => e
            .DataBinding("onDataBinding")
            .DataBound("onDataBound")
        )
        .Sheets(sheets =>
        {
            sheets.Add()
                .Name("Products")
                .DataSource<Kendo.Mvc.Examples.Models.SpreadsheetProductViewModel>(ds => ds
                    .Custom()
                    .Batch(true)
                    .PageSize(25)
                    .Transport(t => t
                        .Read("onRead")
                    )
                )
                .Columns(columns =>
                {
                    columns.Add().Width(100);
                    columns.Add().Width(415);
                    columns.Add().Width(145);
                    columns.Add().Width(145);
                    columns.Add().Width(145);
                })
                .Rows(rows =>
                {
                    rows.Add().Height(40).Cells(cells =>
                    {
                        cells.Add()
                            .Bold(true)
                            .Background("#9c27b0")
                            .TextAlign(SpreadsheetTextAlign.Center)
                            .Color("white");

                        cells.Add()
                            .Bold(true)
                            .Background("#9c27b0")
                            .TextAlign(SpreadsheetTextAlign.Center)
                            .Color("white");

                        cells.Add()
                            .Bold(true)
                            .Background("#9c27b0")
                            .TextAlign(SpreadsheetTextAlign.Center)
                            .Color("white");

                        cells.Add()
                            .Bold(true)
                            .Background("#9c27b0")
                            .TextAlign(SpreadsheetTextAlign.Center)
                            .Color("white");

                        cells.Add()
                            .Bold(true)
                            .Background("#9c27b0")
                            .TextAlign(SpreadsheetTextAlign.Center)
                            .Color("white");
                    });
                });
        })
    )

<script>
    function onRead(options) {
        $.ajax({
            url: '@Url.Action("Data_Source_Products_Read", "Spreadsheet")',
            dataType: "json",
            success: function (result) {
                options.success(result.Data);
            },
            error: function (result) {
                options.error(result);
            }
        });
    }

    function onDataBinding(e) {
        console.log('Data is about to be bound to sheet "' + e.sheet.name() + '".');
    }

    function onDataBound(e) {
        console.log('Data has been bound to sheet "' + e.sheet.name() + '".');
    }
</script>
(Optional) Reference Existing Spreadsheet Instances
Referencing existing component instances allows you to build on top of their configuration. To reference an existing Spreadsheet instance, use the jQuery.data() method. Once a reference is established, use the Spreadsheet client-side API to control its behavior.
-
Use the
idattribute of the component instance to establish a reference.<script> var spreadsheetReference = $("#spreadsheet").data("kendoSpreadsheet"); // spreadsheetReference is a reference to the existing instance of the helper. </script> Use the Spreadsheet client-side API to control the behavior of the widget.
In this example, you will also see how to utilize the Sheet API as well as the Range API to customize the behavior of the Spreadsheet.
```script
    <script>
        var spreadsheet = $("#spreadsheet").data("kendoSpreadsheet");
        var sheet = spreadsheet.activeSheet(); // Select the currently active sheet.
        var range = sheet.range("A2:A7"); // Select the range of cell from A2 through A7.
        range.background("green"); // Set a green background color for the selected range of cells.
    </script>
```
Next Steps
- Subscribing to the Spreadsheet's Events
- Using Validation with the Spreadsheet
- Formatting the Spreadsheet