Server Detail Templates
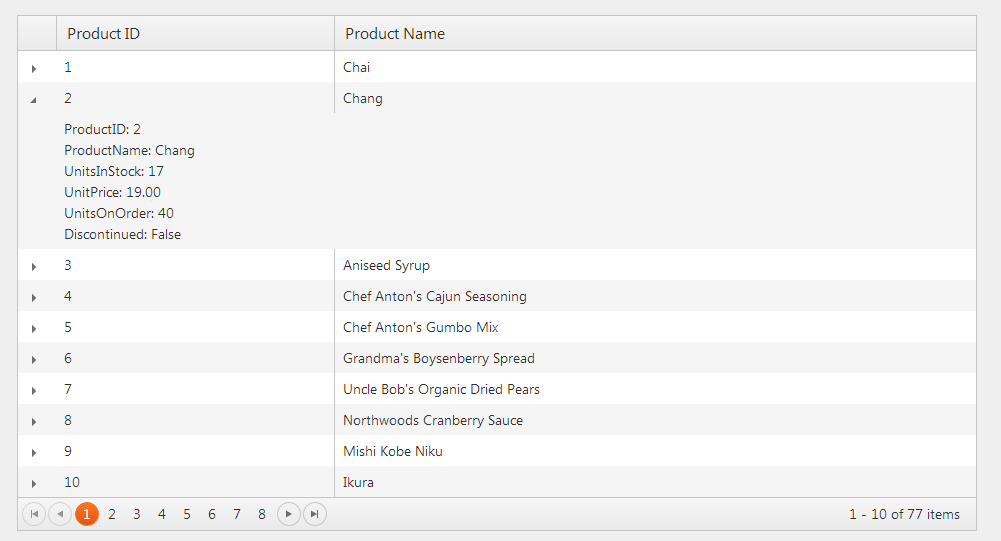
The Telerik UI Grid for ASP.NET MVC enables you to set the detail template that is used during the server binding of the Grid.
For a runnable example, refer to the demo on the server detail template in the Grid.
To configure the server detail template:
Defining the Server Details
- Create a new ASP.NET MVC 5 application. If you have installed the Telerik UI for ASP.NET MVC Visual Studio Extensions, create a Telerik UI for ASP.NET MVC application. Name the application
KendoGridServerDetailTemplate. If you decided not to use the Telerik UI for ASP.NET MVC Visual Studio Extensions, follow the steps from the First Steps article to add Telerik UI for ASP.NET MVC to the application. -
Add a new
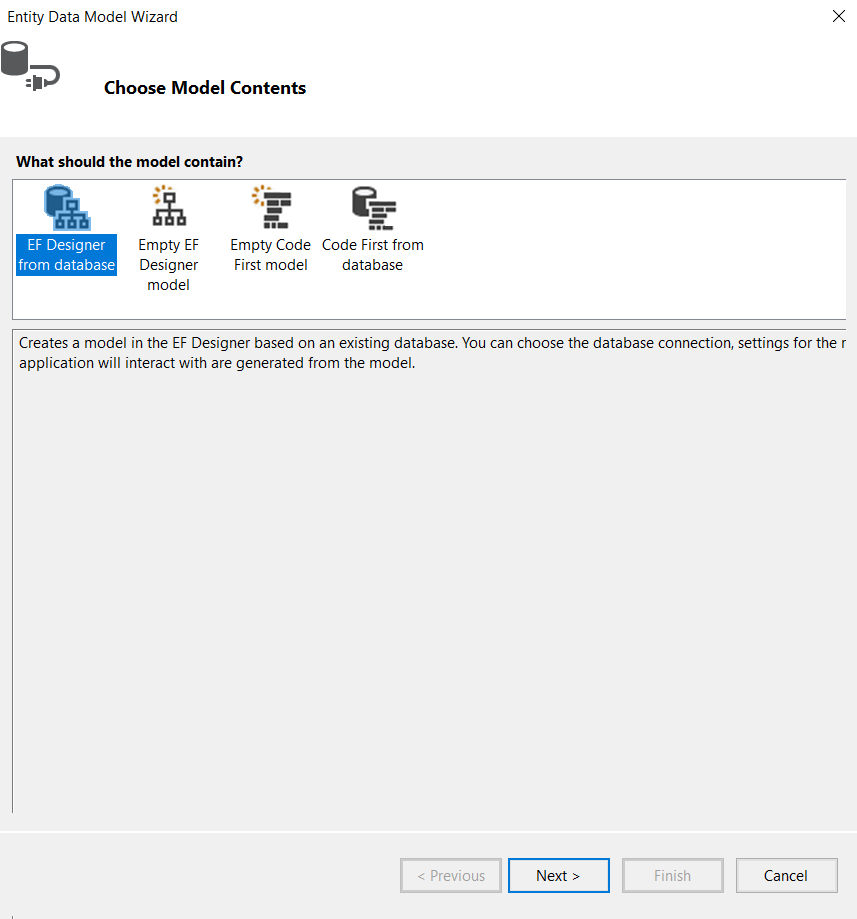
Entity Framework Data Model. Right-click the~/Modelsfolder in the solution explorer and pick Add > New Item. Choose Data > ADO.NET Entity Data Model in the Add New Item dialog. Name the modelNorthwind.edmxand click Next. This starts the Entity Data Model Wizard.
-
Select Generate from database and click Next. Configure a connection to the Northwind database. Click Next.

-
Choose the Products table from Which database objects do you want to include in your model?. Leave all other options as they are set by default. Click Finish.

-
Open
HomeController.csand edit theIndexaction method.public ActionResult Index() { var northwind = new NorthwindEntities(); ViewBag.Products = northwind.Products; return View(); } -
In the view, configure the Grid for server binding to
ViewBag.Products.<% Html.Kendo().Grid((IEnumerable<KendoGridServerDetailTemplate.Models.Product>)ViewBag.Products) .Name("grid") .Columns(columns => { columns.Bound(product => product.ProductID); columns.Bound(product => product.ProductName); }) .Render(); %>@(Html.Kendo().Grid((IEnumerable<KendoGridServerDetailTemplate.Models.Product>)ViewBag.Products) .Name("grid") .Columns(columns => { columns.Bound(product => product.ProductID); columns.Bound(product => product.ProductName); }) ) -
Set the detail template.
    <%: Html.Kendo().Grid((IEnumerable<KendoGridServerDetailTemplate.Models.Product>)ViewBag.Products)
        .Name("grid")
        .Columns(columns =>
        {
            columns.Bound(product => product.ProductID);
            columns.Bound(product => product.ProductName);
        })
        .Pageable()
        .DetailTemplate(product => {
        %>
            <div>ProductID: <%: product.ProductID %></div>
            <div>ProductName: <%: product.ProductName %></div>
            <div>UnitsInStock: <%: product.UnitsInStock %></div>
            <div>UnitPrice: <%: product.UnitPrice %></div>
            <div>UnitsOnOrder: <%: product.UnitsOnOrder %></div>
            <div>Discontinued: <%: product.Discontinued %></div>
        <%
        })
        .Render();
    %>
@(Html.Kendo().Grid((IEnumerable<KendoGridServerDetailTemplate.Models.Product>)ViewBag.Products) .Name("grid") .Columns(columns => { columns.Bound(product => product.ProductID); columns.Bound(product => product.ProductName); }) .Pageable() .DetailTemplate(@<text> <div>ProductID: @item.ProductID</div> <div>ProductName: @item.ProductName</div> <div>UnitsInStock: @item.UnitsInStock</div> <div>UnitPrice: @item.UnitPrice</div> <div>UnitsOnOrder: @item.UnitsOnOrder</div> <div>Discontinued: @item.Discontinued</div> </text>) ) -
Build and run the project.

To download the Visual Studio Project, refer to this GitHub repository.
Setting the Server Hierarchy
- Create a new ASP.NET MVC 5 application. If you have installed the Telerik UI for ASP.NET MVC Visual Studio Extensions, create a Telerik UI for ASP.NET MVC application. Name the application
KendoGridServerDetailTemplate. If you decided not to use the Telerik UI for ASP.NET MVC Visual Studio Extensions, follow the steps from the First Steps article to add Telerik UI for ASP.NET MVC to the application. -
Add a new
Entity Framework Data Model. Right-click the~/Modelsfolder in the solution explorer and pick Add > New Item. Choose Data > ADO.NET Entity Data Model in the Add New Item dialog. Name the modelNorthwind.edmxand click Next. This starts the Entity Data Model Wizard.
-
Select Generate from database and click Next. Configure a connection to the Northwind database. Click Next.

Choose the Products and Categories tables from the Which database objects do you want to include in your model?. Leave all other options as they are set by default. Click Finish.
-
Open
HomeController.csand edit theIndexaction method.public ActionResult Index() { var northwind = new NorthwindEntities(); ViewBag.Categories = northwind.Categories; return View(); } -
In the view, configure the Grid for server binding to
ViewBag.Categories.<% Html.Kendo().Grid((IEnumerable<KendoGridServerHierarchy.Models.Category>)ViewBag.Categories) .Name("grid") .Columns(columns => { columns.Bound(category => category.CategoryID); columns.Bound(category => category.CategoryName); }) .Render(); %>@(Html.Kendo().Grid((IEnumerable<KendoGridServerHierarchy.Models.Category>)ViewBag.Categories) .Name("grid") .Columns(columns => { columns.Bound(category => category.CategoryID); columns.Bound(category => category.CategoryName); }) ) -
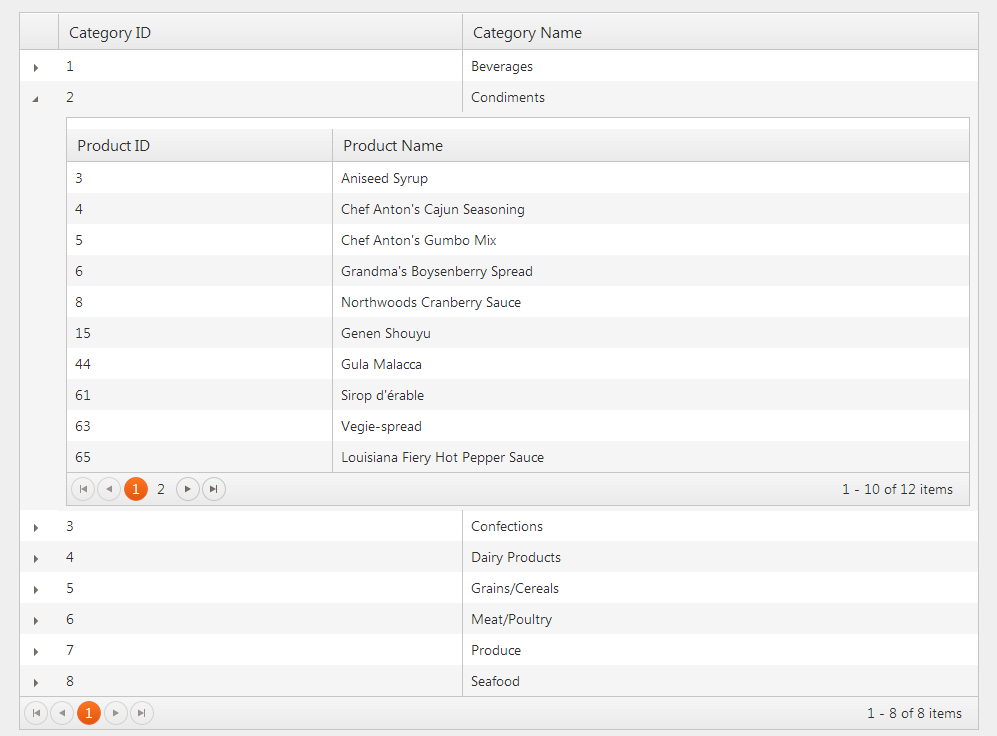
Set the detail template. Define another Grid which is bound to the
Productsproperty of the category entity. Make sure the name of the Grid is unique.<% Html.Kendo().Grid((IEnumerable<KendoGridServerHierarchy.Models.Category>)ViewBag.Categories) .Name("grid") .Columns(columns => { columns.Bound(category => category.CategoryID); columns.Bound(category => category.CategoryName); }) .DetailTemplate(category => { %> <% Html.Kendo().Grid(item.Products) .Name(string.Format("product_grid_{0}", item.CategoryID)) // The Name() should be unique. .Columns(columns => { columns.Bound(product => product.ProductID); columns.Bound(product => product.ProductName); }) .Pageable() .Render(); %> <% }) .Render(); %>@(Html.Kendo().Grid((IEnumerable<KendoGridServerHierarchy.Models.Category>)ViewBag.Categories) .Name("grid") .Columns(columns => { columns.Bound(category => category.CategoryID); columns.Bound(category => category.CategoryName); }) .Pageable() .DetailTemplate(@<text> @(Html.Kendo().Grid(item.Products) .Name(string.Format("product_grid_{0}", item.CategoryID)) // The Name() should be unique. .Columns(columns => { columns.Bound(product => product.ProductID); columns.Bound(product => product.ProductName); }) .Pageable() ) </text>) ) -
Build and run the project.
